Feb 17, 2023
Hugging the Chaos: Connecting Datasets to Trainings with Hugging Face and Aim

The cost of neglecting experiments management
Working with large and frequently changing datasets is hard!\ You can easily end up in a mess if you don’t have a system that traces dataset versions and connects them to your experiments. Moreover, the lack of traceability can make it impossible to effectively compare your experiments. Let alone the reproducibility.
In this article, we will explore how you can combine Hugging Face Datasets and Aim to make machine learning experiments traceable, reproducible and easier to compare.
Let’s dive in and get started!
Hugging Face Datasets + Aim = ❤
Hugging Face Datasets is a fantastic library that makes it super easy to access and share datasets for audio, computer vision, and NLP tasks. With Datasets, you’ll never have to worry about manually loading and versioning your data again.
Aim, on the other hand, is an easy-to-use and open-source experiment tracker with lots of superpowers. It enables easily logging training runs, comparing them via a beautiful UI, and querying them programmatically.

Hugging Face Datasets and Aim combined are a powerful way to track training runs and their respective dataset metadata. So you can compare your experiments based on the dataset version and reproduce them super seamlessly.
Project overview
Let’s go through an object classification project and show how you can use Datasets to load and version your data, and Aim to keep track of everything along the way.
Here’s what we’ll be using:
- Hugging Face Datasets to load and manage the dataset.
- Hugging Face Hub to host the dataset.
- PyTorch to build and train the model.
- Aim to keep track of all the model and dataset metadata.
Our dataset is going to be called “A-MNIST” — a version of the “MNIST” dataset with extra samples added. We’ll start with the original “MNIST” dataset and then add 60,000 rotated versions of the original training samples to create a new, augmented version. We will run trainings on both dataset versions and see how the models are performing.
Dataset preparation
Uploading the dataset to Hub
Let’s head over to Hugging Face Hub and create a new dataset repository called “A-MNIST” to store our dataset.
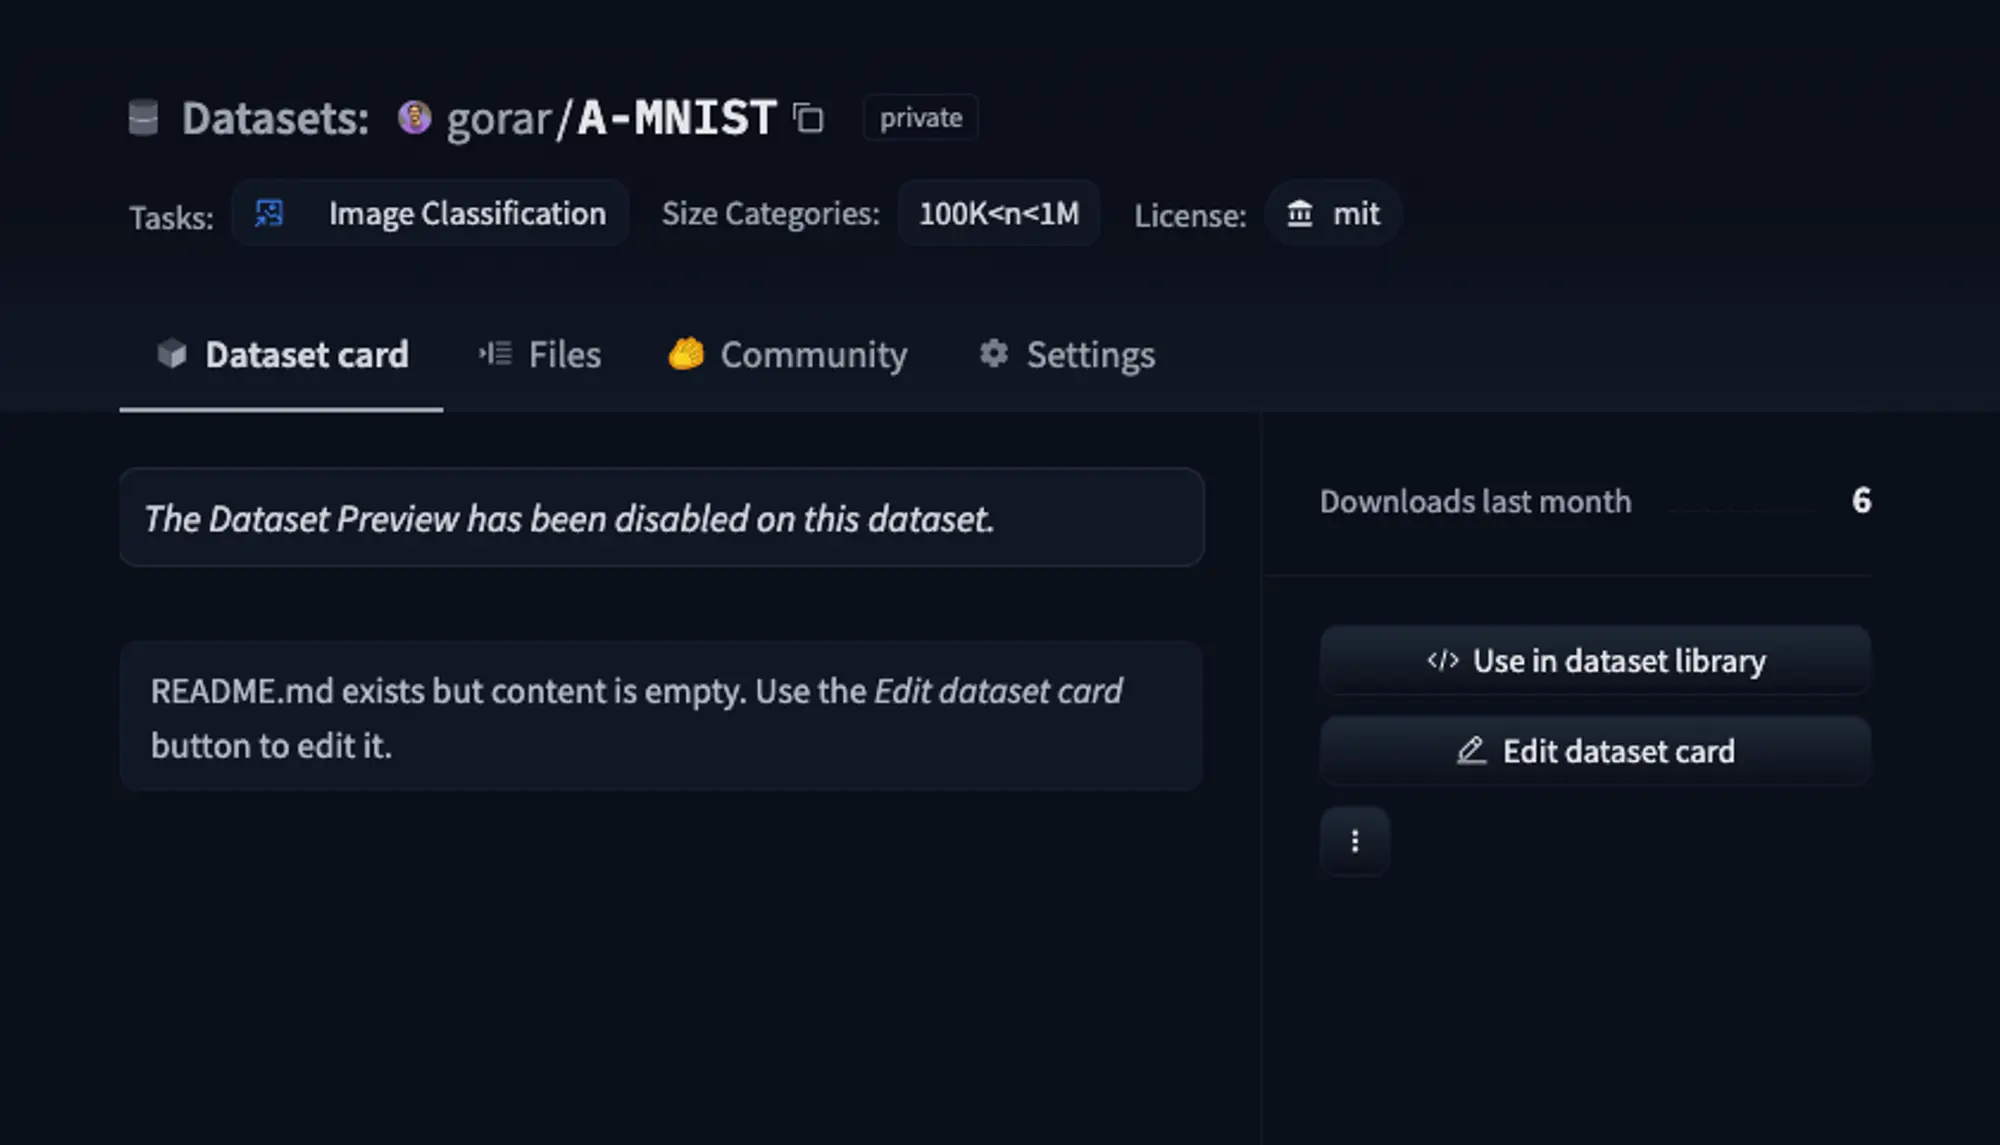
Currently, the repository is empty, so let’s upload the initial version of the dataset.
We’ll use the original MNIST dataset, as the first version v1.0.0. To do this, we’ll need to upload the dataset files along with the dataset loading script A-MNIST.py. The dataset loading script is a python file that defines the different configurations and splits of the dataset, as well as how to download and process the data:
class AMNIST(datasets.GeneratorBasedBuilder):
    """A-MNIST Data Set"""

    BUILDER_CONFIGS = [
            datasets.BuilderConfig(
                name="amnist",
                version=datasets.Version("1.0.0"),
                description=_DESCRIPTION,
            )
        ]
    ...
See the full script here: https://huggingface.co/datasets/gorar/A-MNIST/blob/main/A-MNIST.py
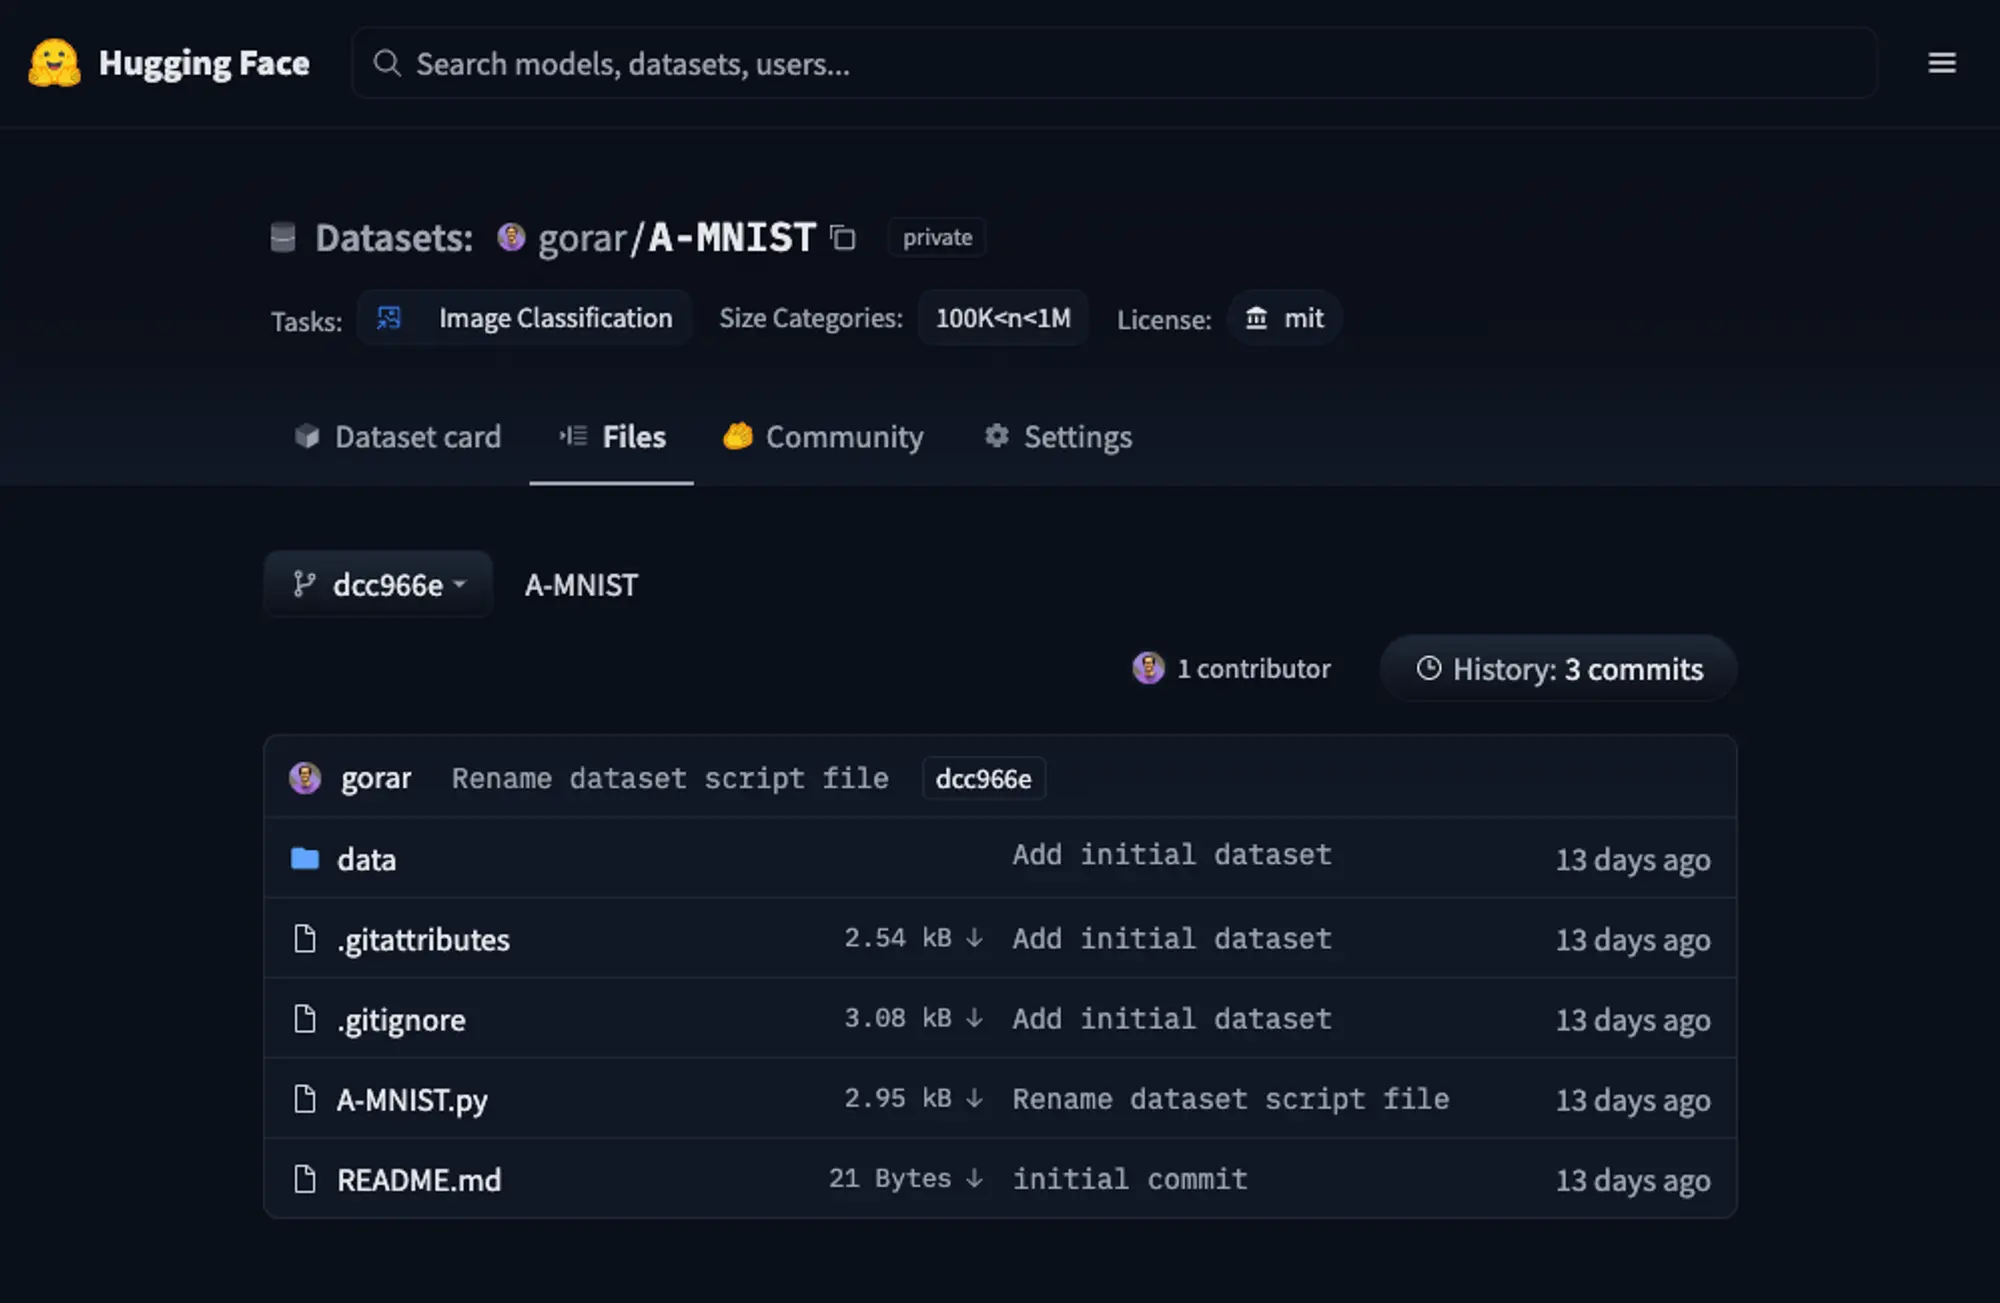
We’ll have the following setup, including all the necessary git configurations and the dataset card:
- `data` - contains the dataset.
    - `t10k-images-idx3-ubyte.gz` - test images.
    - `t10k-labels-idx1-ubyte.gz` - test labels.
    - `train-images-idx3-ubyte.gz` - train images.
    - `train-labels-idx1-ubyte.gz` - train labels.
- `A-MNIST.py` - the dataset loading script.
Let’s commit the changes and push the dataset to the Hub.
Awesome! Now we’ve got the first version of “A-MNIST” hosted on Hugging Face Hub!
Augmenting the dataset
Next up, let’s add more images to the MNIST dataset using augmentation techniques.
We will rotate all the train images by 20 degree and append to the dataset:
rotated_images[i] = rotate(images[i], angle=20, reshape=False)As well as, update the “A-MNIST” dataset version to 1.1.0:
BUILDER_CONFIGS = [
    datasets.BuilderConfig(
        name="amnist",
        version=datasets.Version("1.1.0"),
        description=_DESCRIPTION,
    )
]
After preparing the new train dataset, let’s commit the changes and push the upgraded version to the hub.
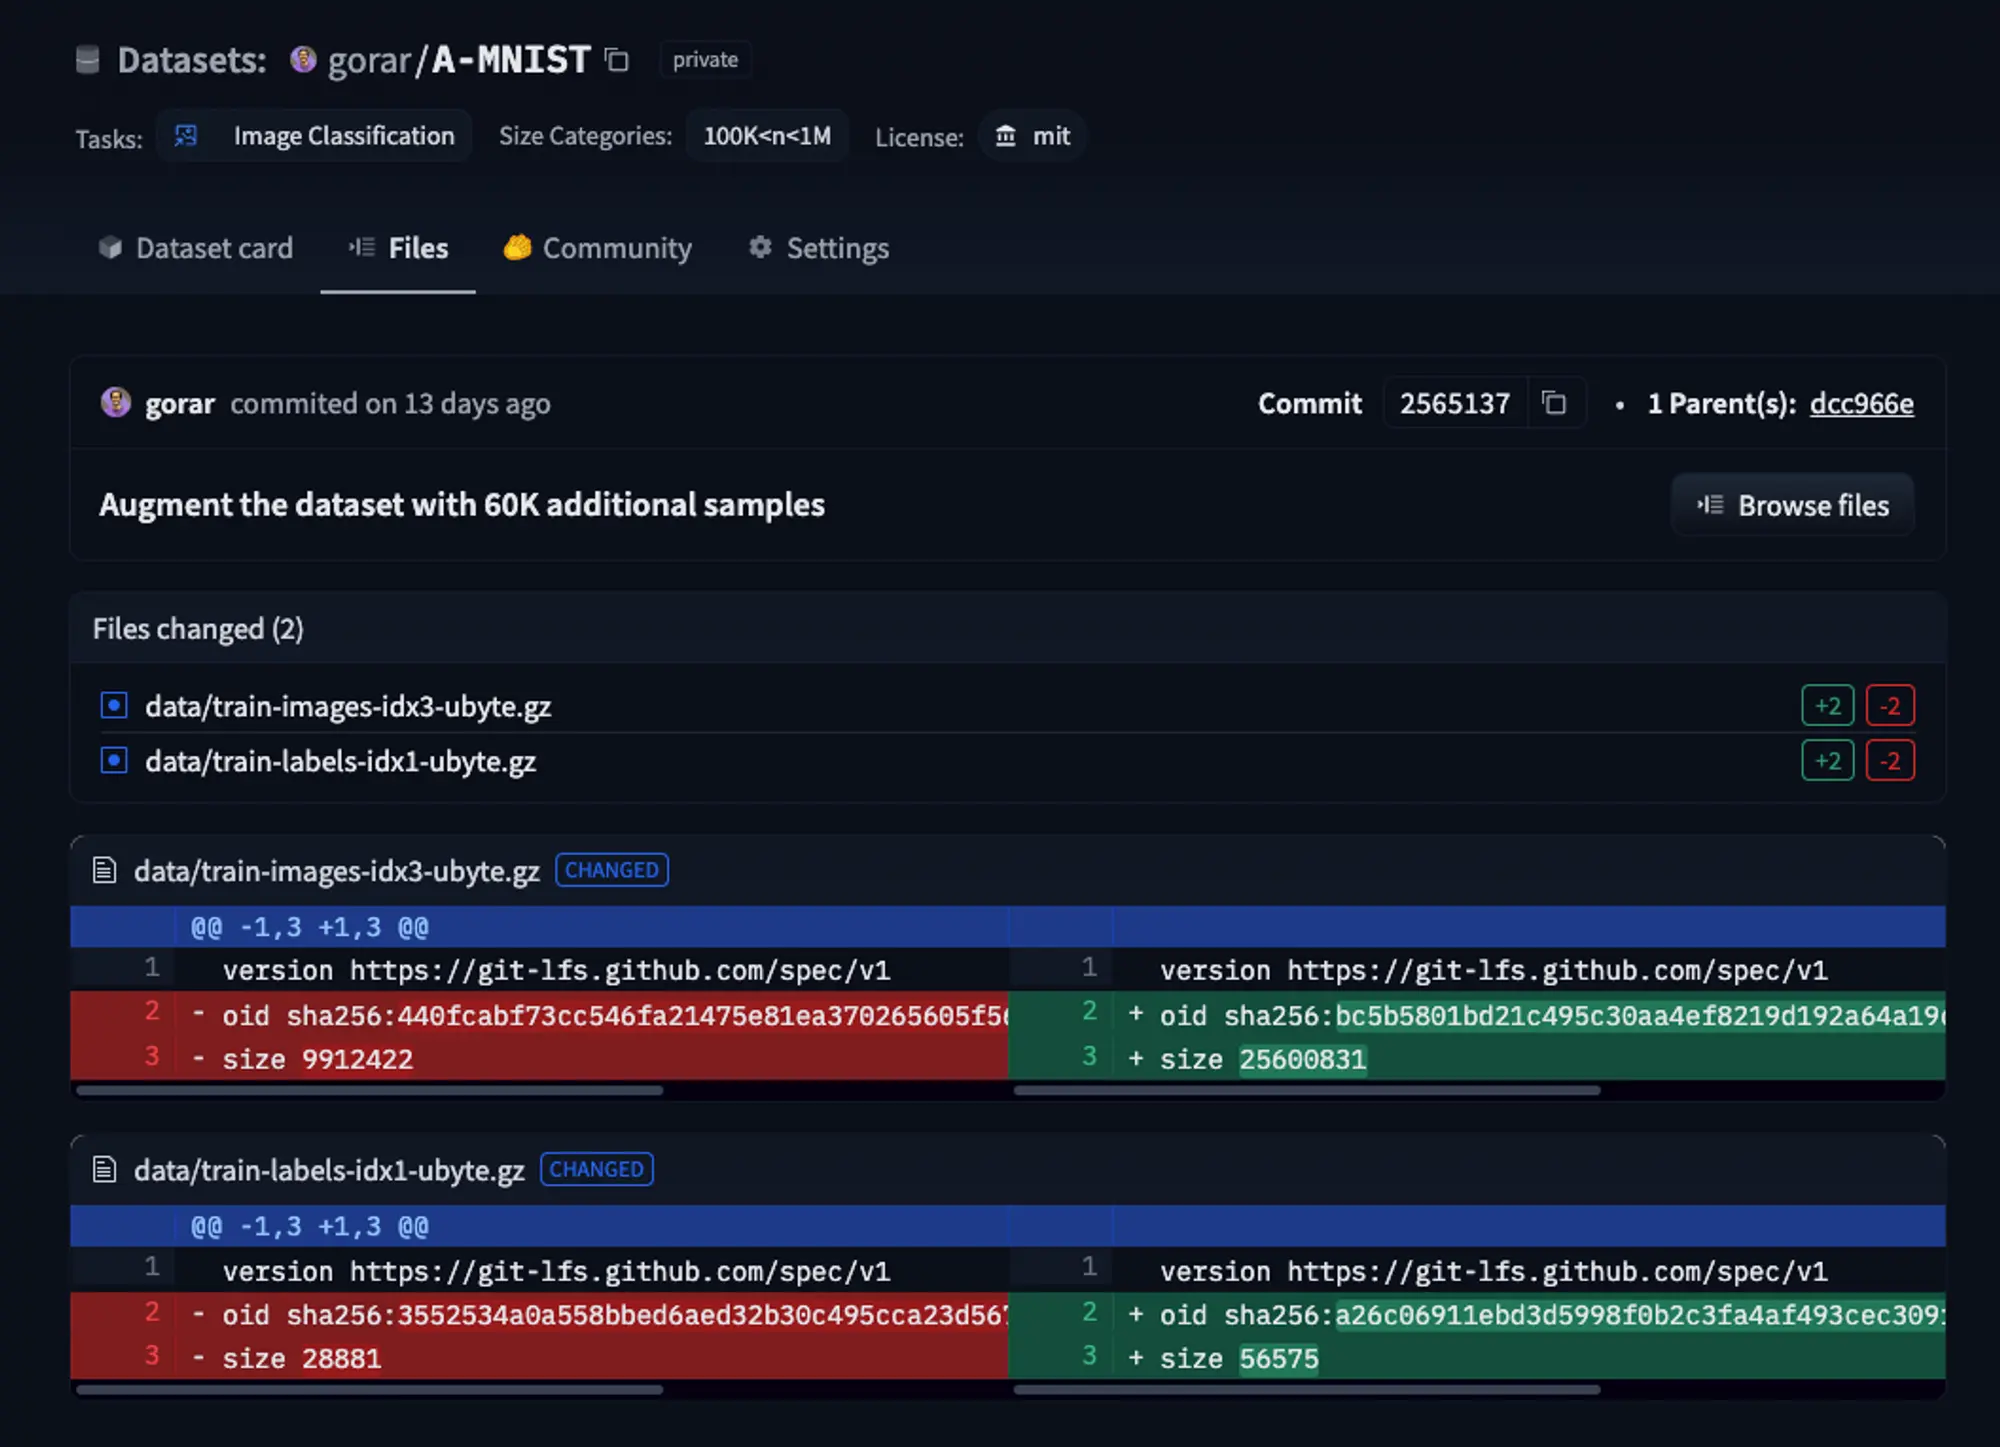
Perfect, v1.1.0 is now available on the Hub! This means that we can easily access it in the training script using the Hugging Face Datasets. 🎉
Training setup
Let’s load the dataset using datasets python package. It’s really simple, just one line of code:
dataset = load_dataset("gorar/A-MNIST")One of the amazing features of datasets is that is has native support for PyTorch, which allows us to prepare and initialize dataset loaders with ease:
from datasets import load_dataset
from torch.utils.data import DataLoader

# Loading the dataset
dataset = load_dataset("gorar/A-MNIST")

# Defining train and test splits
train_dataset = dataset['train'].with_format('torch')
test_dataset = dataset['test'].with_format('torch')

# Initializing data loaders for train and test split
train_loader = DataLoader(dataset=train_dataset, batch_size=4, shuffle=True)
test_loader = DataLoader(dataset=test_dataset, batch_size=4, shuffle=True)
We’re ready to write the training script and build the model. We are using PyTorch to build a simple convolutional neural network with two convolutional layers:
class ConvNet(nn.Module):
    def __init__(self, num_classes=10):
        super(ConvNet, self).__init__()
        self.layer1 = nn.Sequential(
            nn.Conv2d(1, 16, kernel_size=5, stride=1, padding=2),
            nn.BatchNorm2d(16),
            nn.ReLU(),
            nn.MaxPool2d(kernel_size=2, stride=2))
        self.layer2 = nn.Sequential(
            nn.Conv2d(16, 32, kernel_size=5, stride=1, padding=2),
            nn.BatchNorm2d(32),
            nn.ReLU(),
            nn.MaxPool2d(kernel_size=2, stride=2))
        self.fc = nn.Linear(7 * 7 * 32, num_classes)

    def forward(self, x):
        out = self.layer1(x)
        out = self.layer2(out)
        out = out.reshape(out.size(0), -1)
        out = self.fc(out)
        return out
...
See the full code here: https://gist.github.com/gorarakelyan/936fb7b8fbde4de807500c5617b47ea8
We’ve got everything ready now. Let’s kick off the training by running:
python train.pyHurray, the training is underway! 🏃

It would be tough to monitor my training progress on terminal. This is where Aim’s superpowers come into play.
Integrating Aim
Trainings tracking
Aim offers a user-friendly interface to keep track of your training hyper-parameters and metrics:
import aim

aim_run = aim.Run()

# Track hyper-parameters
aim_run['hparams'] = {
    'num_epochs': num_epochs,
    'num_classes': num_classes,
    ...
}

# Track metrics
for i, samples in enumerate(train_loader):
    ...
    aim_run.track(acc, name='accuracy', epoch=epoch, context={'subset': 'train'})
    aim_run.track(loss, name='loss', epoch=epoch, context={'subset': 'train'})
Furthermore, the awesome thing about Aim is that it is tightly integrated with ML ecosystem.
Since v3.16, Aim has a builtin integration with Hugging Face Datasets. Simply import HFDataset module from Aim and you can track all of your dataset metadata with just a single line of code!
from aim.hf_dataset import HFDataset
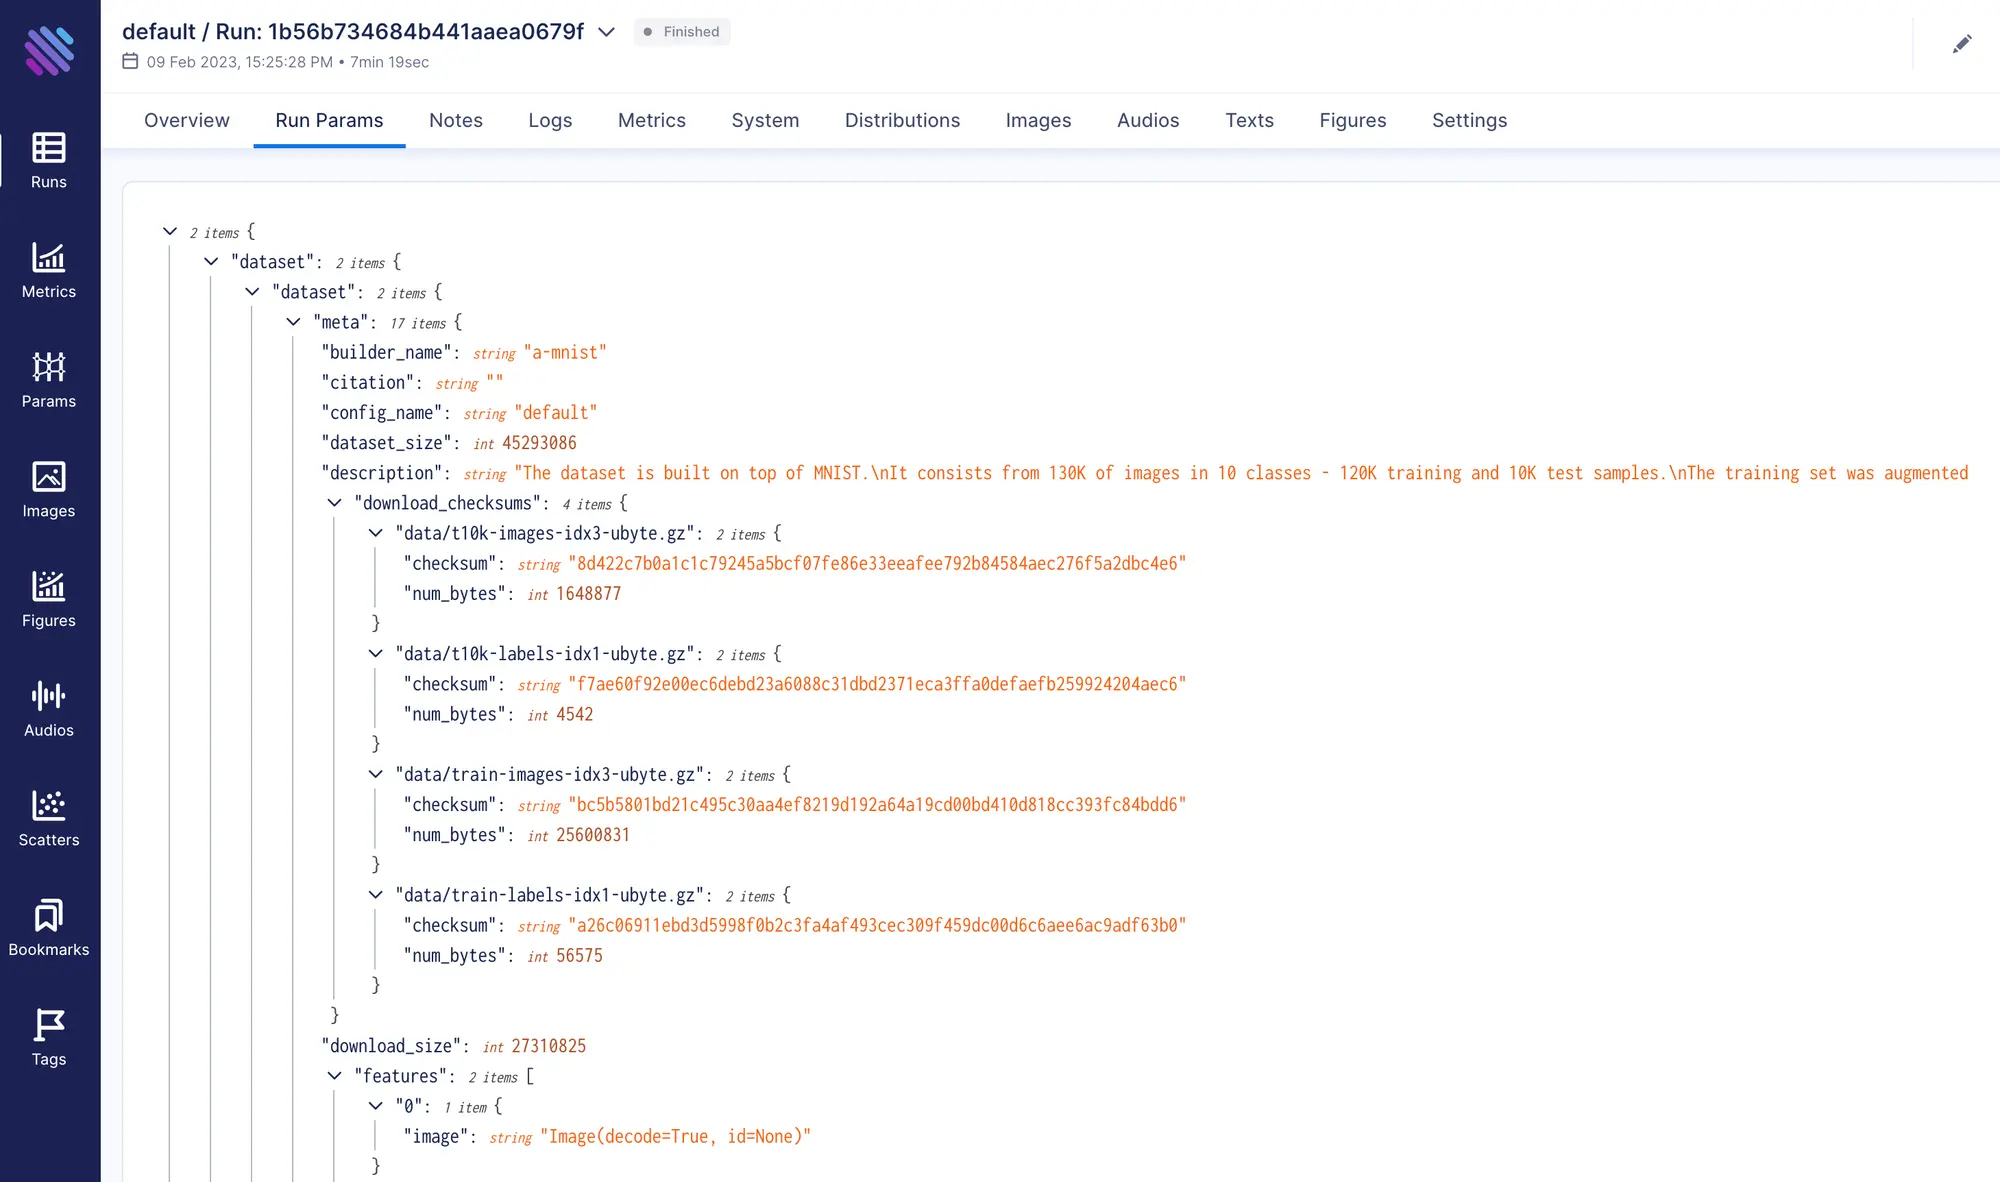
aim_run['dataset'] = HFDataset(dataset)Aim will automagically gather the metadata from the dataset instance, store it within the Aim run, and display it on the Aim UI run page, including details like the dataset’s description, version, features, etc.
Experimentation
Conducting trainings
We’ll perform several training runs on both versions of the datasets and adjust learning rates to evaluate their impact on the training process. Specifically, we’ll use 1.0.0 and 1.1.0 versions of our dataset, and experiment with 0.01, 0.03, 0.1, 0.3 learning rates.
Datasets provide the ability to choose which dataset version we want to load. To do this, we just need to pass version and git revision of the dataset we want to work with:
# Loading A-MNIST v1.0.0
dataset = load_dataset("gorar/A-MNIST", version='1.0.0', revision='dcc966eb0109e31d23c699199ca44bc19a7b1b47')

# Loading A-MNIST v1.1.0
dataset = load_dataset("gorar/A-MNIST", version='1.1.0', revision='da9a9d63961462871324d514ca8cdca1e5624c5c')
We will run a simple bash script to execute the trainings. However, for a more comprehensive hyper-parameters tuning approach, tools like Ray Tune or other tuning frameworks can be used.
Exploring training results via Aim
Now that we have integrated Aim into our training process, we can explore the results in a more user-friendly way. To launch Aim’s UI, we need to run the aim up command. A following message would be printed on the terminal output meaning the UI is successfully running:

To access the UI, let’s navigate to 127.0.0.1:43800 in the browser.
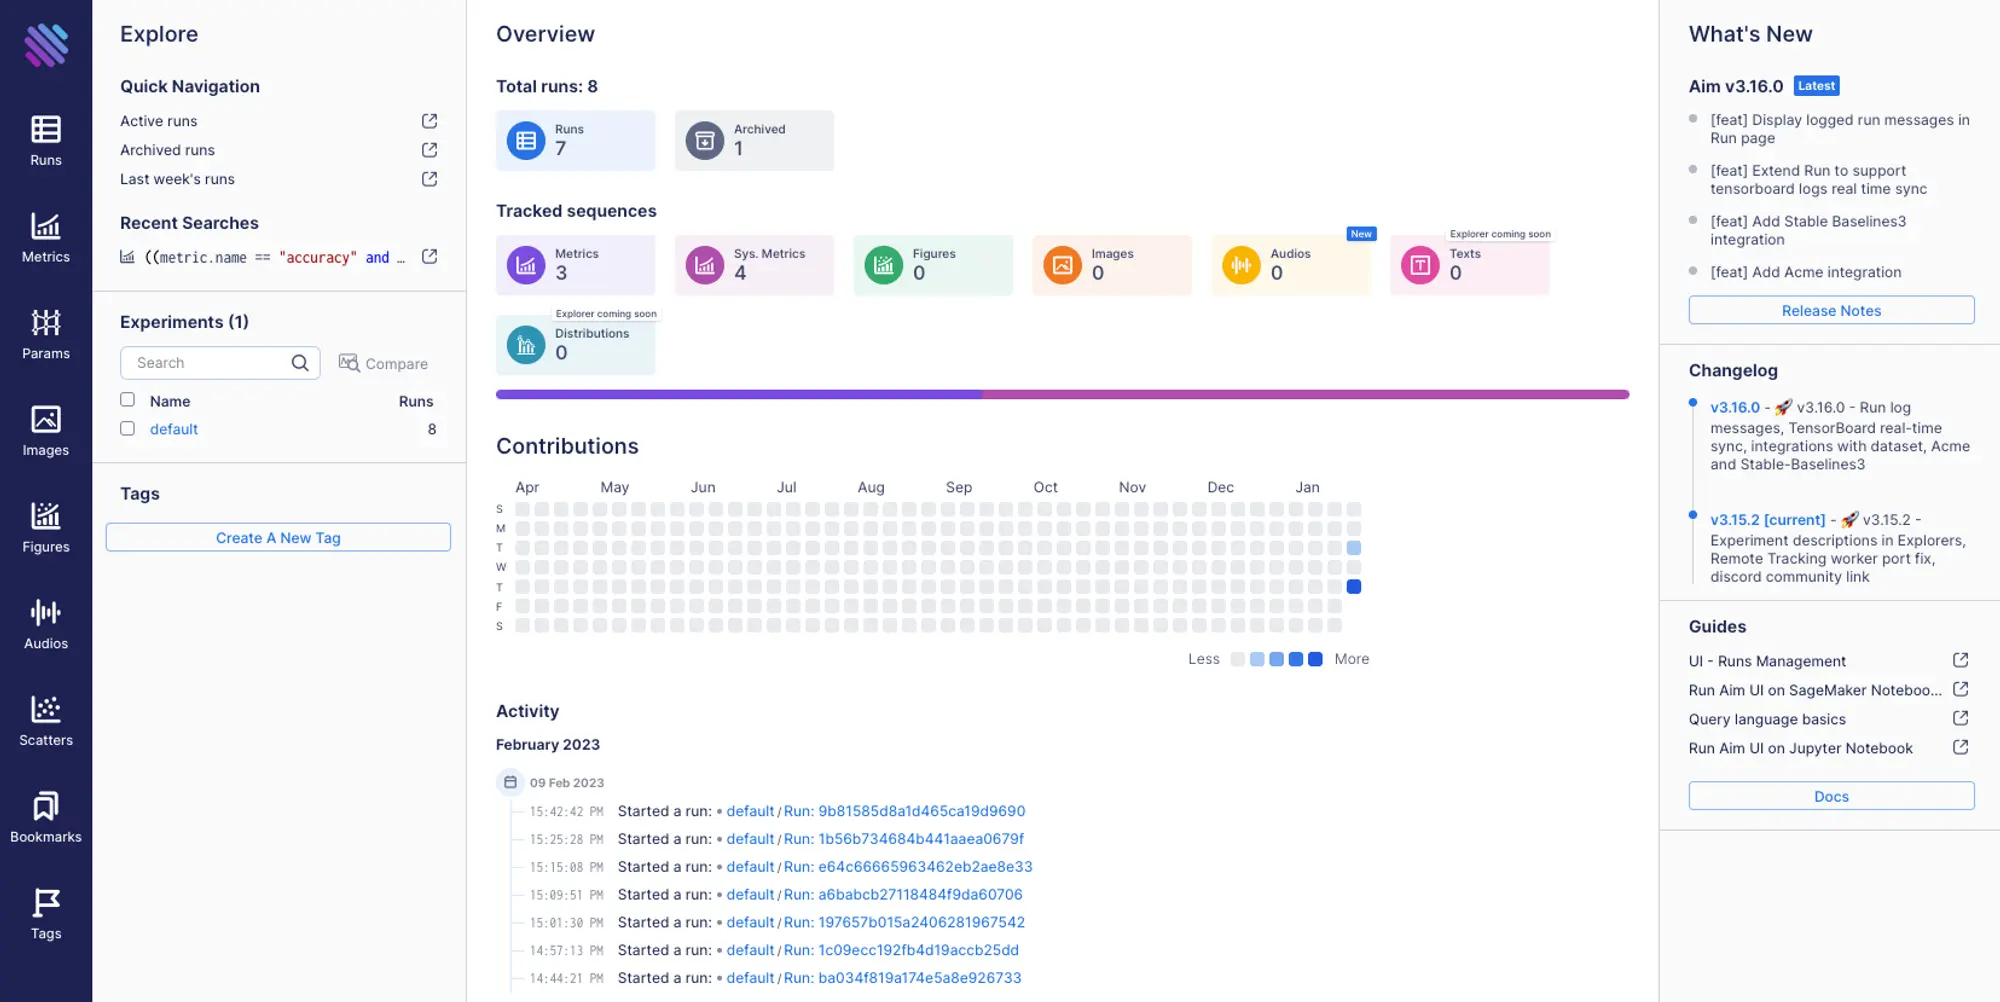
We can see our trainings on the contributions map and in the activity feed. Let’s take a closer look at an individual run details by navigating to the run’s page on the UI.

All of the information is displayed in an organized and easy-to-read manner, allowing us to quickly understand how our training is performing and identify any potential issues.
We can view the tracked hyper-parameters, metadata related to the dataset, and metrics results. Additionally, Aim automatically gathers information like system resource usage and outputs from the terminal.
The UI also provides tools for visualizing and comparing results from multiple runs, making it easy to compare different model architectures, hyper-parameter and dataset settings to determine the best approach for a given problem.
Comparing trainings via Aim
Let’s find out which models performed the best. We can easily compare the metrics of all the runs by opening up the Metrics Explorer 127.0.0.1:43800/metrics.
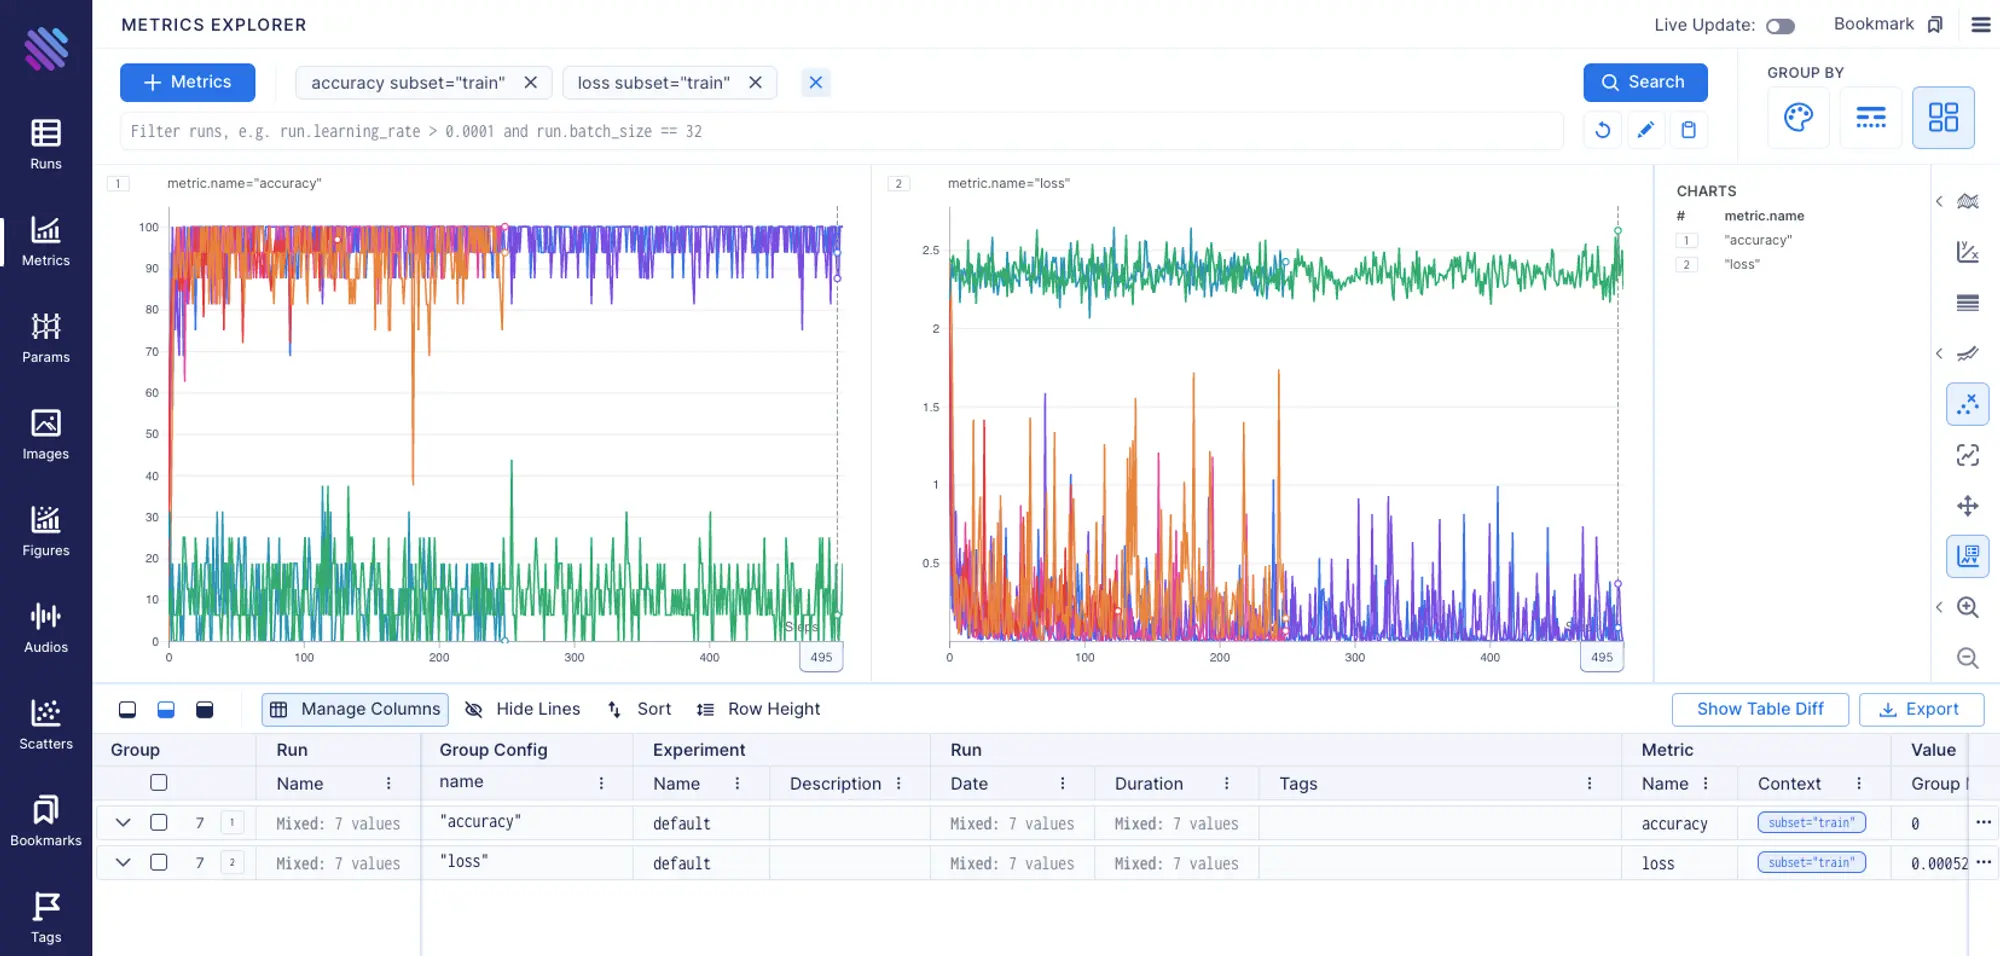
Aim is very powerful when it comes to filtering runs and grouping. It provides an ability to group metrics based on any tracked metadata value.
Let’s group by run.dataset.dataset.meta.version to see how the models performed based on the dataset version they were trained on.
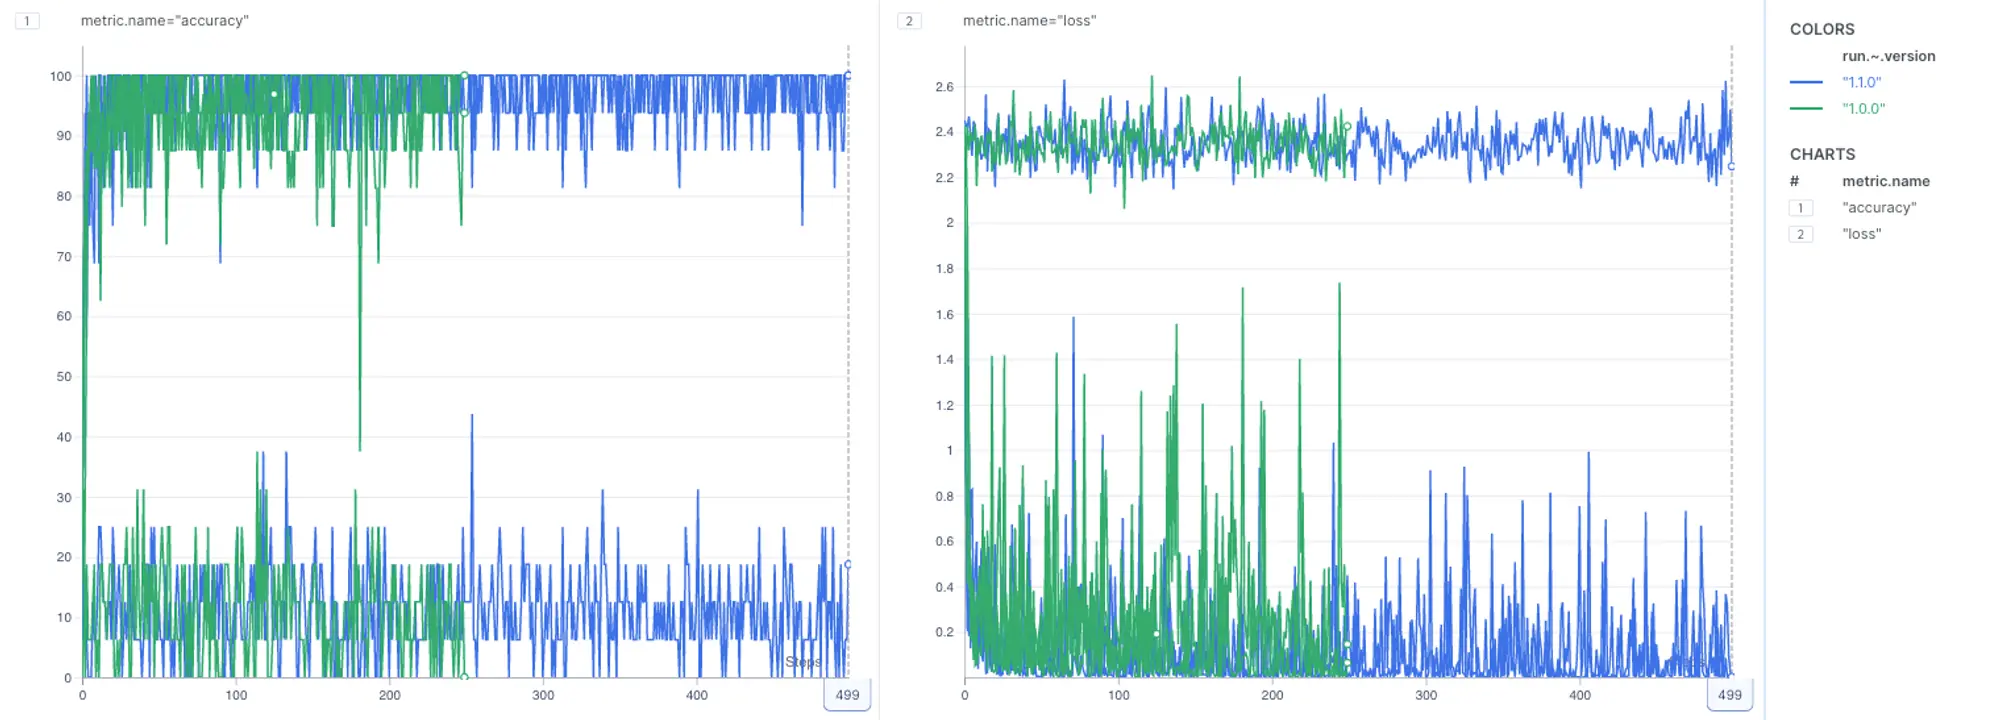
\ According to the legends section, the green lines represent models that were trained on the v1.0.0 dataset (the original MNIST dataset), while the blue metrics represent models trained on v1.1.0, an augmented dataset.
Now, to improve visibility and better evaluate performance, let’s go ahead and smooth out these lines.
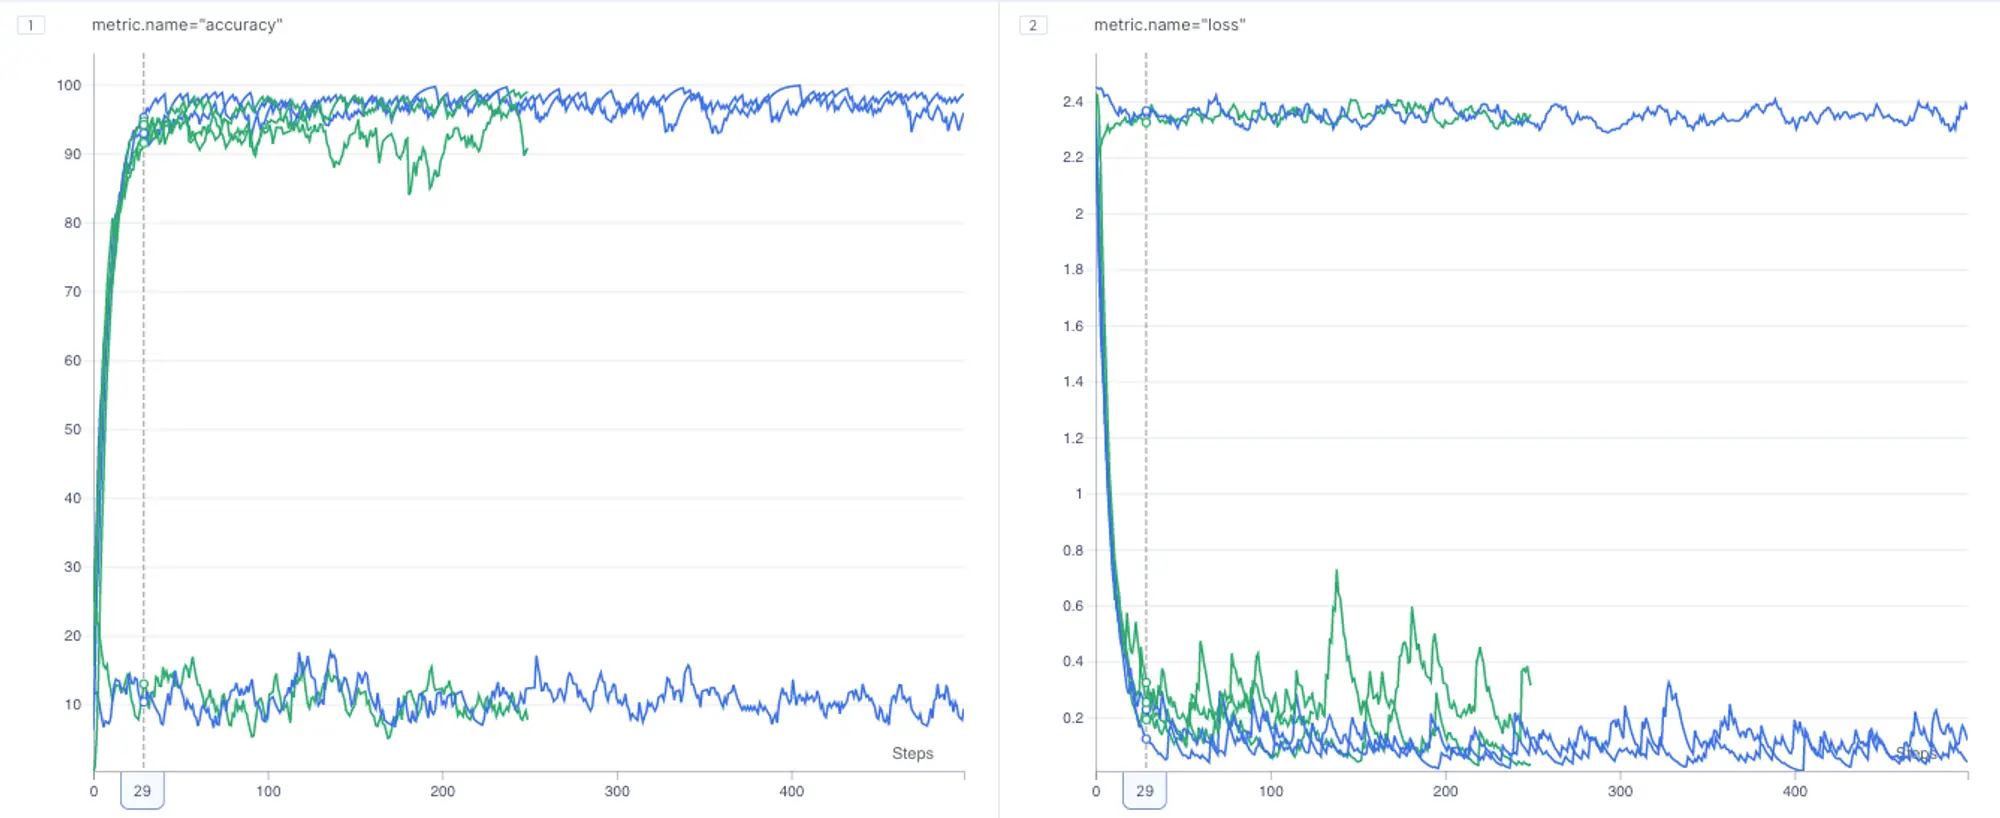
It appears that both models performed similarly on both dataset versions. Since we also experimented with the learning rate hyper-parameter, let’s group metrics by the learning rate to learn its impact on models performance.
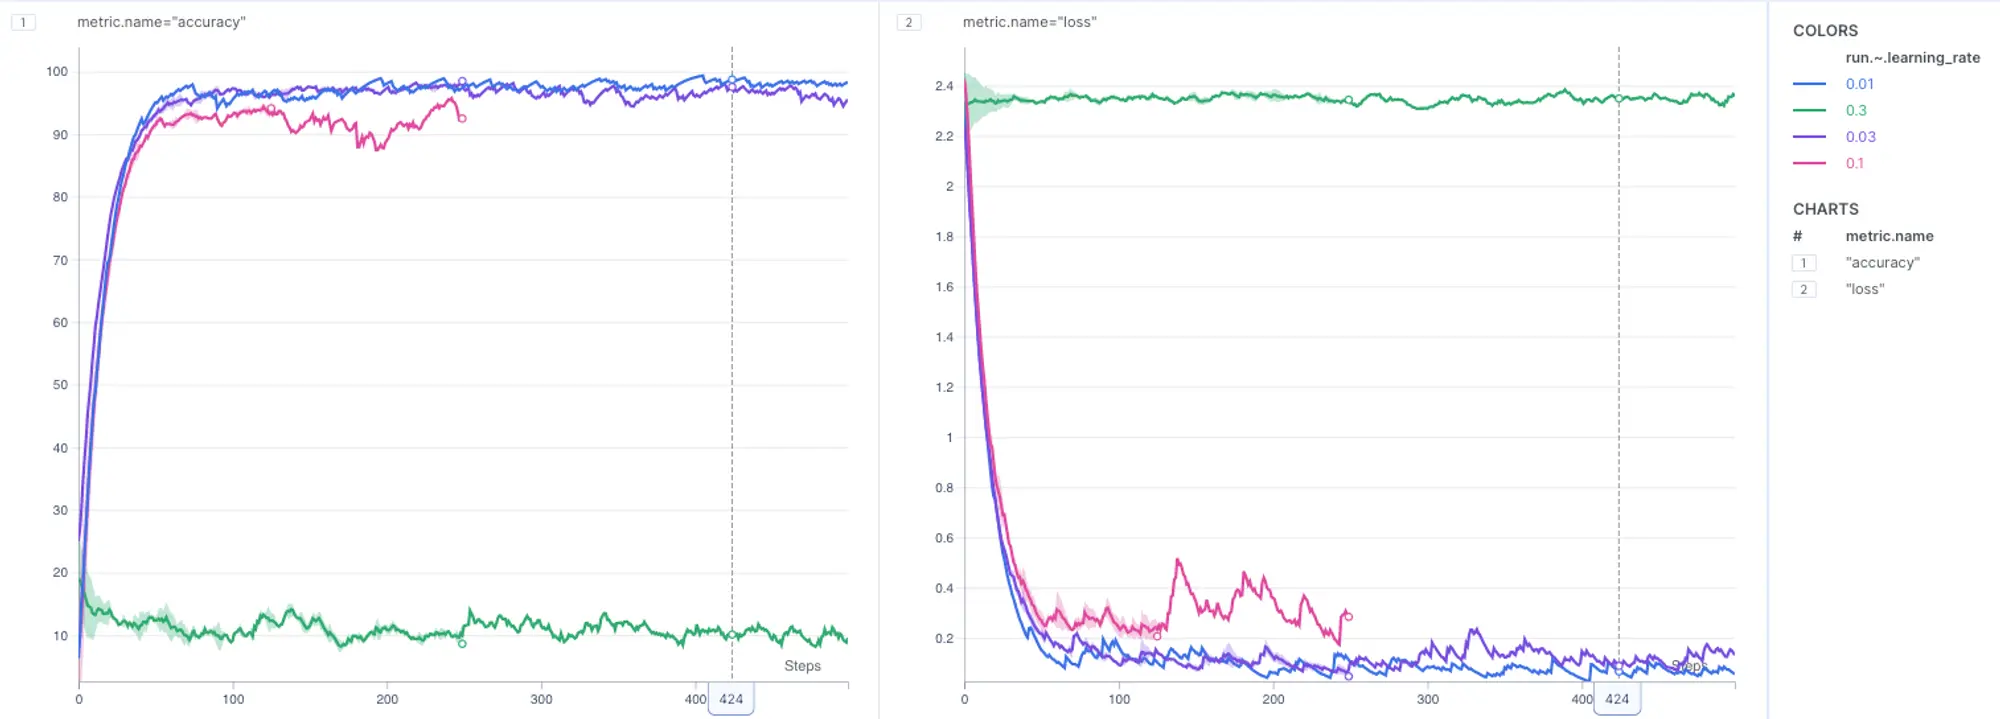
It seems that the blue lines, associated with a learning rate of 0.01, demonstrated the best performance!
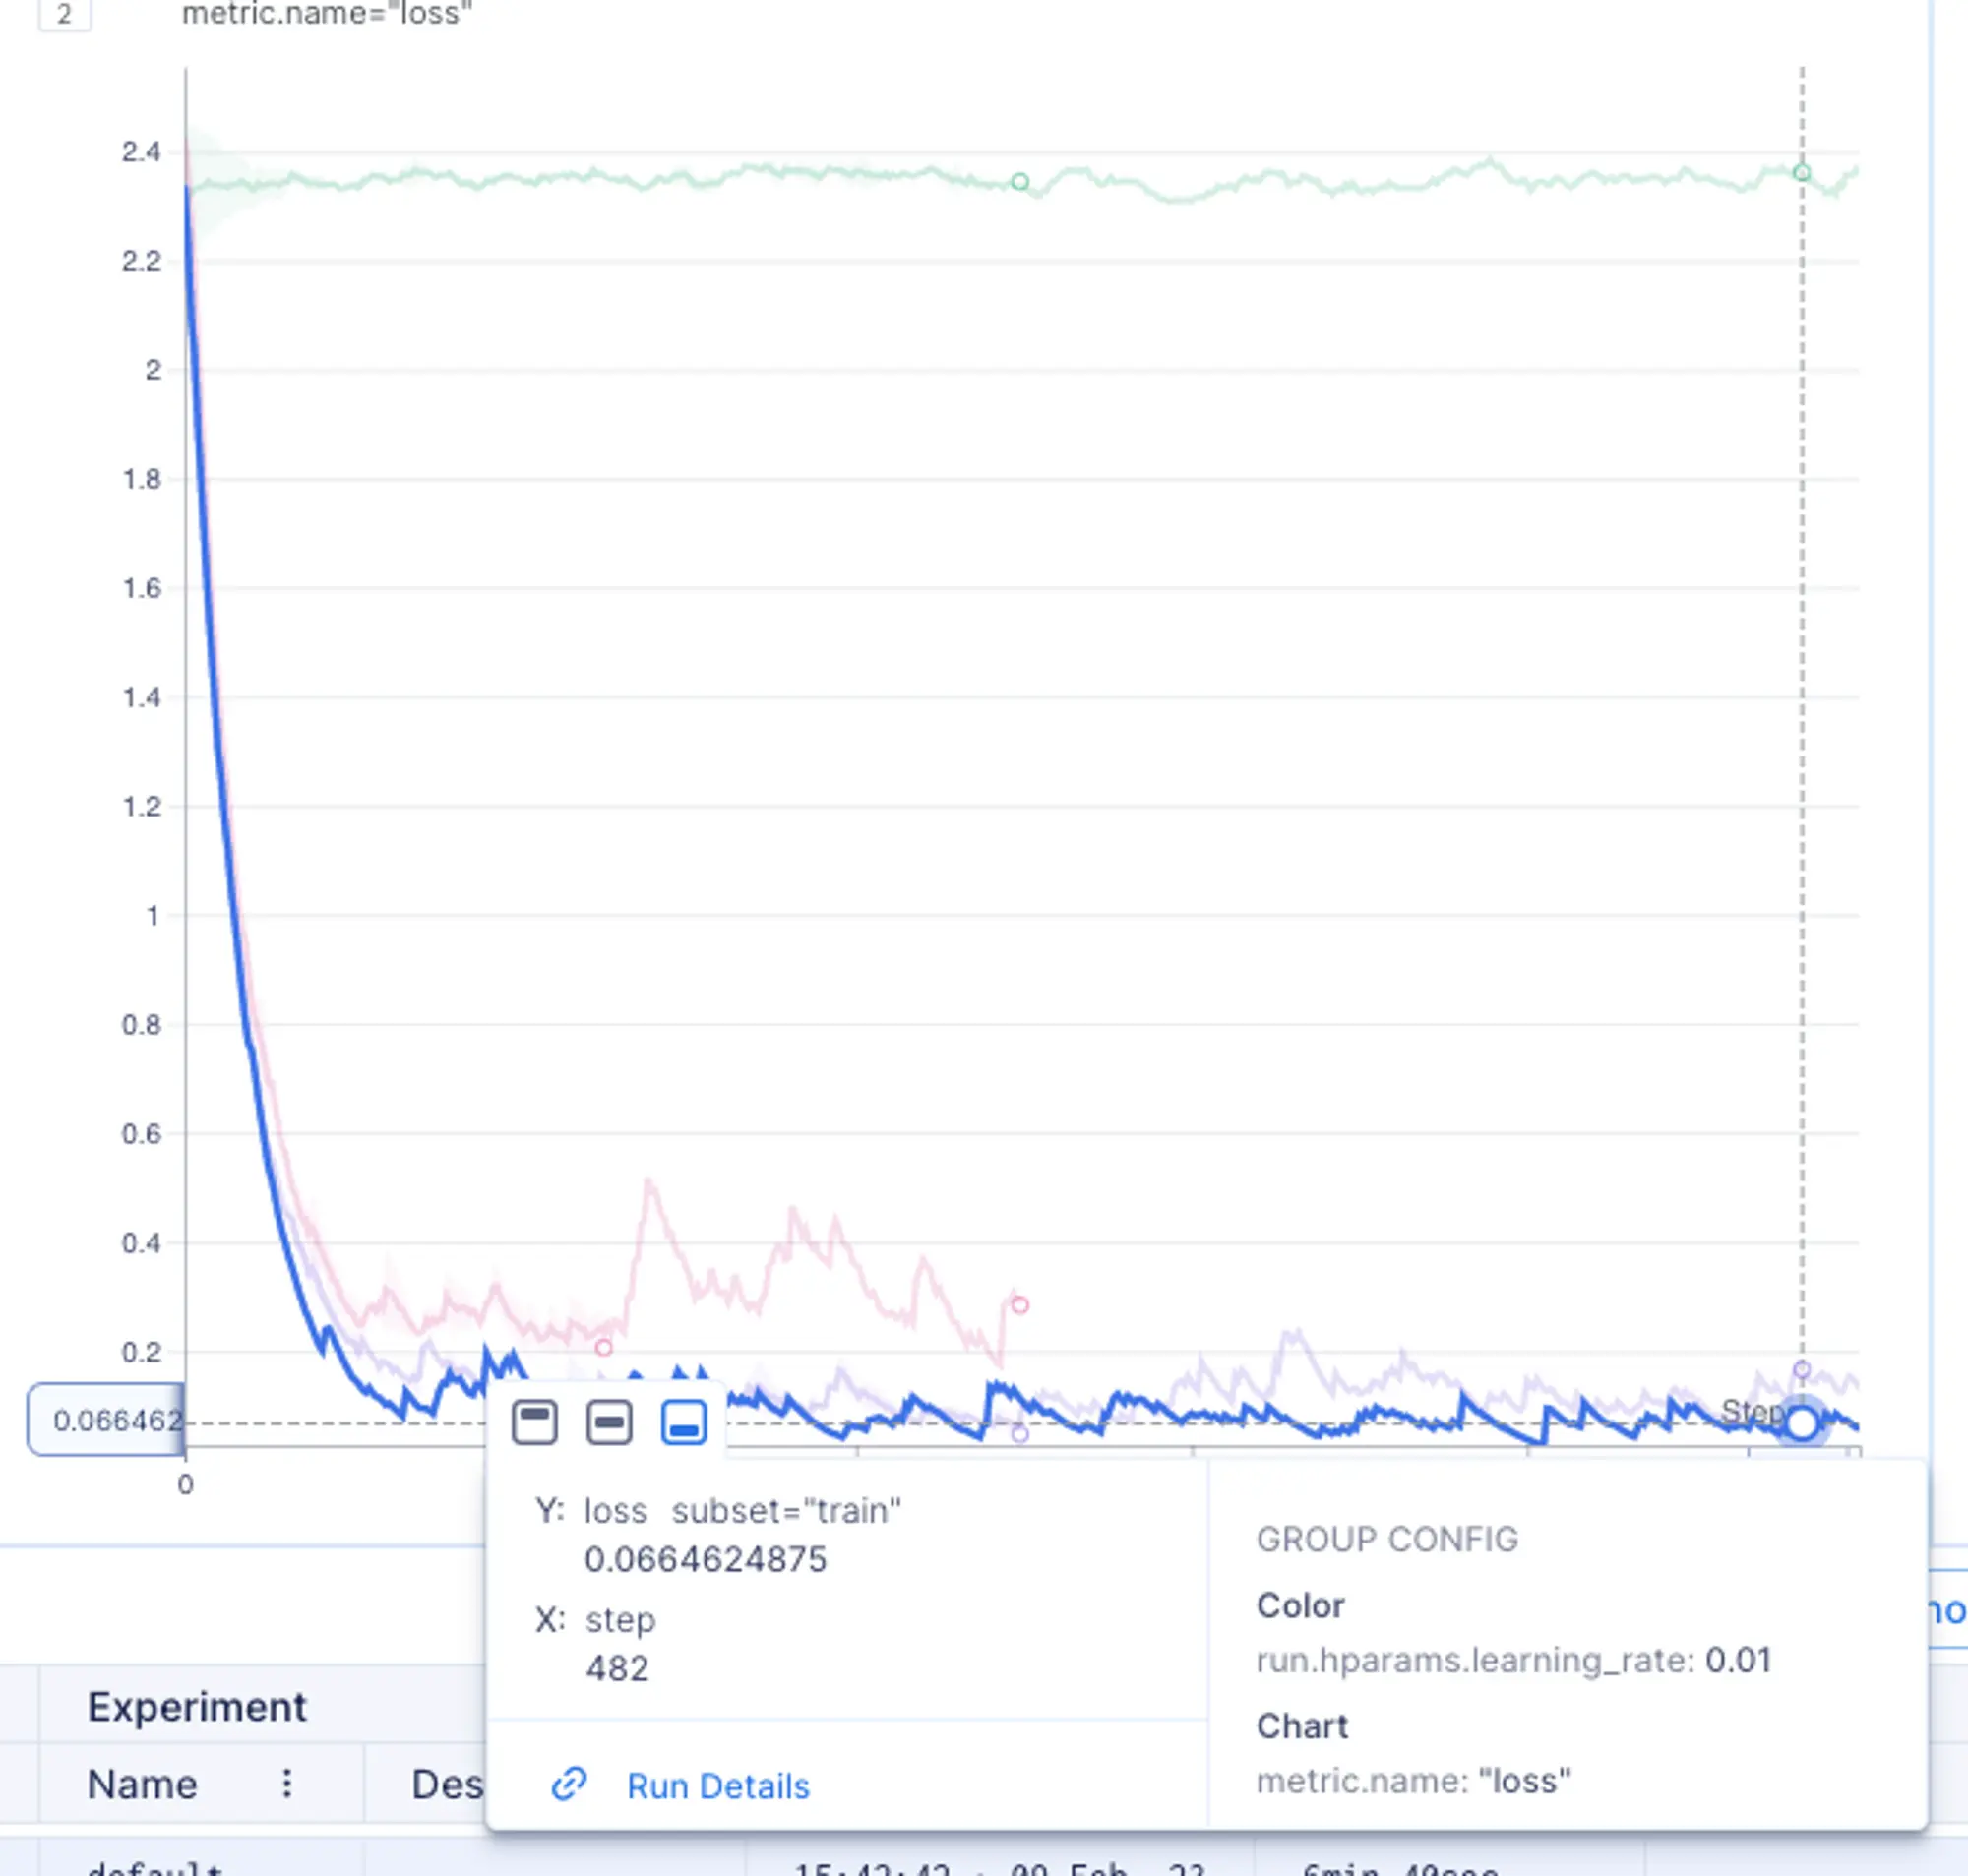
To sum it up, regardless of the dataset version, the models trained with a learning rate of 0.01 came out on top in terms of performance.
With just a few clicks, we were able to compare different runs based on the dataset and learning rate value they were trained on! 🎉
Reproducibility
Have you noticed how we achieved out-of-the-box reproducibility with the Hugging Face datasets and Aim integration? By versioning the dataset and keeping track of its revision, we can effortlessly reproduce experiments using the same dataset it was previously trained on.
Aim stores model hyper-parameters, dataset metadata and other moving pieces, which allows us to quickly recreate and analyze previous experiments!
Conclusion
In this article, we took a closer look at how to get started with uploading and using datasets through the Hugging Face Hub and Datasets. We carried out a series of trainings, and Aim helped us keep track of all the details and made it easier to stay organized.
We compared the results of the trainings conducted on different versions of the dataset. As well as, discovered how helpful the combination of Datasets and Aim can be for reproducing previous runs.
Simplifying our daily work with efficient stack helps us focus on what really matters — getting the best results from our machine learning experiments.
Learn more
Check out the Aim + Datasets integration docs here.\ Datasets repo: https://github.com/huggingface/datasets\ Aim repo: https://github.com/aimhubio/aim
If you have questions, join the Aim community, share your feedback, open issues for new features and bugs. You’re most welcome! 🙌
Drop a ⭐️ on GitHub, if you find Aim useful.