Feb 14, 2023
Aim and MLflow — Choosing Experiment Tracker for Zero-Shot Cross-Lingual Transfer

The release of aimlflow sparked user curiosity, a tool that facilitates seamless integration of a powerful experiment tracking user interface of Aim with MLflow logs.
The question arises as to why we need aimlflow or why we need to view MLflow tracked logs on Aim. The answer is that Aim provides a highly effective user interface that reveals the potential for gaining valuable insights.
In this blog post, we will address the zero-shot cross-lingual transfer task in NLP, and subsequently, monitor the metadata using both Aim and MLflow. Finally, we will attempt to obtain insightful observations from our experiments through the utilization of their respective user interfaces.
Task Setup
The task that we will be tackling in this scope is the zero-shot cross-lingual transfer. Zero-shot cross-lingual transfer refers to a machine learning technique where a model is trained in one language but is able to perform well in another language without any additional fine-tuning. This means that the model has the ability to generalize its understanding of the task across different languages without the need for additional training data.
Particularly, we will train a model for the natural language inference task (NLI) on the English dataset and then classify the label of a given sample written in a different language, without additional training. This approach is useful in situations where labeled data is scarce in some languages and plentiful in others.
Zero-shot cross-lingual transfer can be achieved through various methods, including cross-lingual word embeddings and shared multilingual representations learned in a common space (multilingual language model), the latter is widely used.
We will explore two techniques in our experimentation:
- Fine-tuning the entire pre-trained multilingual language model. Adjusting the weights of the network to solve the given classification task, resuming training from the last state of a pre-trained model.
- Feature extraction which refers to attaching a classification head on top of the pre-trained language model and only training that portion of the network.
In both techniques, we will undertake training utilizing the en subset of the XNLI dataset. Following this, we will conduct evaluations on our evaluation set, consisting of six language subsets from the XNLI dataset, including English(en), German(de), French(fr), Spanish(es), Chinese(zh), and Arabic(ar).
The Datasets
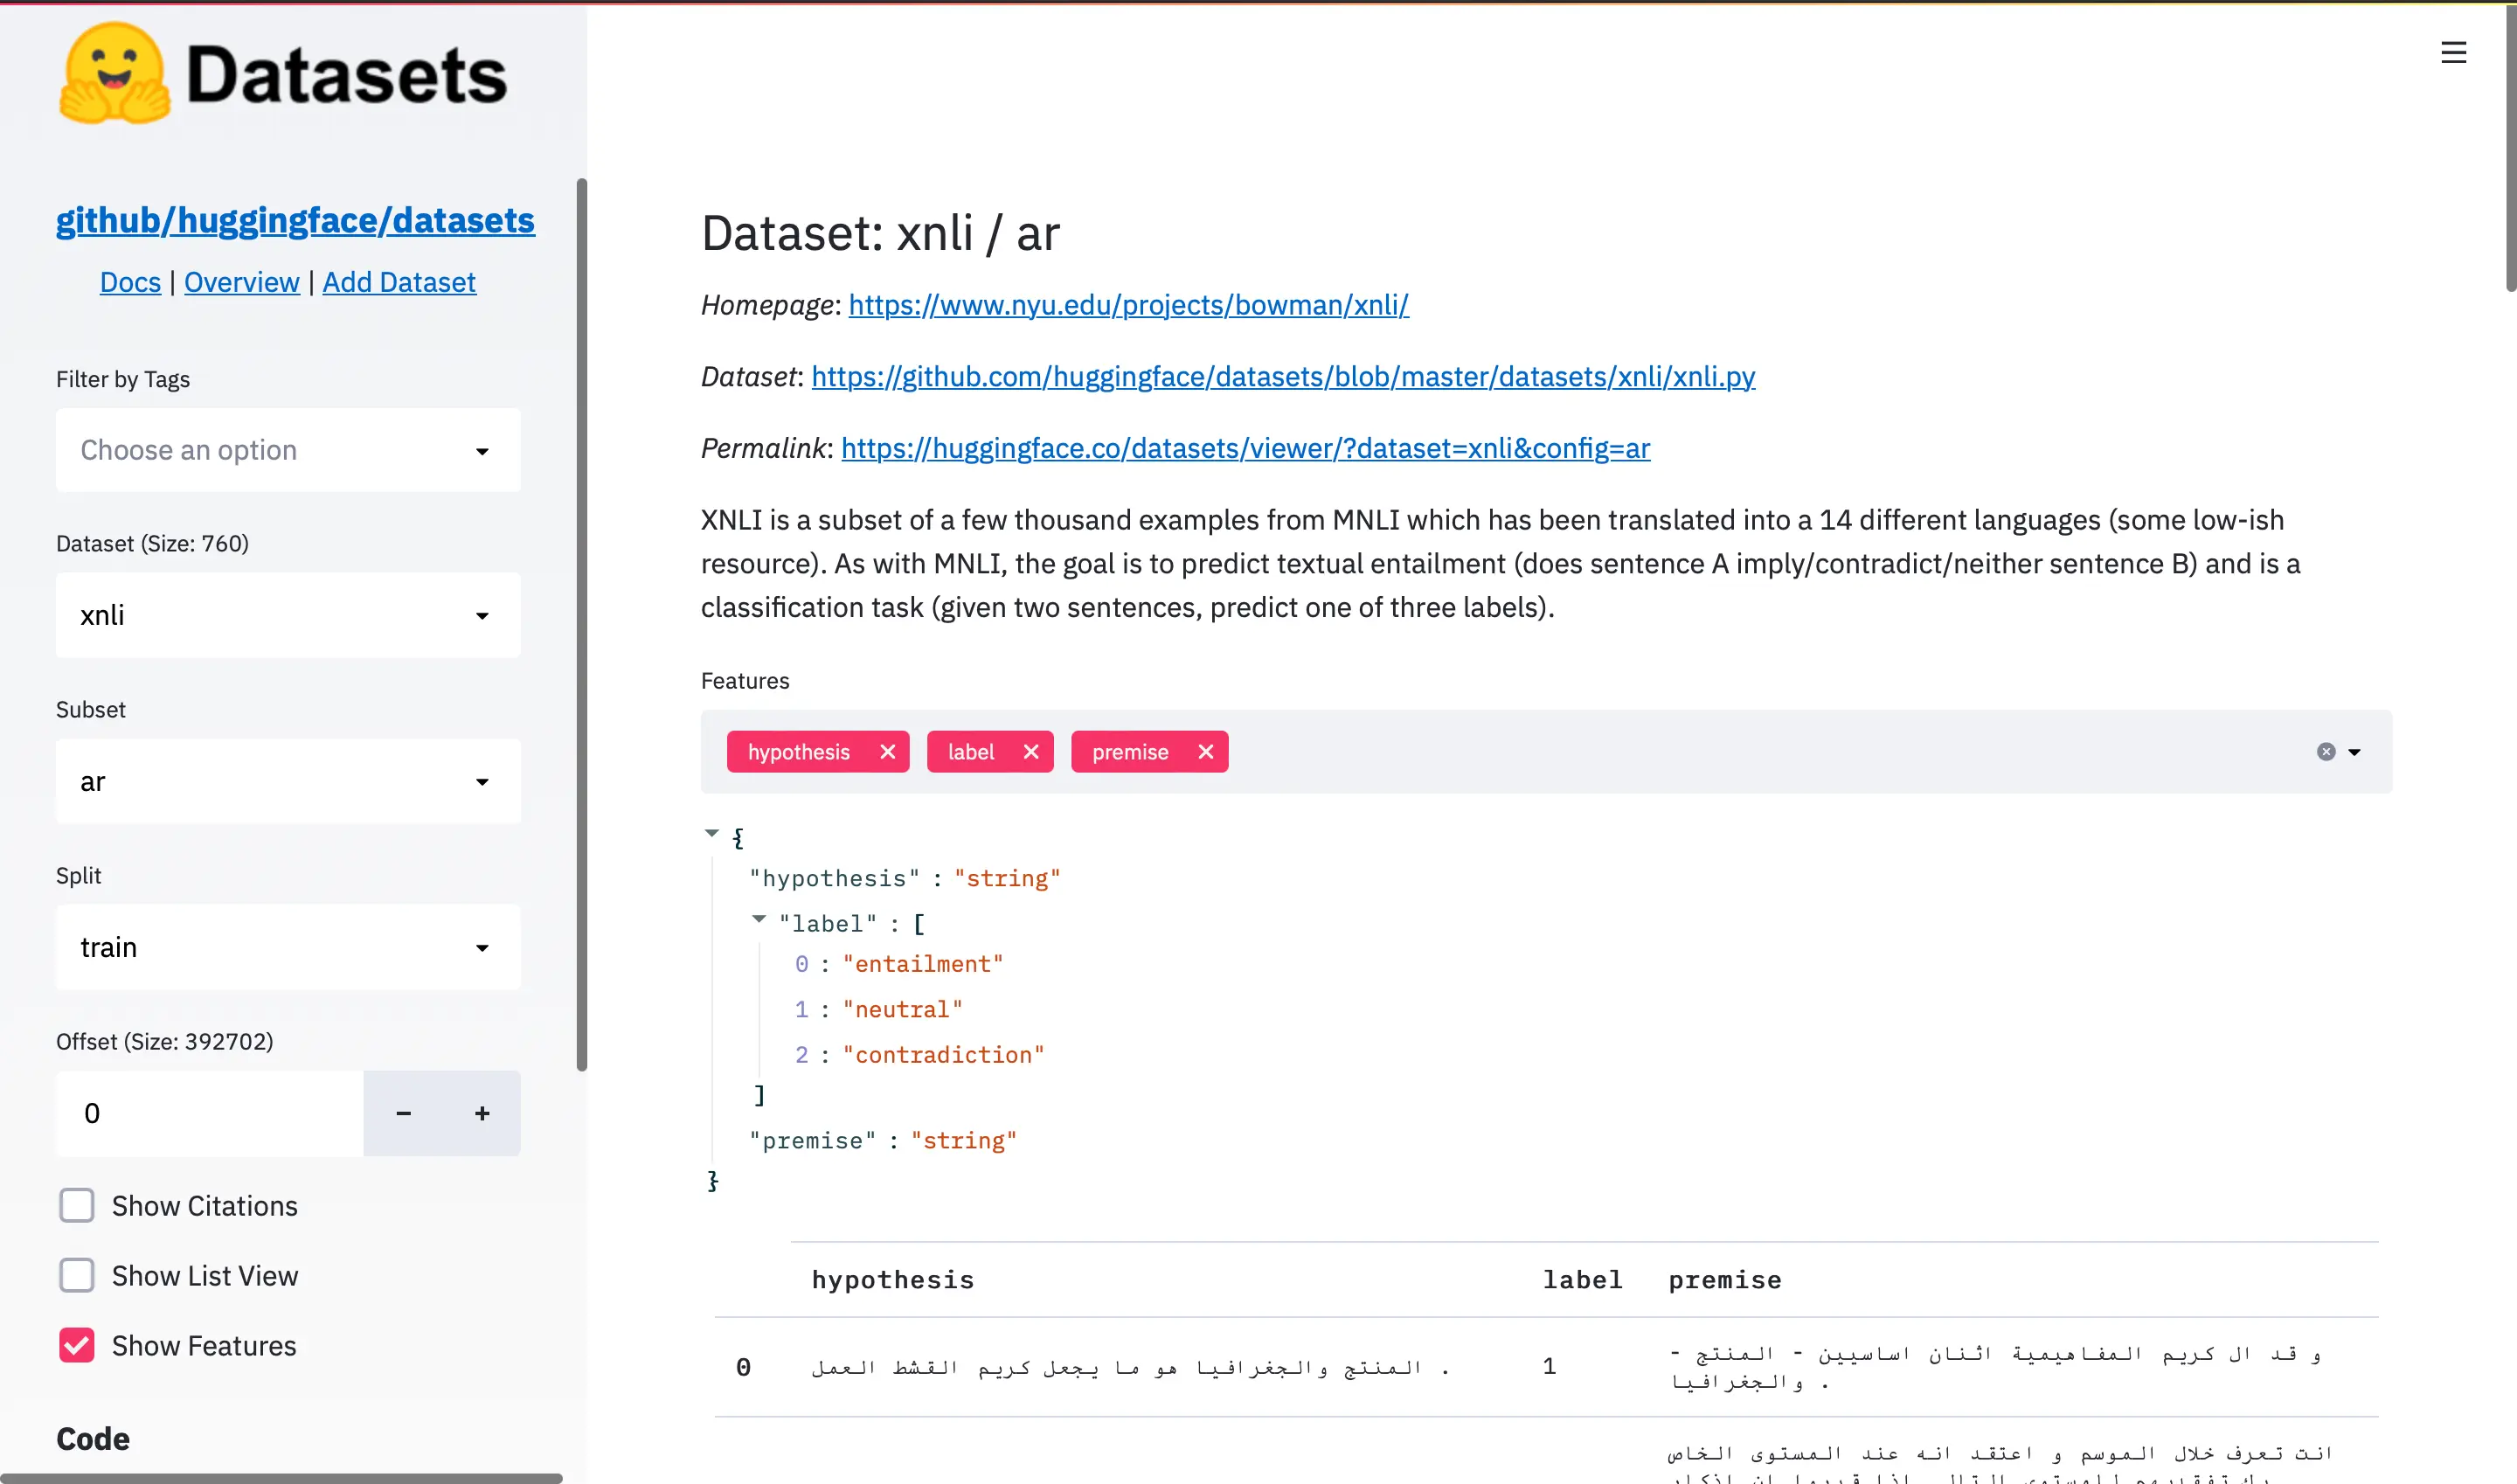
We will utilize the XNLI (cross-lingual NLI) dataset, which is a selection of a few thousand examples from the MNLI (multi NLI) dataset, translated into 14 different languages, including some with limited resources.
The template of the NLI task is as follows. Given a pair of sentences, a premise and a hypothesis need to determine whether a hypothesis is true (entailment), false (contradiction), or undetermined (neutral) given a premise.
Let’s take a look at a few samples to get hang of it. Say the given hypothesis is “Issues in Data Synthesis.” and the premise is “Problems in data synthesis.”. Now there are 3 options whether this hypothesis entails the premise, contradicts, or is neutral. In this pair of sentences, it is obvious that the answer is entailment because the words issues and problems are synonyms and the term data synthesis remains the same.
Another example this time of a neutral pair of sentences is the following: the hypothesis is “She was so happy she couldn't stop smiling.” and the premise is “She smiled back.”. The first sentence doesn’t imply the second one, however, it doesn’t contradict it as well. Thus they are neutral.
An instance of contradiction, the hypothesis is “The analysis proves that there is no link between PM and bronchitis.” and the premise is “This analysis pooled estimates from these two studies to develop a C-R function linking PM to chronic bronchitis.”. In the hypothesis, it is stated that the analysis shows that there is no link between two biological terms. Meanwhile, the premise states the opposite, that the analysis combined two studies to show that there is a connection between the two terms.
For more examples please explore the HuggingFace Datasets page powered by Streamlit: https://huggingface.co/datasets/viewer/.
The Models
In our experiments, we will utilize the following set of pre-trained multilingual language models:
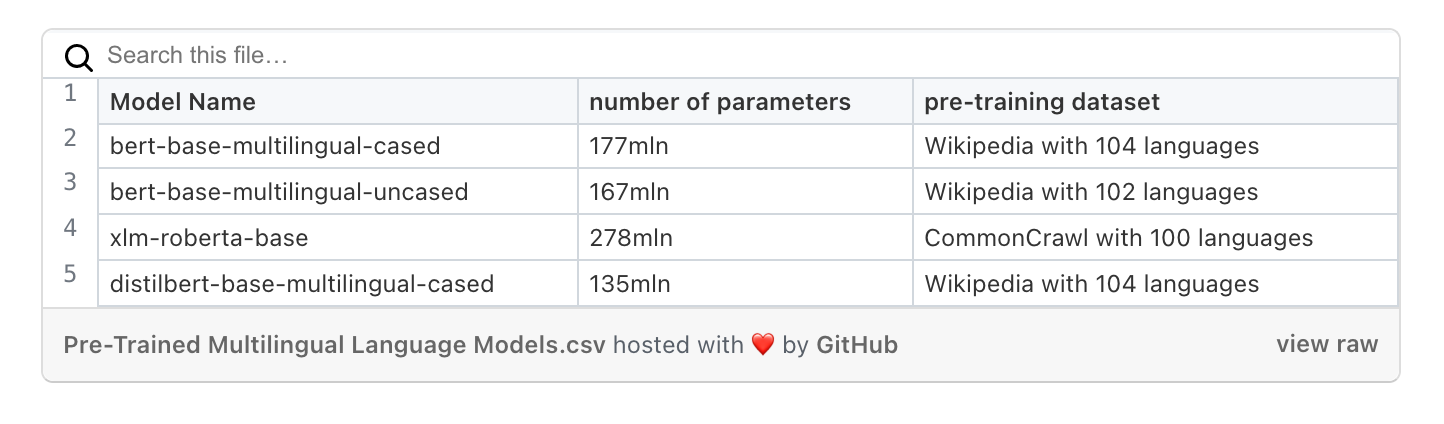
We will load each model with its last state weights and continue training the entire network (fine-tuning) or the classification head only (feature extraction) from that state. All of the mentioned models are trained with the Masked Language Modeling (MLM) objective.
Setting up Training Environment
Before beginning, it is important to keep in mind that the following is what the ultimate structure of our directory will resemble:
aim-and-mlflow-usecase
├── logs
│   ├── aim_callback
│   │   └── .aim
│   ├── aimlflow
│   │   └── .aim
│   ├── checkpoints
│   └── mlruns
└── main.py
Let’s start off by creating the main directory, we named it aim-and-mlflow-usecase, you can simply name anything you want. After which we need to download the main.py from the following source: https://github.com/aimhubio/aimlflow/tree/main/examples/cross-lingual-transfer. The code explanation and sample usage can be found in the README.md file of the directory. We will be using this script to run our experiments.

The logs directory as the name suggests stores the logs. In the checkpoints folder, all the model states will be saved. The mlruns is the repository for MLflow experiments. The aim_callback will store the repository of Aim runs tracked using Aim’s built-in callback for Hugging Face Transformers, meanwhile, the aimlflow will store the runs converted from MLflow using the aimlflow tool.
It is important to keep in mind that due to limited computational resources, we have chosen to use only 15,000 samples of the training dataset and will be training for a mere 3 epochs with a batch size of 8. Consequently, the obtained results may not be optimal. Nevertheless, the aim of this use case is not to achieve the best possible results, but rather to showcase the advantages of using both Aim and MLflow.
In order to start the training process, we will be using the following command. But first, let’s navigate to the directory where our script is located (aim-and-mlflow-usecase in our case).
python main.py feature-extraction \
    --model-names bert-base-multilingual-cased bert-base-multilingual-uncased xlm-roberta-base distilbert-base-multilingual-cased \
    --eval-datasets-names en de fr es ar zh \
    --output-dir {PATH_TO}/logs
Where {PATH_TO} is the absolute path of the aim-and-mlflow-usecase directory. In this particular command, we use the feature-extraction technique for 4 pre-trained models and validate on 6 languages of the XNLI dataset. In parallel or after the first process completion we can run the same command this time using the fine-tuning technique:
python main.py fine-tune \
    --model-names bert-base-multilingual-cased bert-base-multilingual-uncased xlm-roberta-base distilbert-base-multilingual-cased \
    --eval-datasets-names en de fr es ar zh \
    --output-dir {PATH_TO}/logs
Go grab some snacks, trainings take a while 🍫 ☺️.
Using aimlflow
Meanwhile, one might wonder why we are tracking the experiment results using MLflow and Aim. We could simply track the metrics via MLflow and use the aimlflow to simply convert and view our experiments live on Aim. Let’s first show how this can be done after which tackle the question.
Instal aimlflow on your machine via pip, if it is not already installed:
$ pip install aimlflow$ aimlflow sync --mlflow-tracking-uri=logs/mlruns --aim-repo=logs/aimlflow/.aimThis command will start converting all of the experiment hyperparameters, metrics, and artifacts from MLflow to Aim, and continuously update the database with new runs every 10 seconds.
More on how the aimlflow can be set up for local and remote MLflow experiments can be found in these two blog posts respectively:
This is one approach to follow, but for a more improved user interface experience, we suggest utilizing Aim’s built-in callback, aim.hugging_face.AimCallback, which is specifically designed for transformers.Trainer functionality. It tracks a vast array of information, including environment details, packages and their versions, CPU, and GPU usage, and much more.
Unlocking the Power of Data Analysis
Once the training completes some steps, we can start exploring the experiments and comparing the MLflow and Aim user interfaces. First, let’s launch both tools’ UIs. To do this, we need to navigate to the logs directory and run the MLflow UI using the following command:
$ mlflow ui$ aim upNote that for the best possible experience, we will be using the
aim_callback/.aimrepository in this demonstration, as it has deeper integration with theTrainer.
The UIs of both MLflow and Aim will be available by default on ports 5000 and 43800 respectively. You can access the homepages of each tool by visiting http://127.0.0.1:5000 for MLflow and http://127.0.0.1:43800 for Aim.


In order to gain valuable insights from the experiment results, it is imperative to navigate to the proper pages in both user interfaces. To do so, in MLflow, we can visit the Compare Runs page:
By selecting all the experiments, navigate to the comparison page by clicking the Compare button.
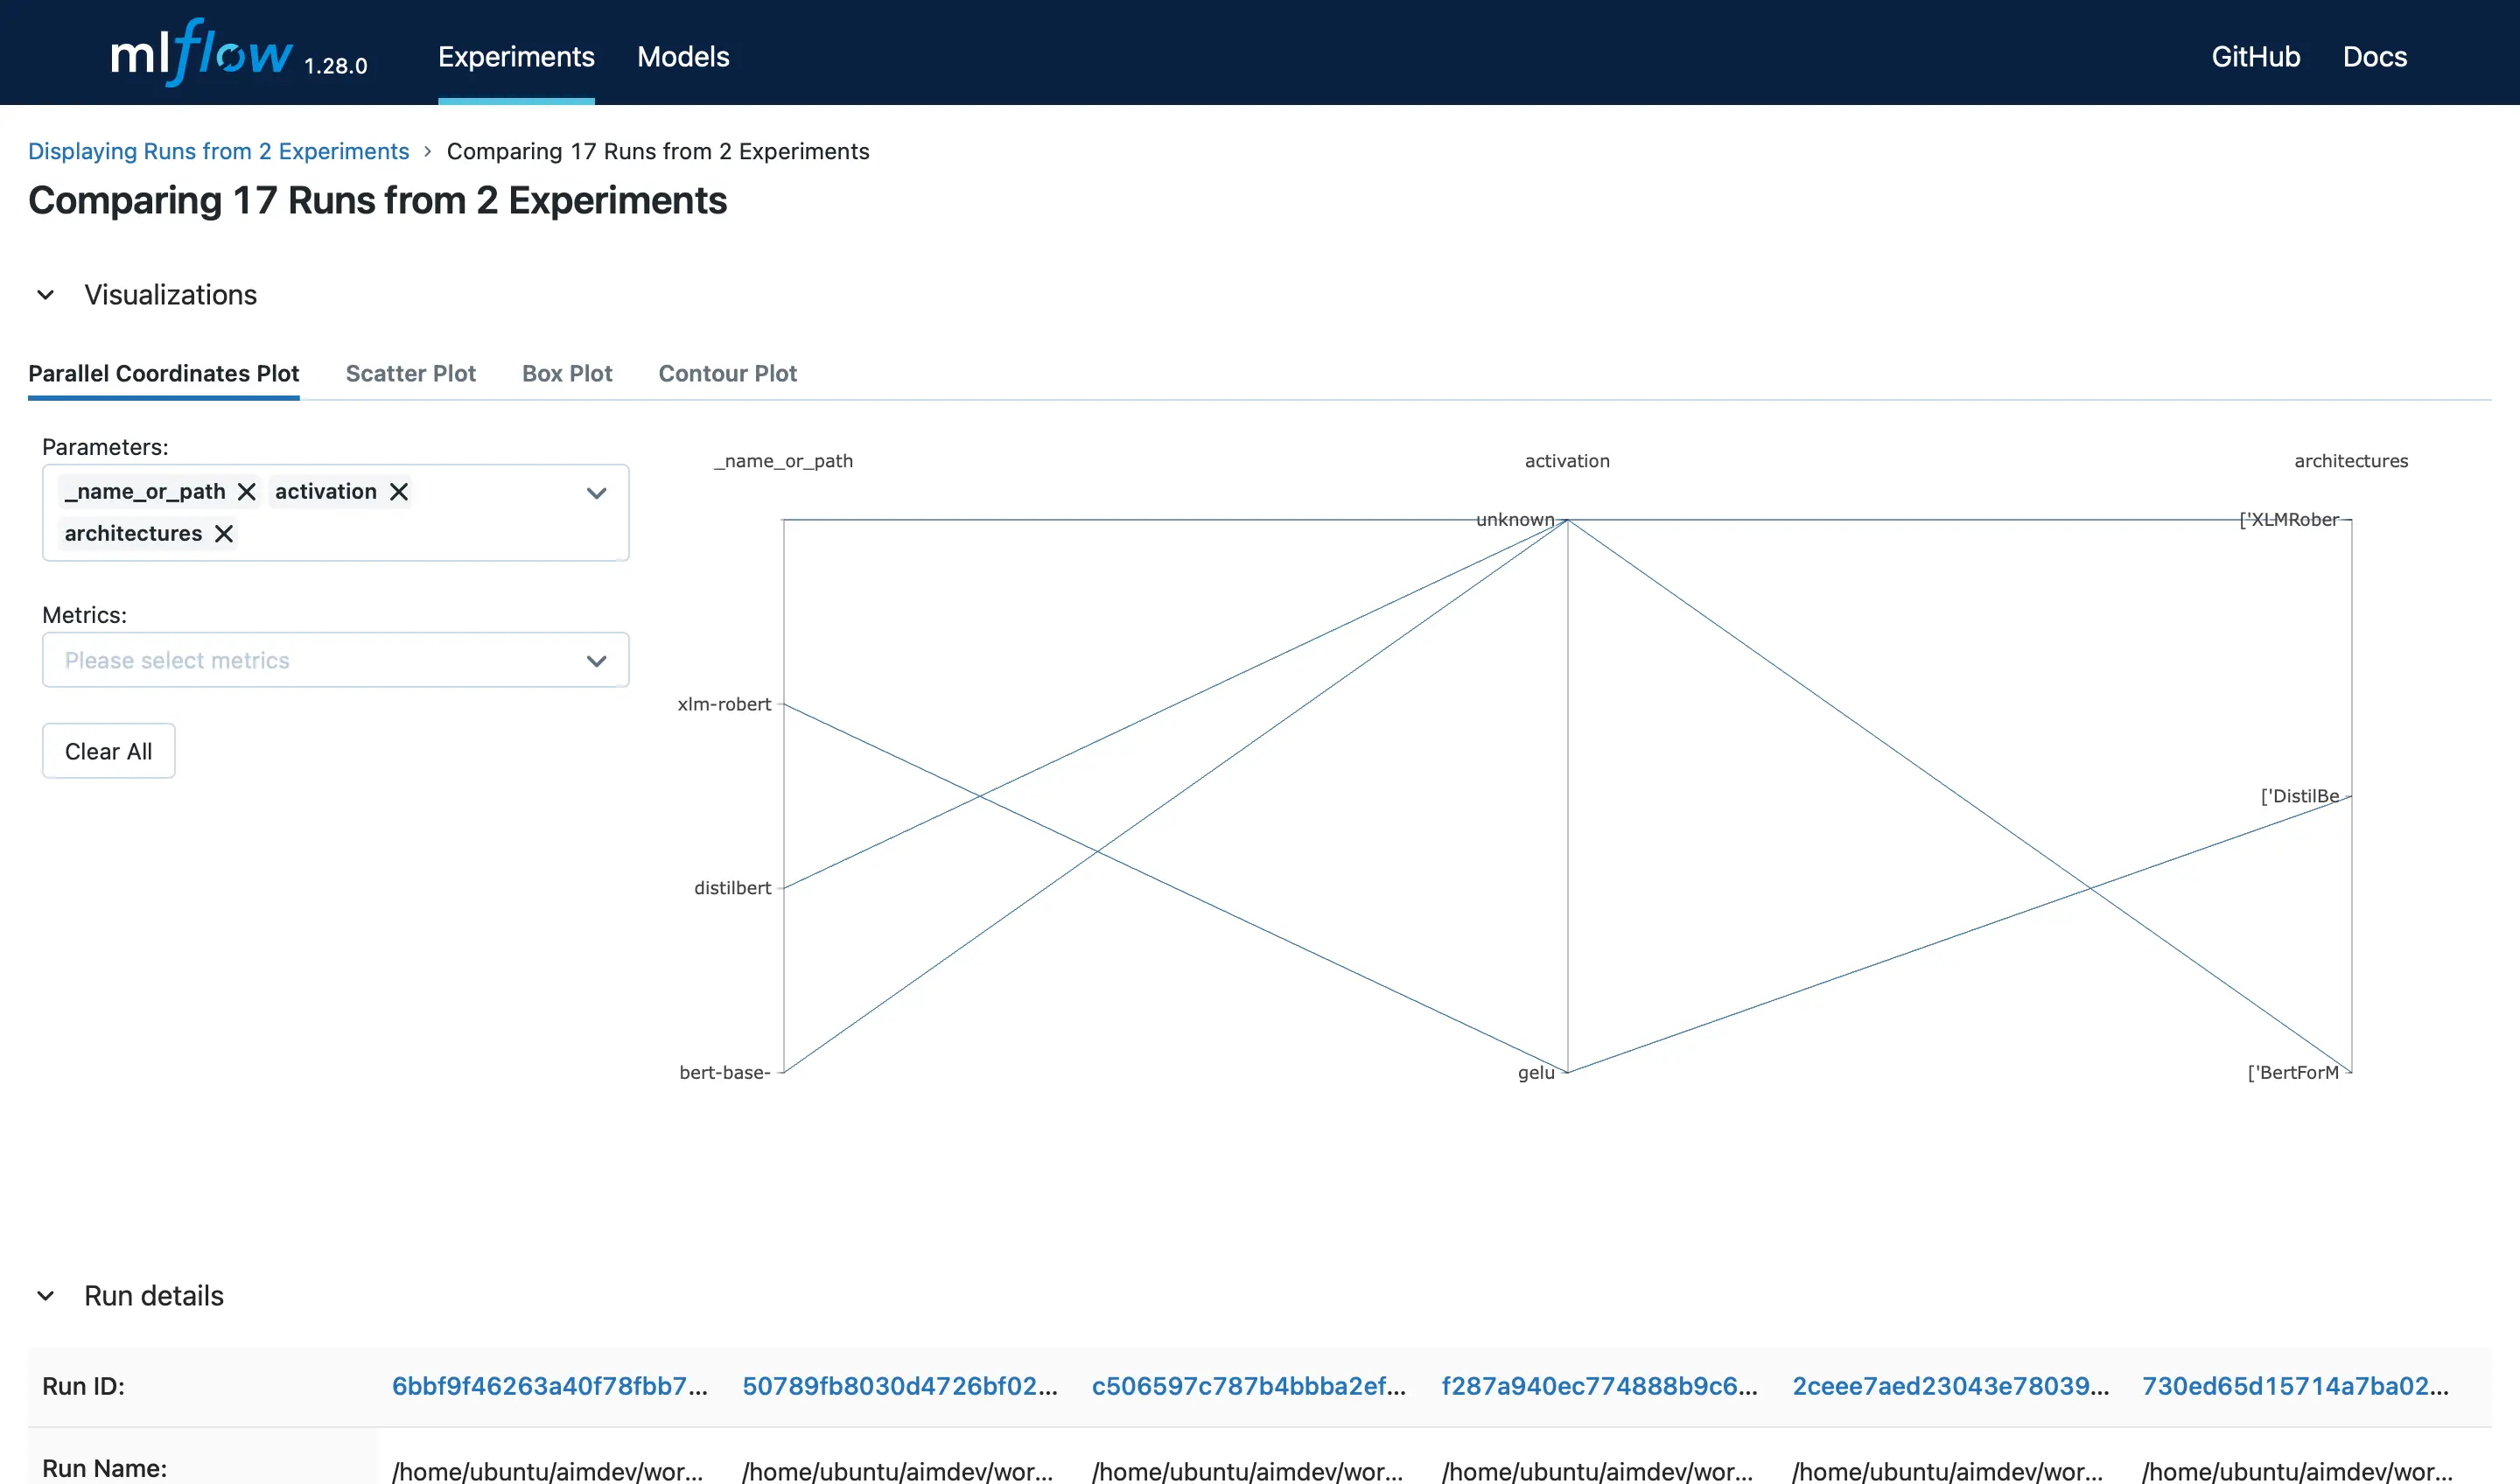
The Run details section presents the run metadata, including the start and end time and duration of the run. The Parameters section displays the hyperparameters used for the run, such as the optimizer and architecture. The Metrics section showcases the latest values for each metric.
Having access to all this information is great, but what if we want to explore the evolution of the metrics over time to gain insights into our training and evaluation processes? Unfortunately, MLflow does not offer this functionality. However, Aim does provide it, to our advantage.
To organize the parameters into meaningful groups for our experiment, simply go to Aim’s Metrics Explorer page and follow a few straightforward steps:
Gaining insights
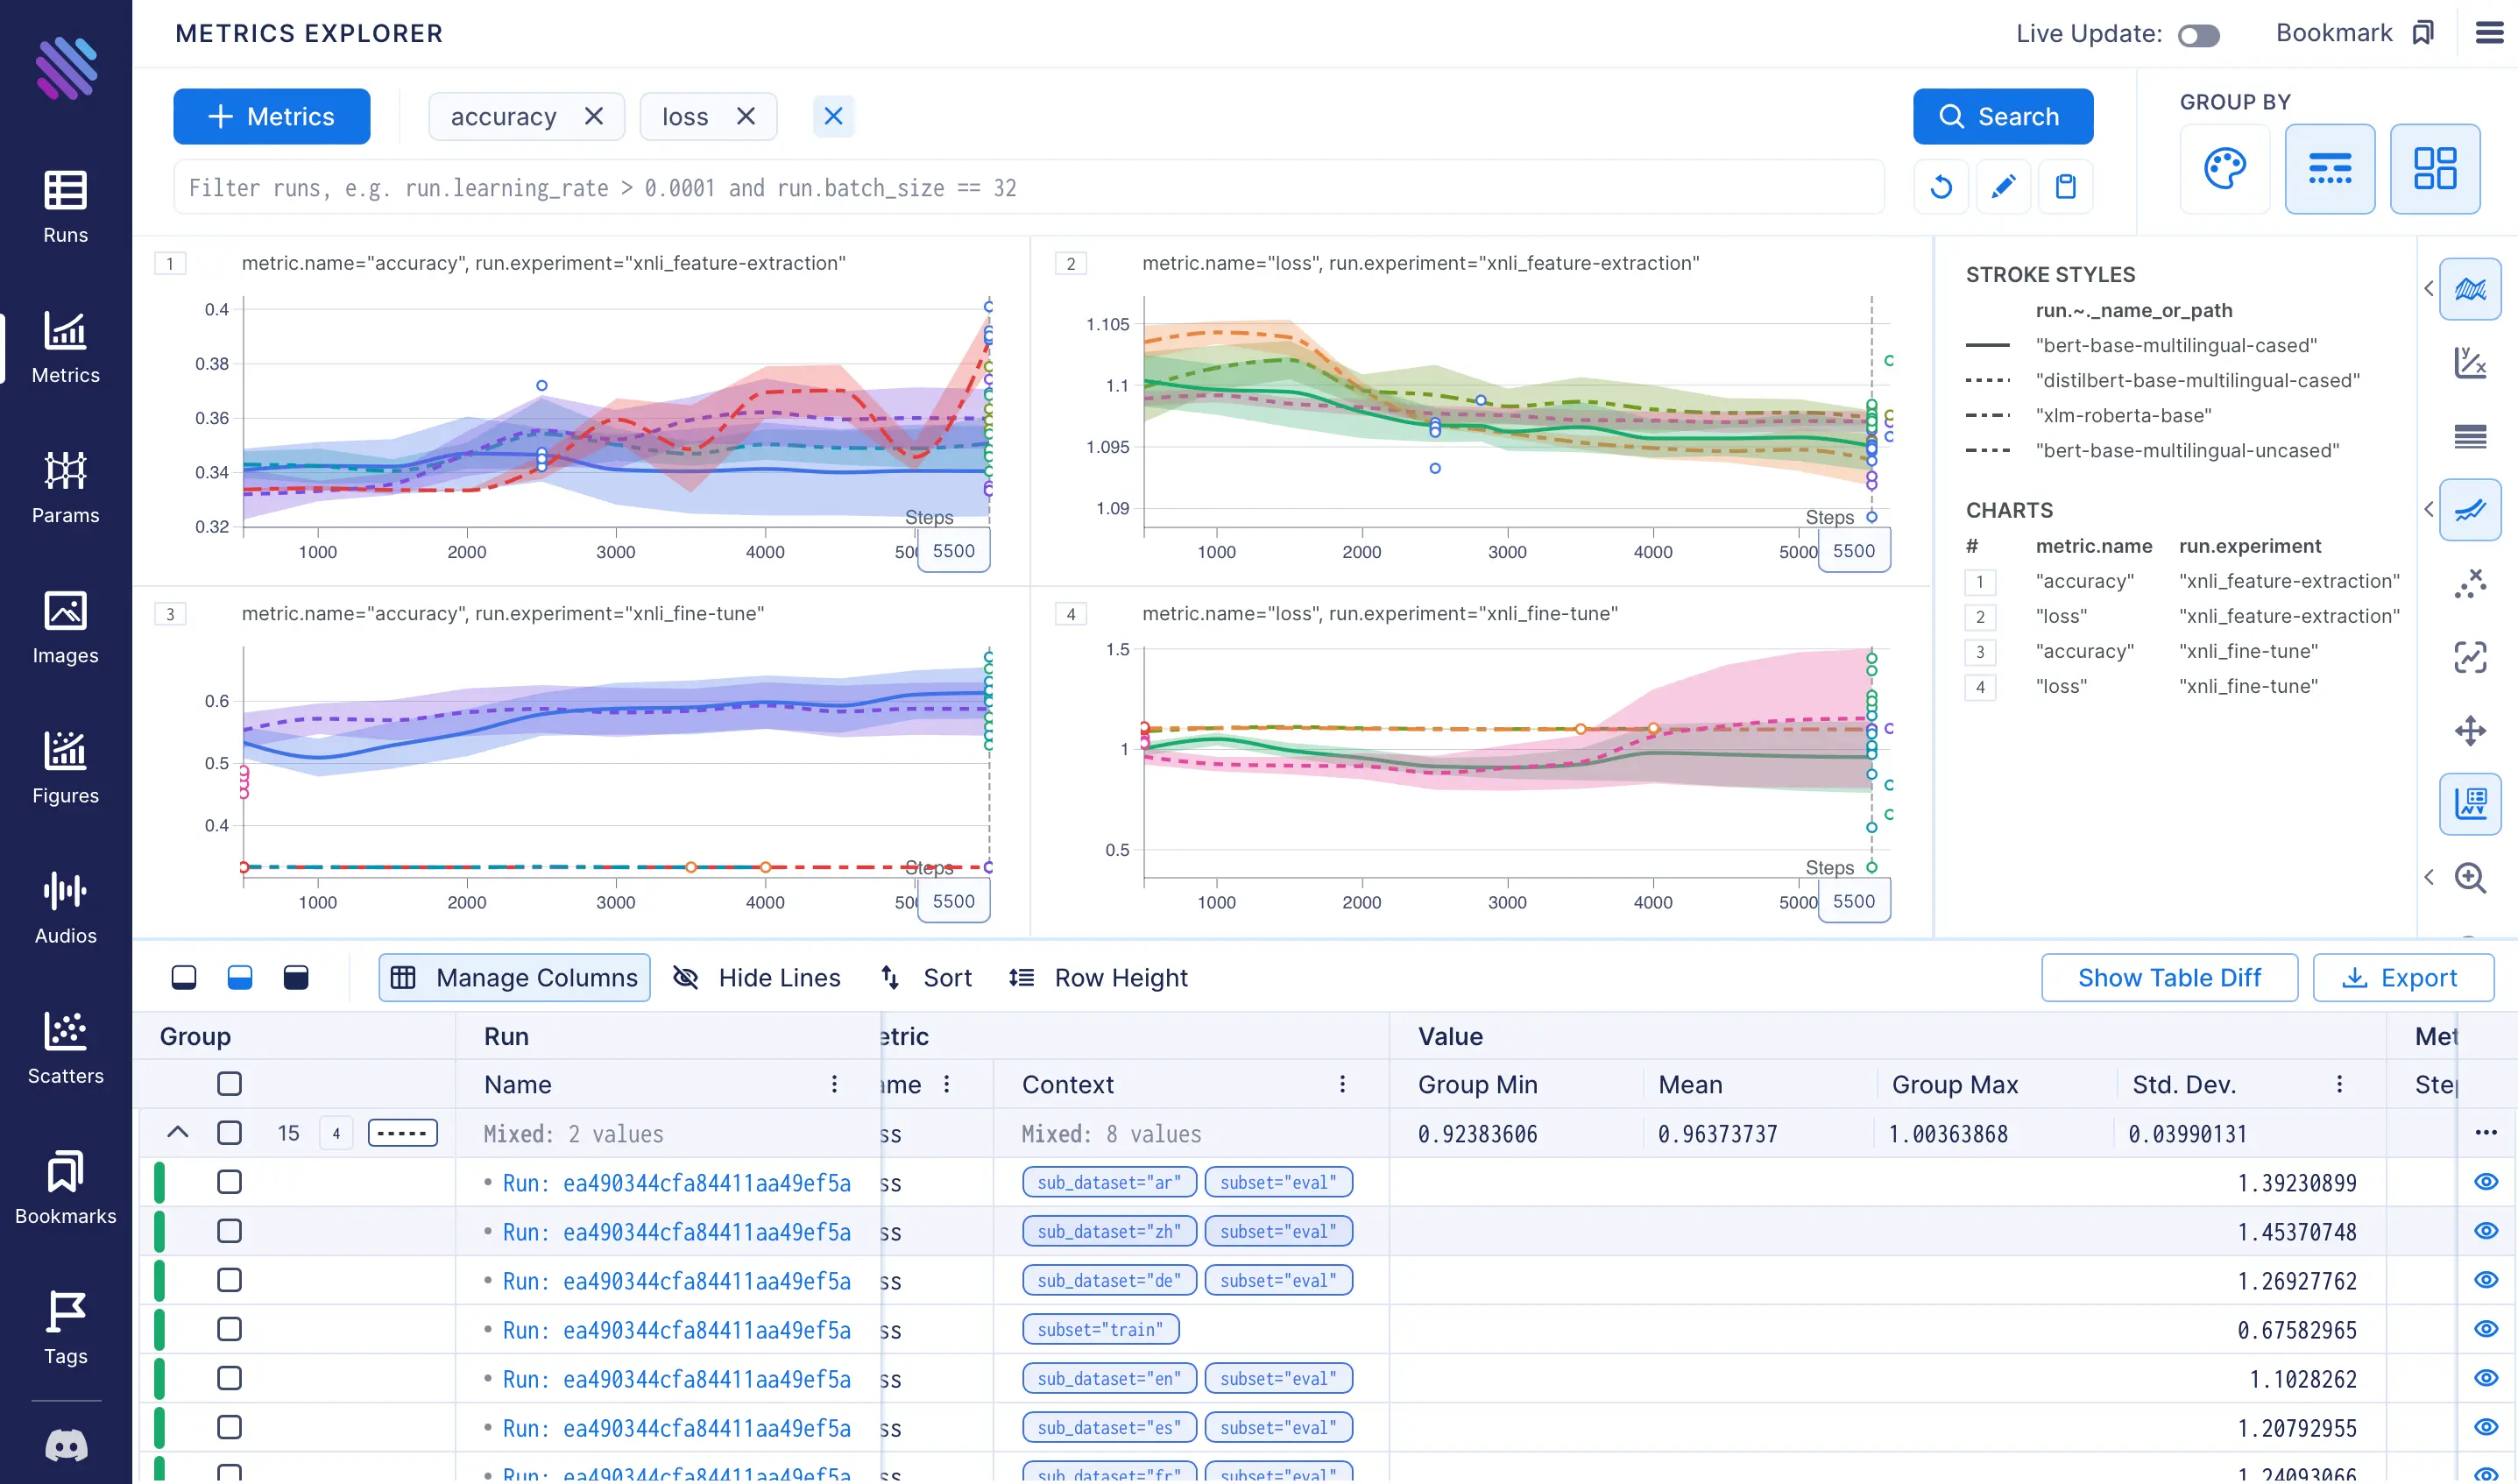
Let’s examine the charts more closely and uncover valuable insights from our experiments.
A quick examination of the charts reveals the following observations:
- The fine-tuning technique is clearly superior to feature extraction in terms of accuracy and loss, as evidenced by a comparison of the maximum and minimum results in charts 1 and 3, and charts 2 and 4, respectively.
- The graphs for feature extraction show significant fluctuations across languages, whereas the results for fine-tuning vary greatly with changes to the model. To determine the extent of the variation, we can consolidate the metrics by removing either the grouping by language (color) or model (stroke), respectively. In this case, we will maintain the grouping by model name to examine the variation of each model for a given technique.
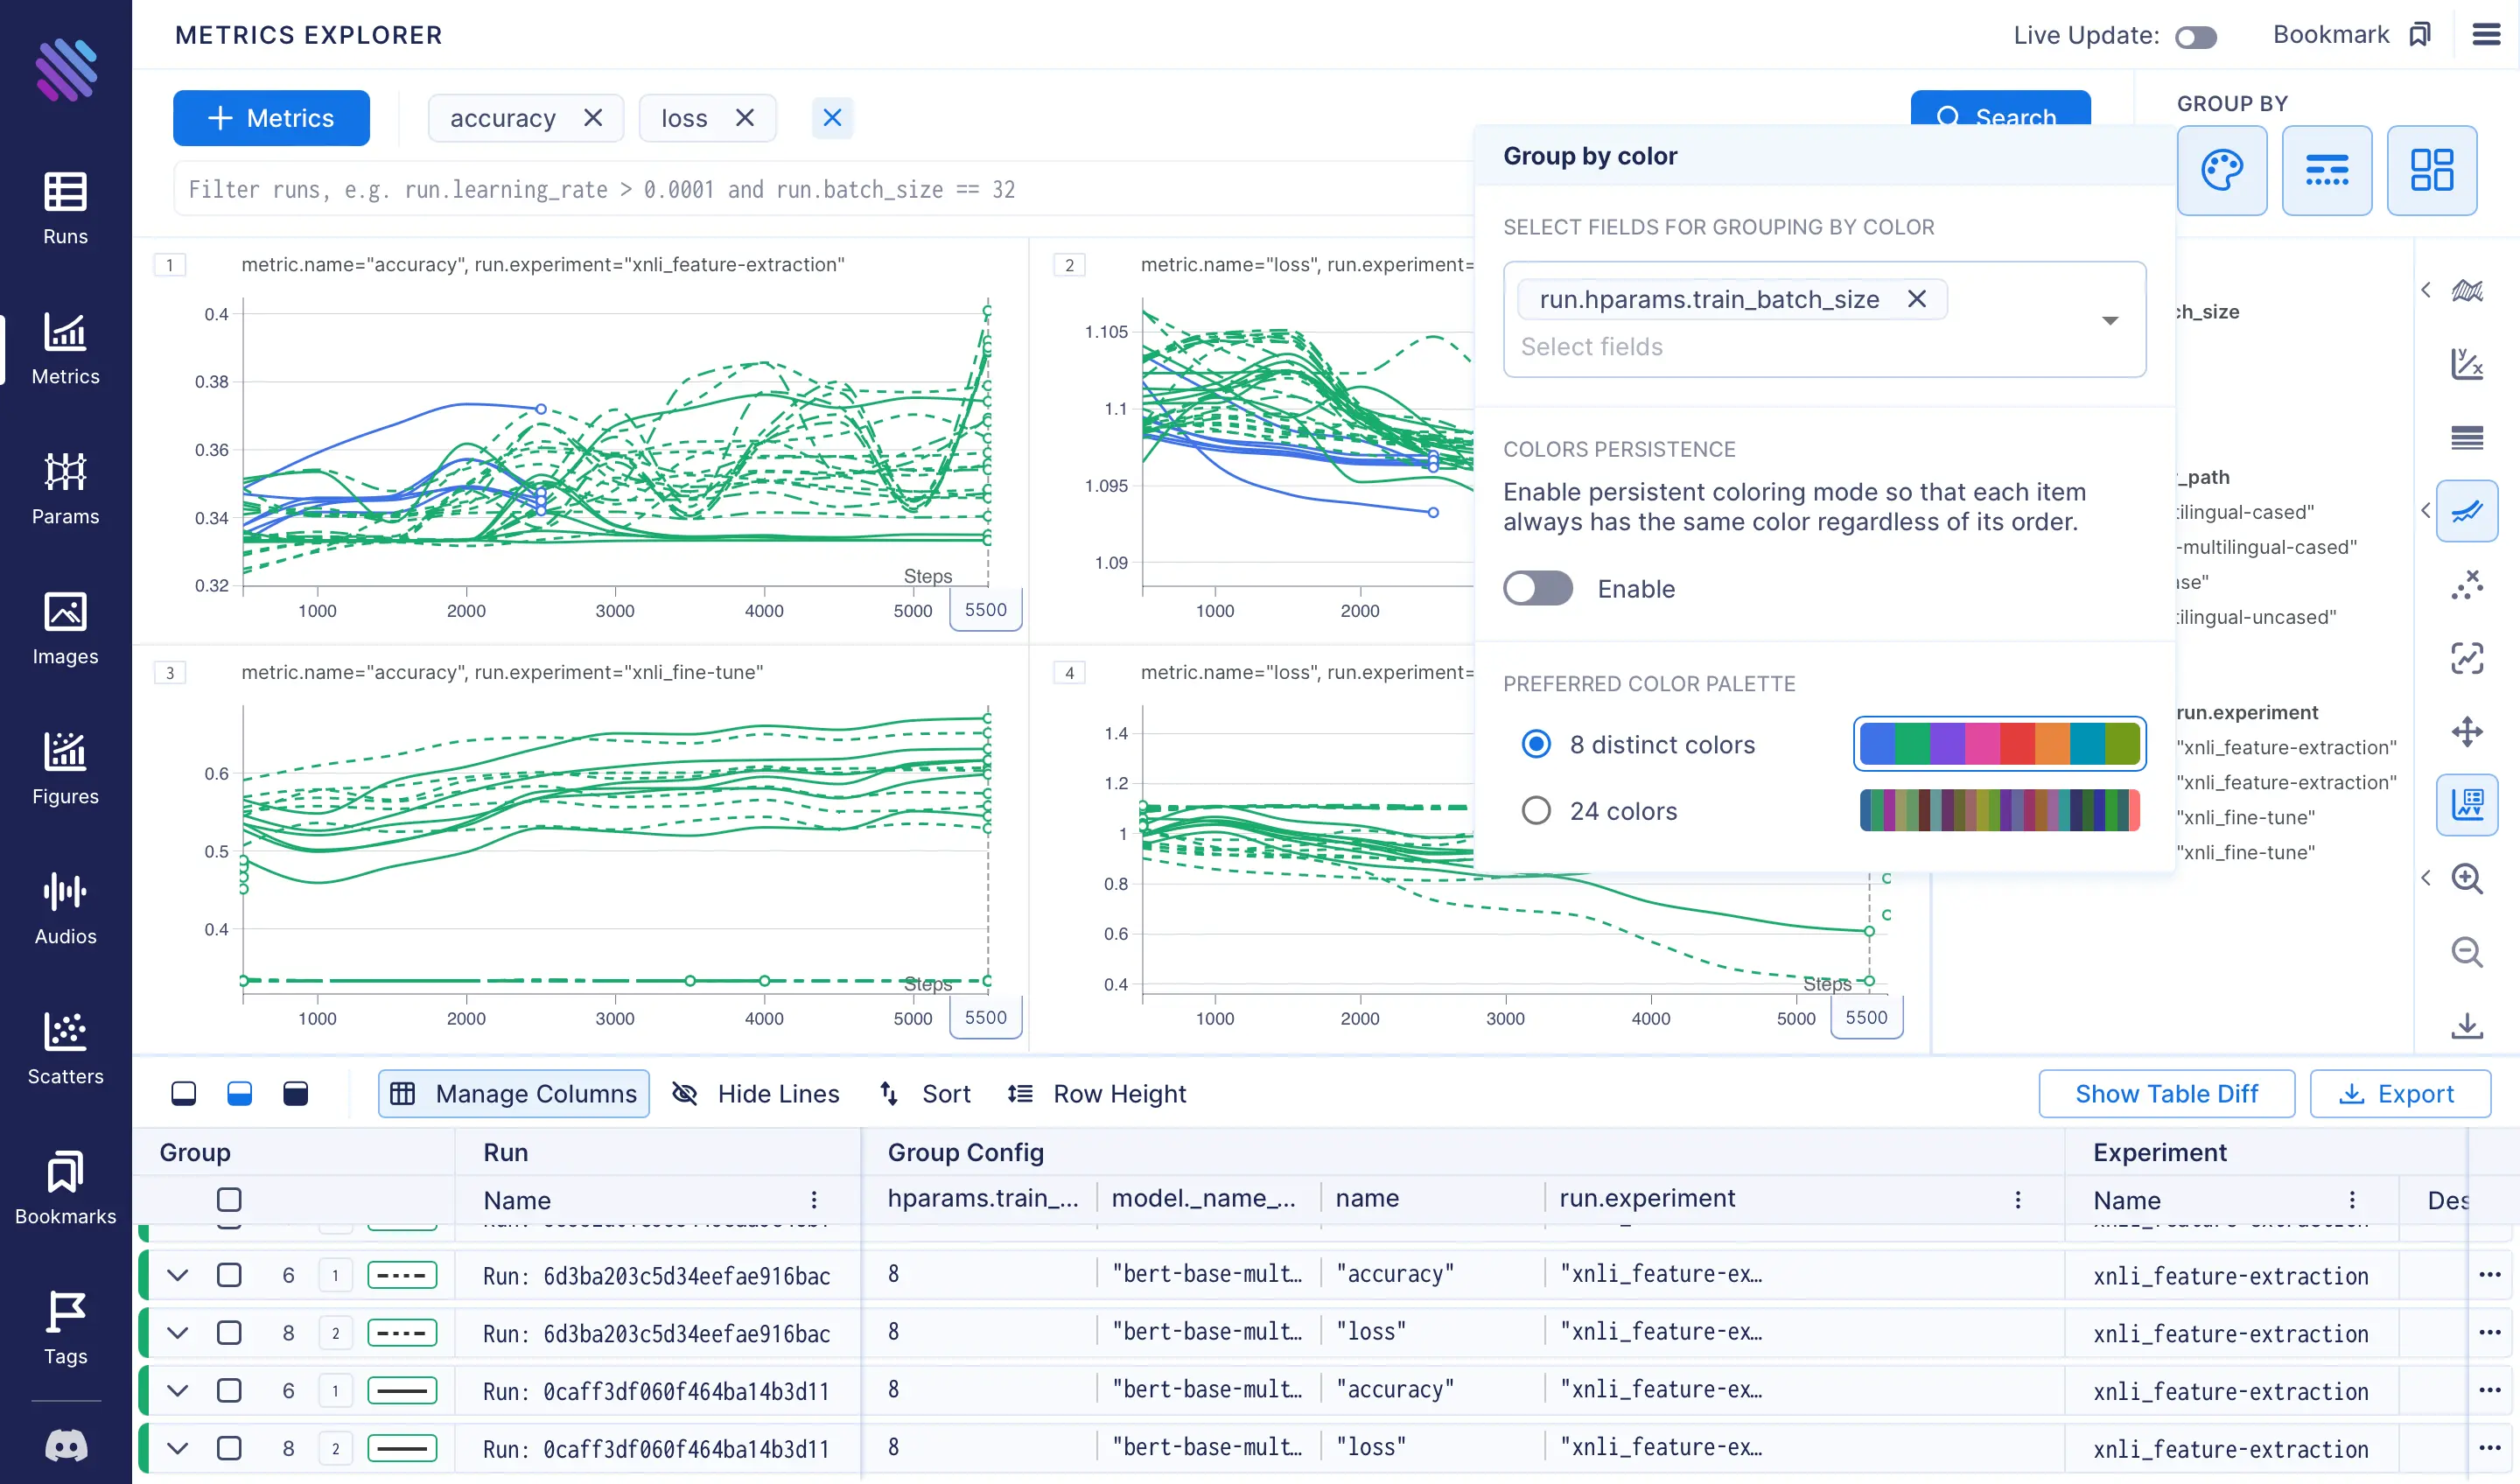
- Even though we have only trained a single model with a larger batch size (16, instead of the default 8), it is still valuable to examine the trend. To accomplish this, we will eliminate the grouping by model name and group only by
train_batch_size. As we can observe, after only 2500 steps, there is a trend of decreasing loss and increasing accuracy at a quicker pace. Thus, it is worth considering training with larger batch sizes.
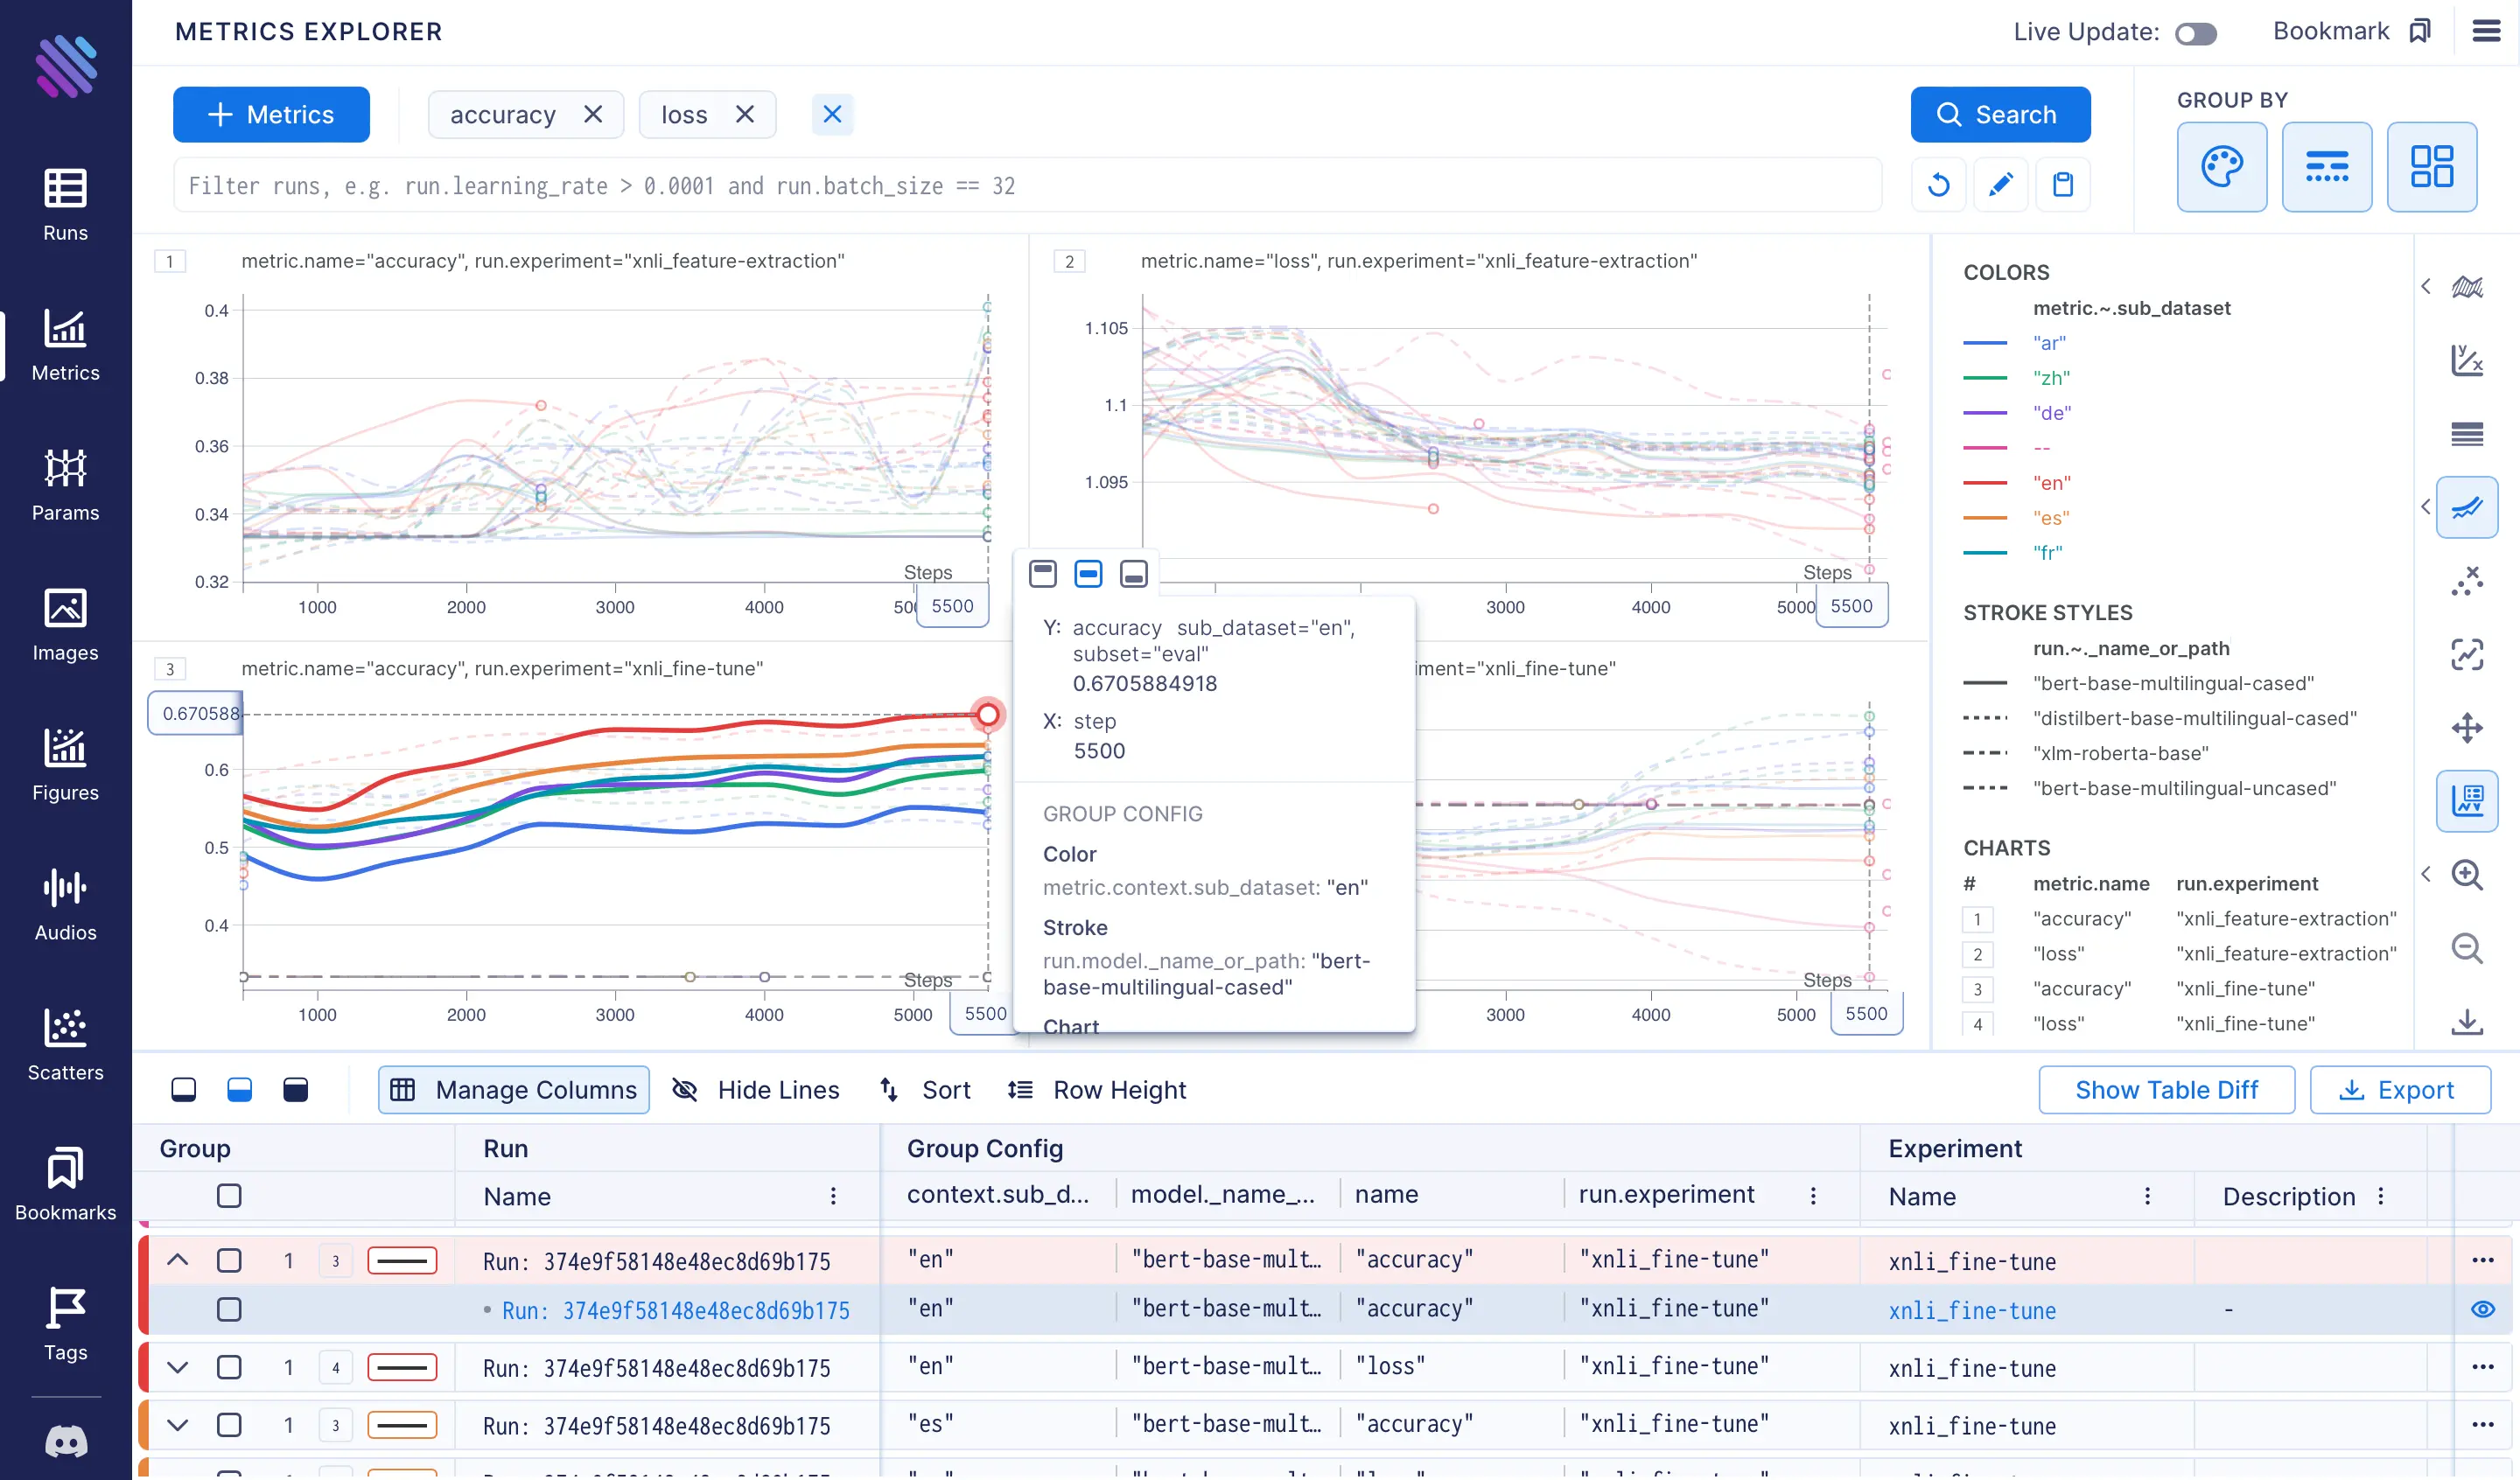
- The charts unmistakably show that the
bert-base-multilingual-casedmodel achieved the best accuracy results, with the highest score observed for theensubset, as the model was trained on that subset. Subsequently,es,fr,de,zh, andarfollowed. Unsurprisingly the scores for thezhandardatasets were lower, given that they belong to distinct linguistic families and possess unique syntax.
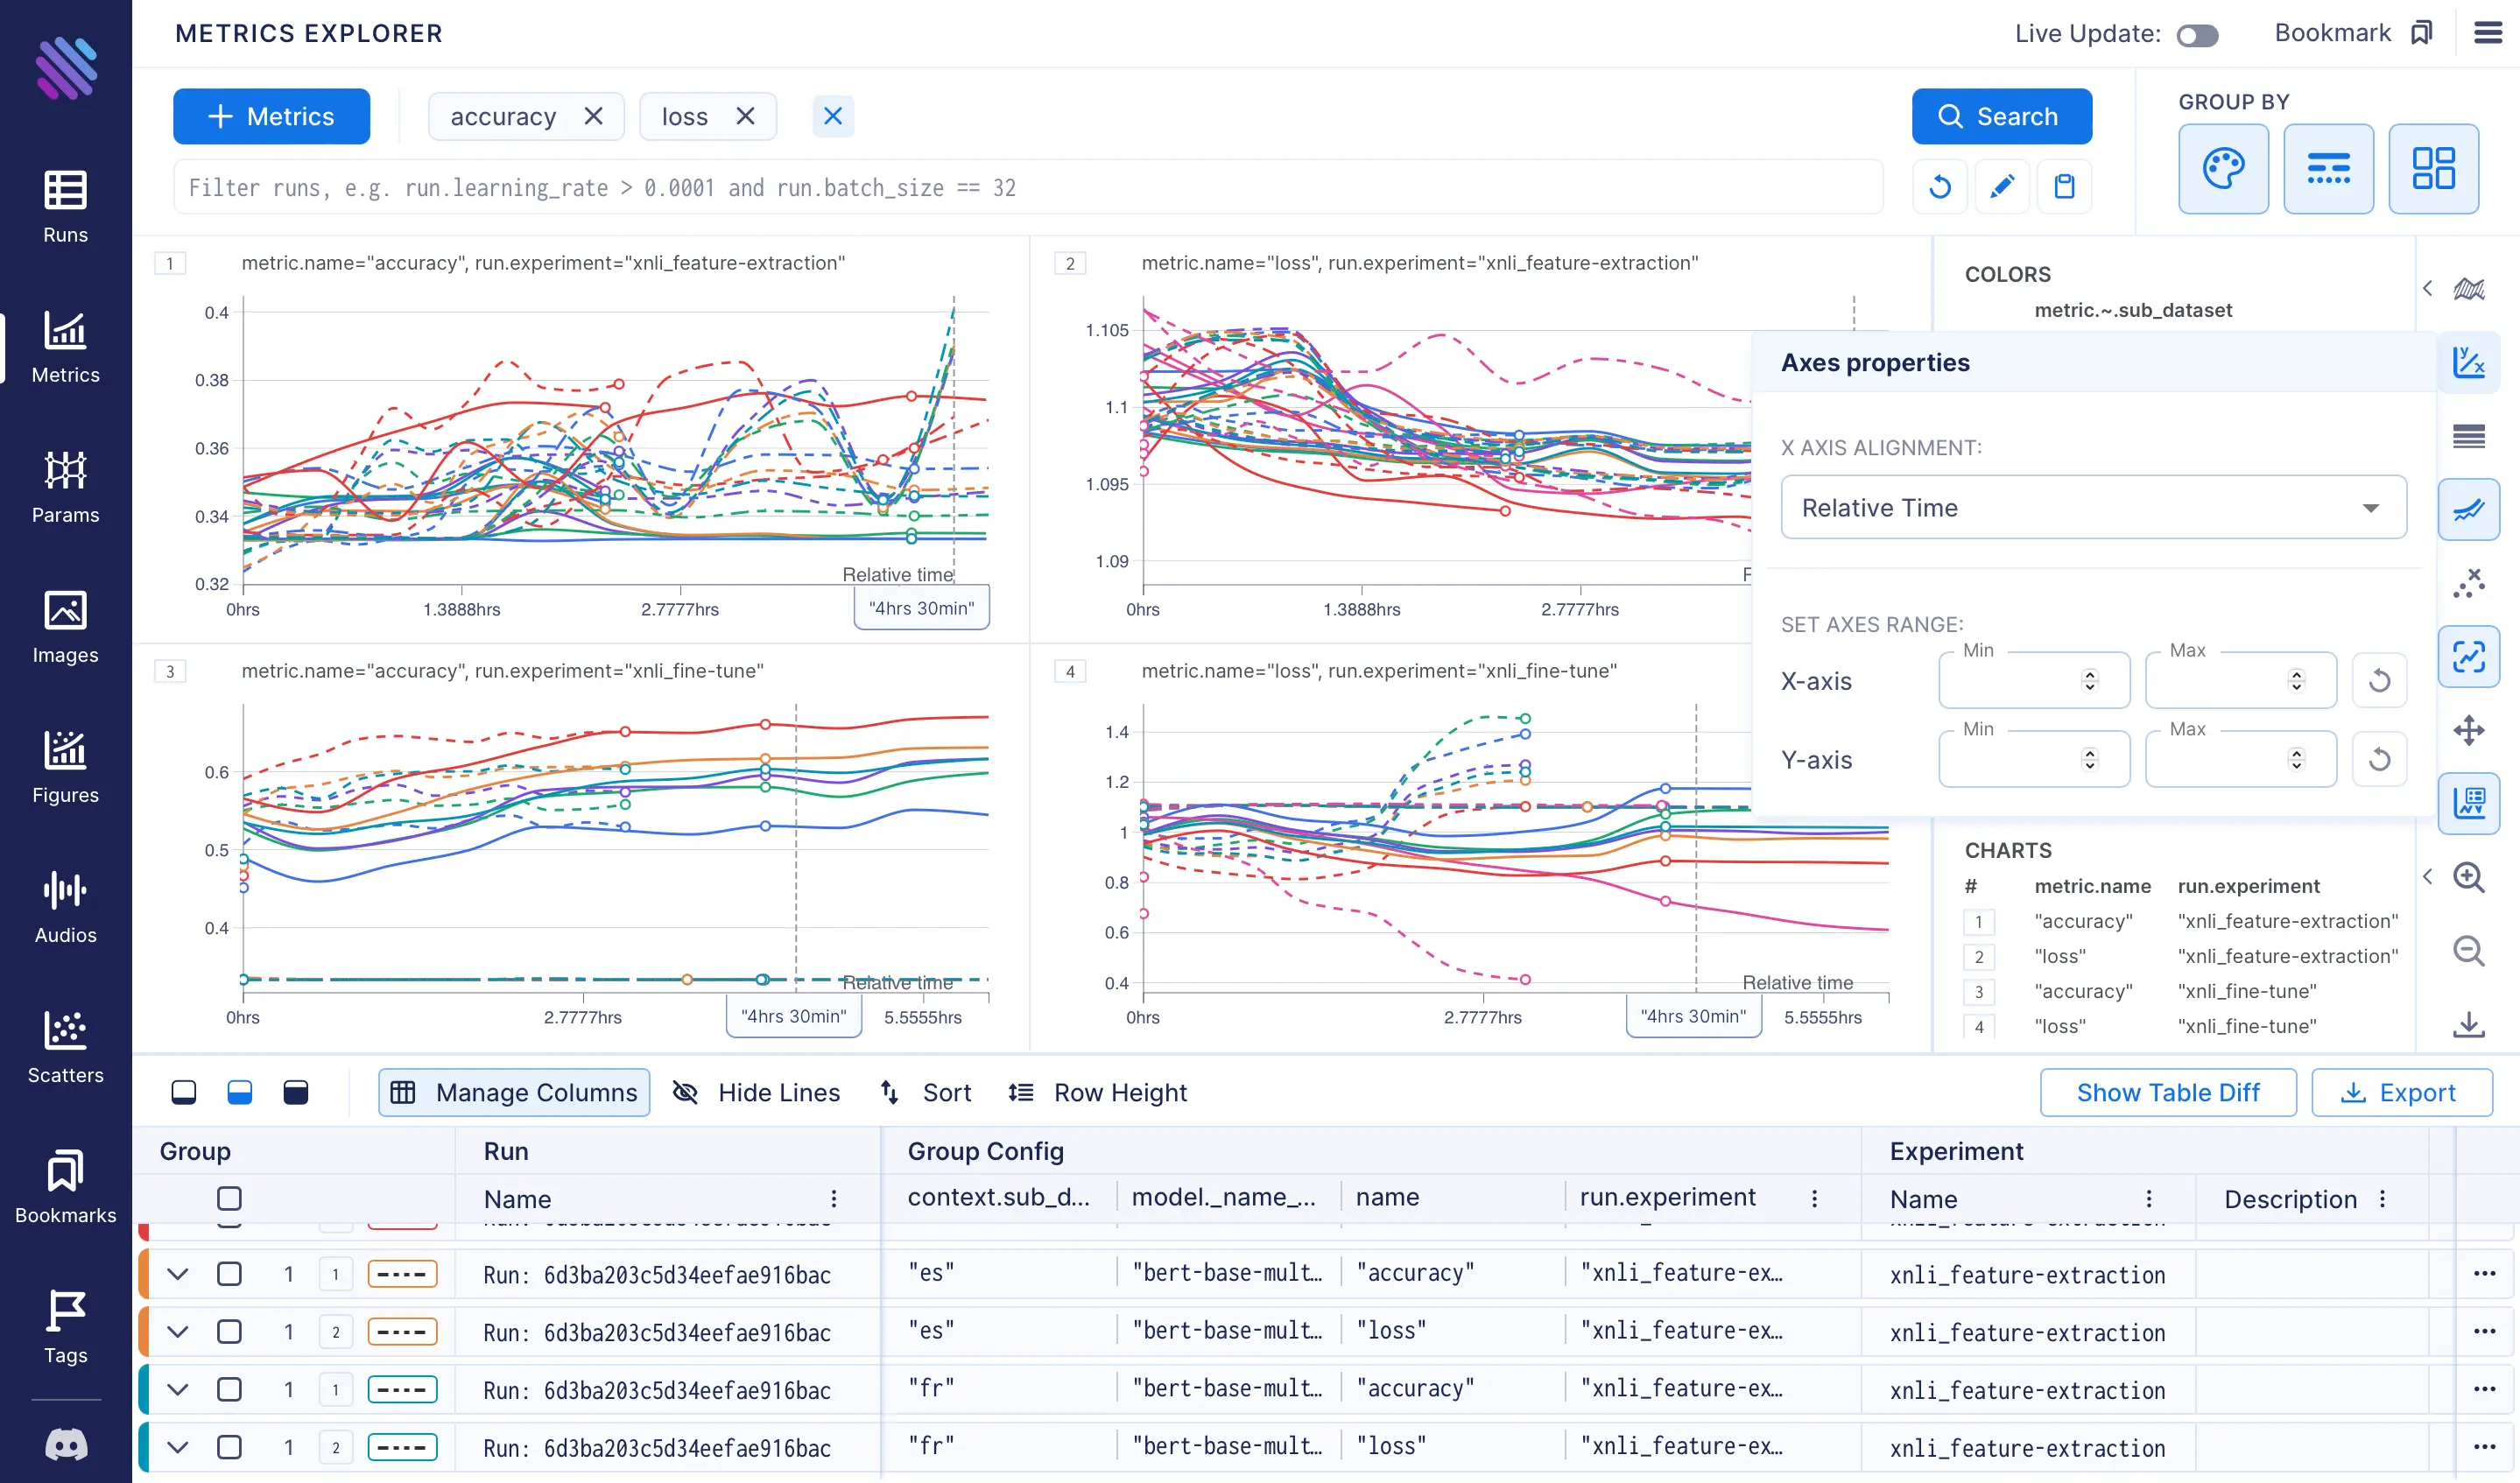
- Let us examine the training times and efficiencies. By setting the x-axis to align with relative time rather than default steps, we observe that the final tracking point of the fine-tuning technique took almost 25% more time to complete compared to the feature-extraction technique.
One can continue analysis further after training with bigger batch sizes and more variations of the learning rate, models, etc. The Parameter Explorer will then lend its aid in presenting intricate, multi-layered data in a visually appealing, multi-dimensional format. To demonstrate how the Parameter Explorer works, let’s pick the following parameters: train_batch_size, learning_rate,_name_or_path, loss, and the accuracies of sub_datasets. The following chart will be observed after clicking the Search button. From here we can see that the run which resulted in the highest accuracies for all subsets has a final loss value equal to 0.6, uses the bert-base-multilingual-cased model, with 5·10⁻⁵ learning_rate and the batch_size is 8.
Taking into account the aforementioned insights, we can move forward with future experiments. It is worth noting that while fine-tuning results improved accuracy scores, it requires a slightly longer training time. Increasing the batch size and training for longer steps/epochs is expected to further enhance the results. Furthermore, fine-tuning other hyperparameters such as the learning rate, weight decay, and dropout will make the experiments set more diverse and may lead to even better outcomes.
Conclusion
This blog post demonstrates how to solve an NLP task, namely zero-shot cross-lingual transfer while tracking your run metrics and hyperparameters with MLflow and then utilizing Aim’s powerful user interface to obtain valuable insights from the experiments.
We also showcased how to use the aimlfow which has piqued user interest as a tool that seamlessly integrates the experiment tracking user interface of Aim with MLflow logs.