
Discover seamless tracking and exploration of your PyTorch Lightning experiments with AimOS callback handler. Store all the metadata of your experiments and track the corresponding metrics. This article provides a straightforward walkthrough of how it works with a practical example, focusing on integrating PyTorch Lightning into AimOS.
Introduction
AimOS, through its seamless integration, meticulously tracks all your hyperparameters and metrics for PyTorch Lightning experiments. To see this work, let's dive into an example script to witness the synergy between AimOS and your PyTorch Lightning experiments.
AimOS 🔍 — An easy-to-use modular observability for AI Systems. Extensible, scalable and modular.
Running a Sample Training with PyTorch Lightning: A Step-by-Step Guide
Let's take a look at a practical example using a script to train a simple NN for image classification on MNIST dataset.
Setting the Stage
Before diving into the script, ensure that AimOS is installed. If not, simply run: `pip3 install aimos`
1. Importing Required Modules
Start by importing the necessary modules.
import os

import lightning.pytorch as pl
import torch
from aimstack.experiment_tracker.pytorch_lightning import Logger as AimLogger
from torch import nn, optim, utils
from torch.nn import functional as F
from torchmetrics import Accuracy
from torchvision.datasets import MNIST
from torchvision.transforms import ToTensor
2. Preparing the Dataset and the DataLoaders
Download the training and test subsets of the MNIST dataset and load it, after which do random split of the training set dividing it into training and the validation sets. Afterwards, simply define the DataLoaders with large batch sizes and multiple workers to speed up the process.
dataset = MNIST(os.getcwd(), train=True, download=True, transform=ToTensor())
train_dataset, val_dataset = utils.data.random_split(dataset, [55000, 5000])
test_dataset = MNIST(os.getcwd(), train=False, download=True, transform=ToTensor())

train_loader = utils.data.DataLoader(train_dataset, num_workers=2, batch_size=256)
val_loader = utils.data.DataLoader(val_dataset, num_workers=2, batch_size=256)
test_loader = utils.data.DataLoader(test_dataset, num_workers=2, batch_size=256)
3. Instantiate the Model
Let's create a PyTorch Lightning module that will contain the model and the logic for performing forward passes through the model during training, validation, and testing. We will also configure the optimizer within the module.
class LitModule(pl.LightningModule):
    def __init__(self, hidden_size=64, lr=5e-3):
        super().__init__()
        self.hidden_size = hidden_size
        self.lr = lr
        self.num_classes = 10
        self.dims = (1, 28, 28)
        channels, width, height = self.dims

        self.model = nn.Sequential(
            nn.Flatten(),
            nn.Linear(channels * width * height, hidden_size),
            nn.ReLU(),
            nn.Dropout(0.1),
            nn.Linear(hidden_size, hidden_size),
            nn.ReLU(),
            nn.Dropout(0.1),
            nn.Linear(hidden_size, self.num_classes),
        )

        self.accuracy = Accuracy(task="multiclass", num_classes=self.num_classes)

    def forward(self, x):
        x = self.model(x)
        return F.log_softmax(x, dim=1)

    def training_step(self, batch, batch_idx):
        x, y = batch
        logits = self(x)
        loss = F.nll_loss(logits, y)
        self.log("train_loss", loss)

        return loss

    def validation_step(self, batch, batch_idx):
        x, y = batch
        logits = self(x)
        loss = F.nll_loss(logits, y)
        preds = torch.argmax(logits, dim=1)
        self.accuracy(preds, y)

        self.log("val_loss", loss, prog_bar=True)
        self.log("val_acc", self.accuracy, prog_bar=True)

        return loss

    def test_step(self, batch, batch_idx):
        x, y = batch
        logits = self(x)
        loss = F.nll_loss(logits, y)
        preds = torch.argmax(logits, dim=1)
        self.accuracy(preds, y)

        self.log("test_loss", loss, prog_bar=True)
        self.log("test_acc", self.accuracy, prog_bar=True)

        return loss

    def configure_optimizers(self):
        optimizer = optim.Adam(self.parameters(), lr=self.lr)
        return optimizer
To log metrics and the loss, we will use the self.log method provided by the PyTorch Lightning module. Simply provide the name of the metric and the corresponding value to track. For validation and test steps we will also calculate the multi-class accuracy and track it in their respective contexts.
4. Initialize AimOS Callback
Initialize the AimOS callback by providing the experiment name.
aim_logger = AimLogger(
    experiment_name="example_experiment"
)
Make sure that your AimOS server is active and running. If it is not, use the following command to start it up. By default, it should be on port 53800.
aimos server5. Training
Instantiate the module we created recently, set the learning rate of the experiment as we will run experiments with different learning rates. After which simply define the trainer and let the training begin. 🚀
model = LitModule(lr=lr)
aim_logger.experiment.set("lr", lr, strict=False)

trainer = pl.Trainer(accelerator="gpu", devices=1, max_epochs=5, logger=aim_logger)
trainer.fit(model=model, train_dataloaders=train_loader, val_dataloaders=val_loader)

trainer.test(dataloaders=test_loader)
Let’s use these learning rates to have more understanding about the learning curve of the task: [5e-1, 5e-2, 5e-3, 5e-4, 5e-5, 5e-6].
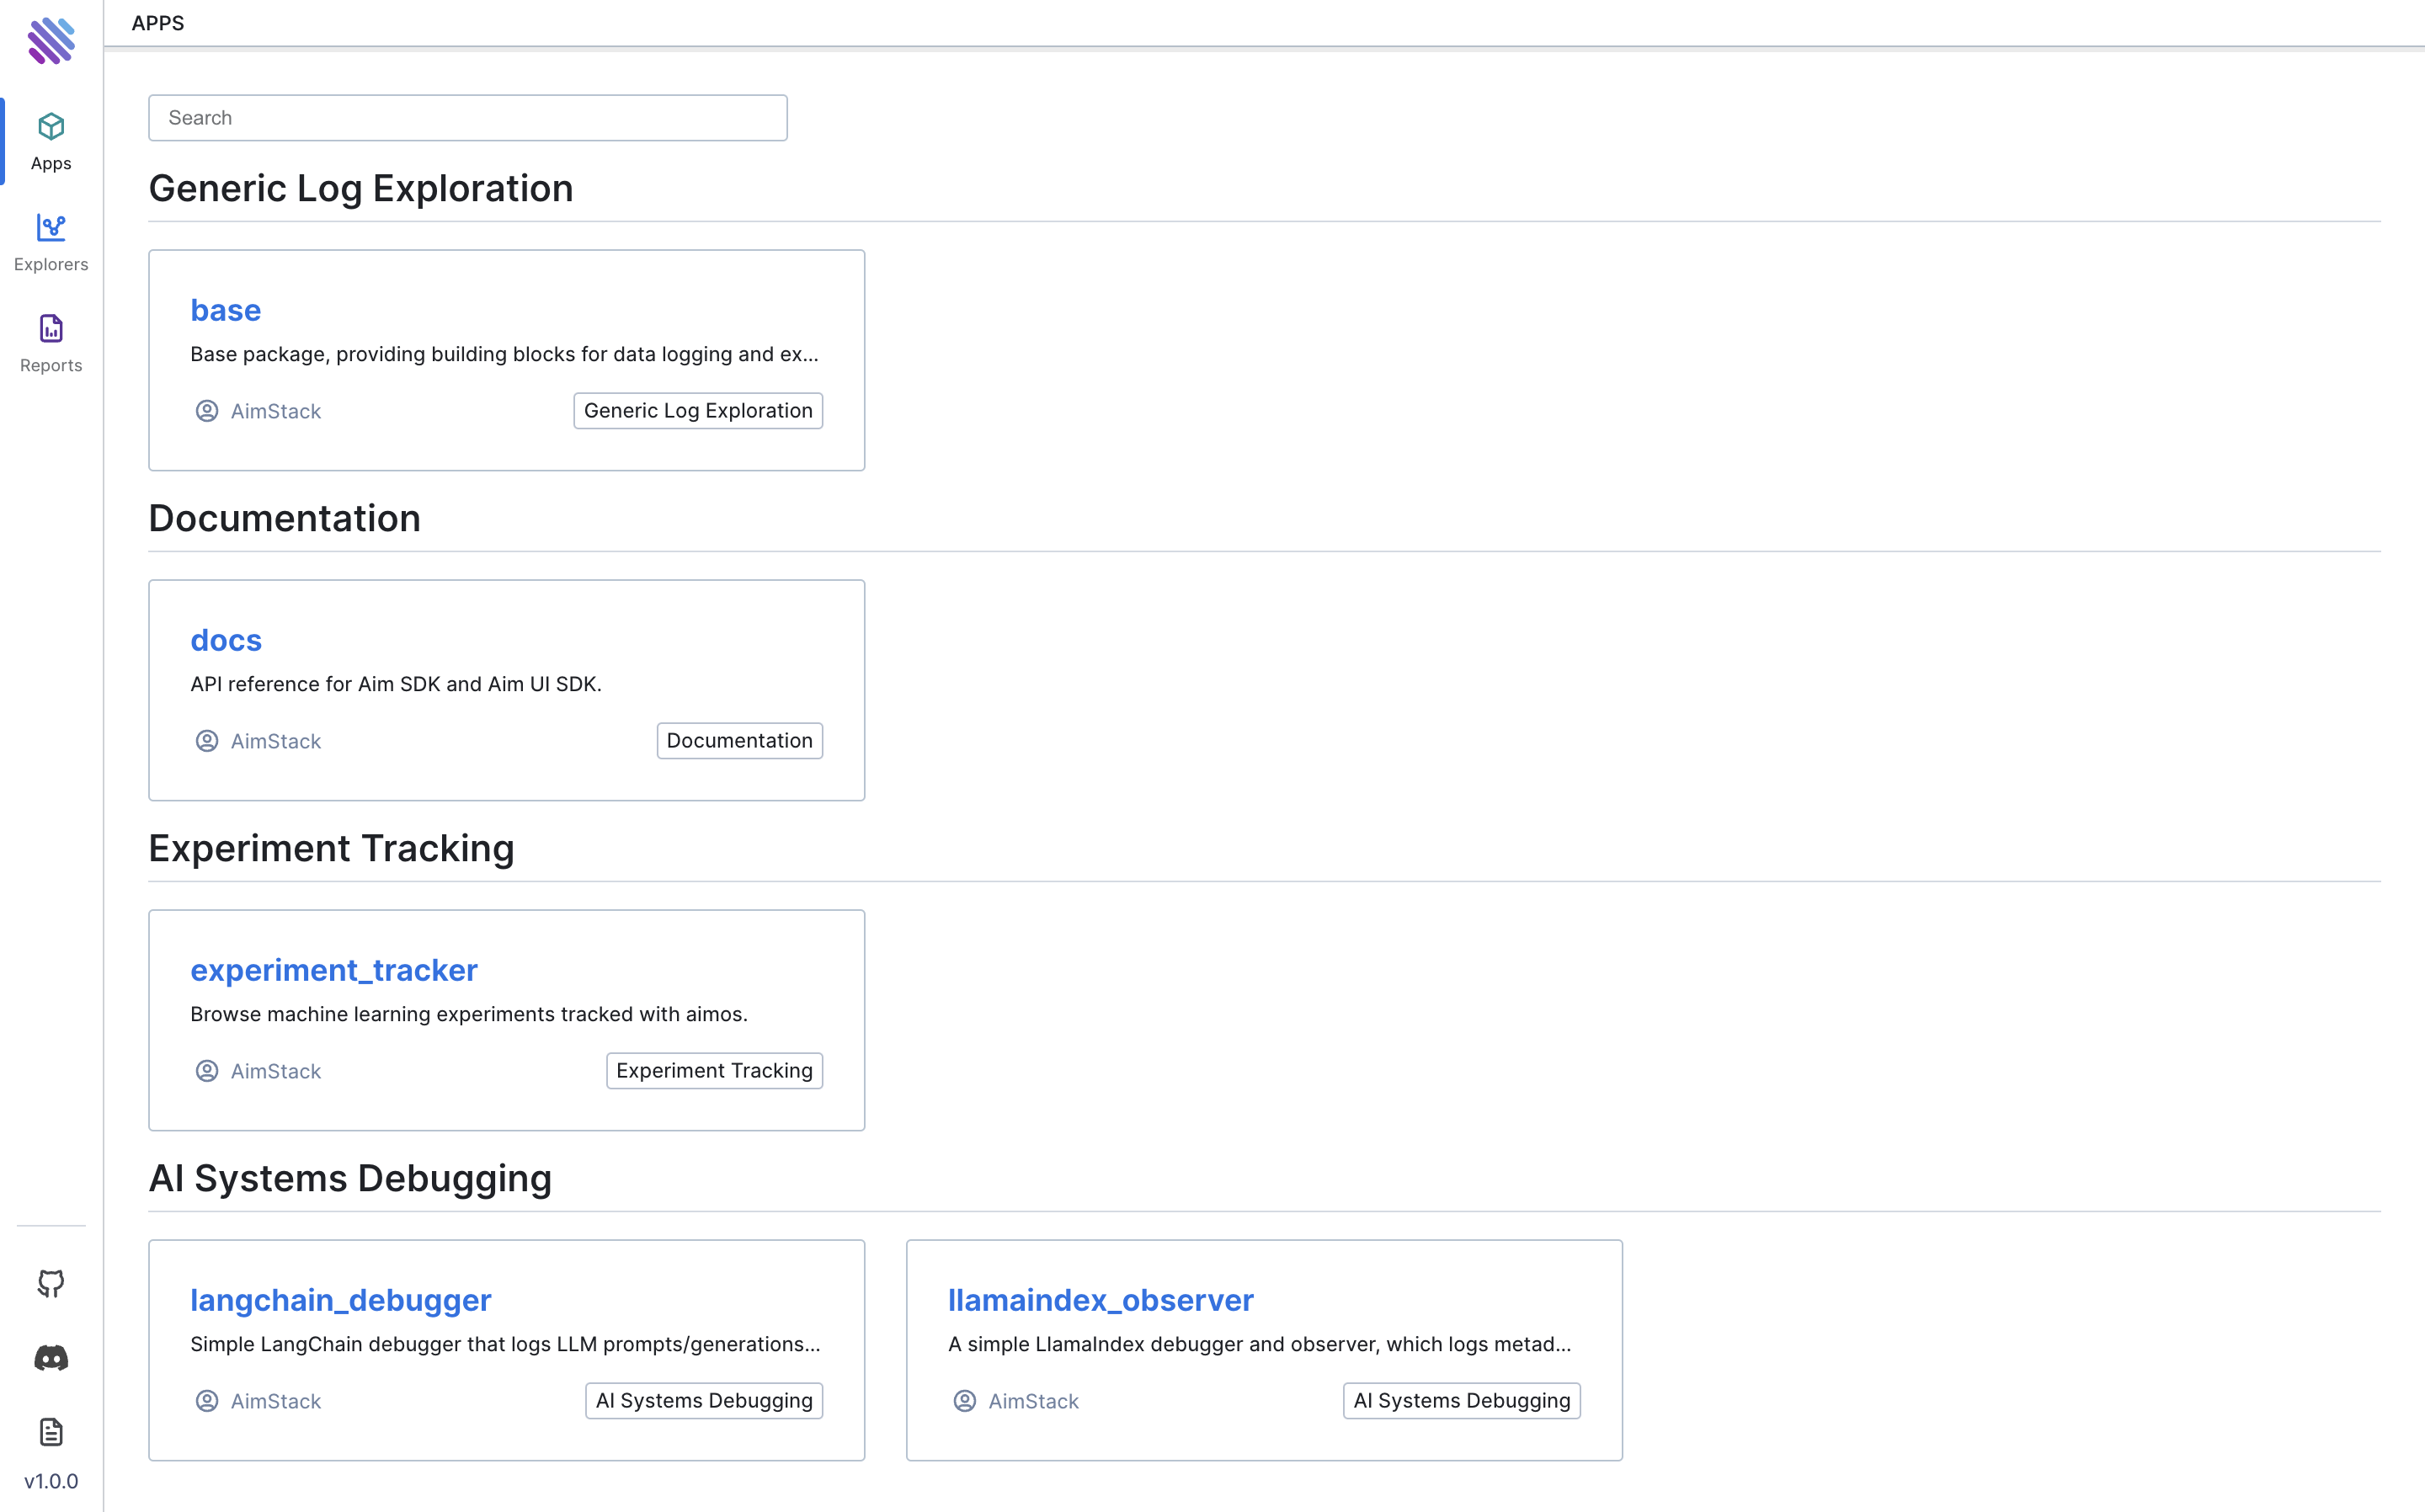
After completing these steps, you will successfully log all actions on AimOS. Now, run the AimOS UI to observe the tracked metadata. Navigate to the folder where the .aimrepository is initialized and execute:
aimos uiThis is the view you'll see after following the provided URL:
Interpreting Experiment Results
Now let’s dive into the UI and explore the wealth of information tracked by AimOS to gain insights about your PyTorch Lightning experiment. Navigate through the following sections for a comprehensive understanding of your experiment's performance.
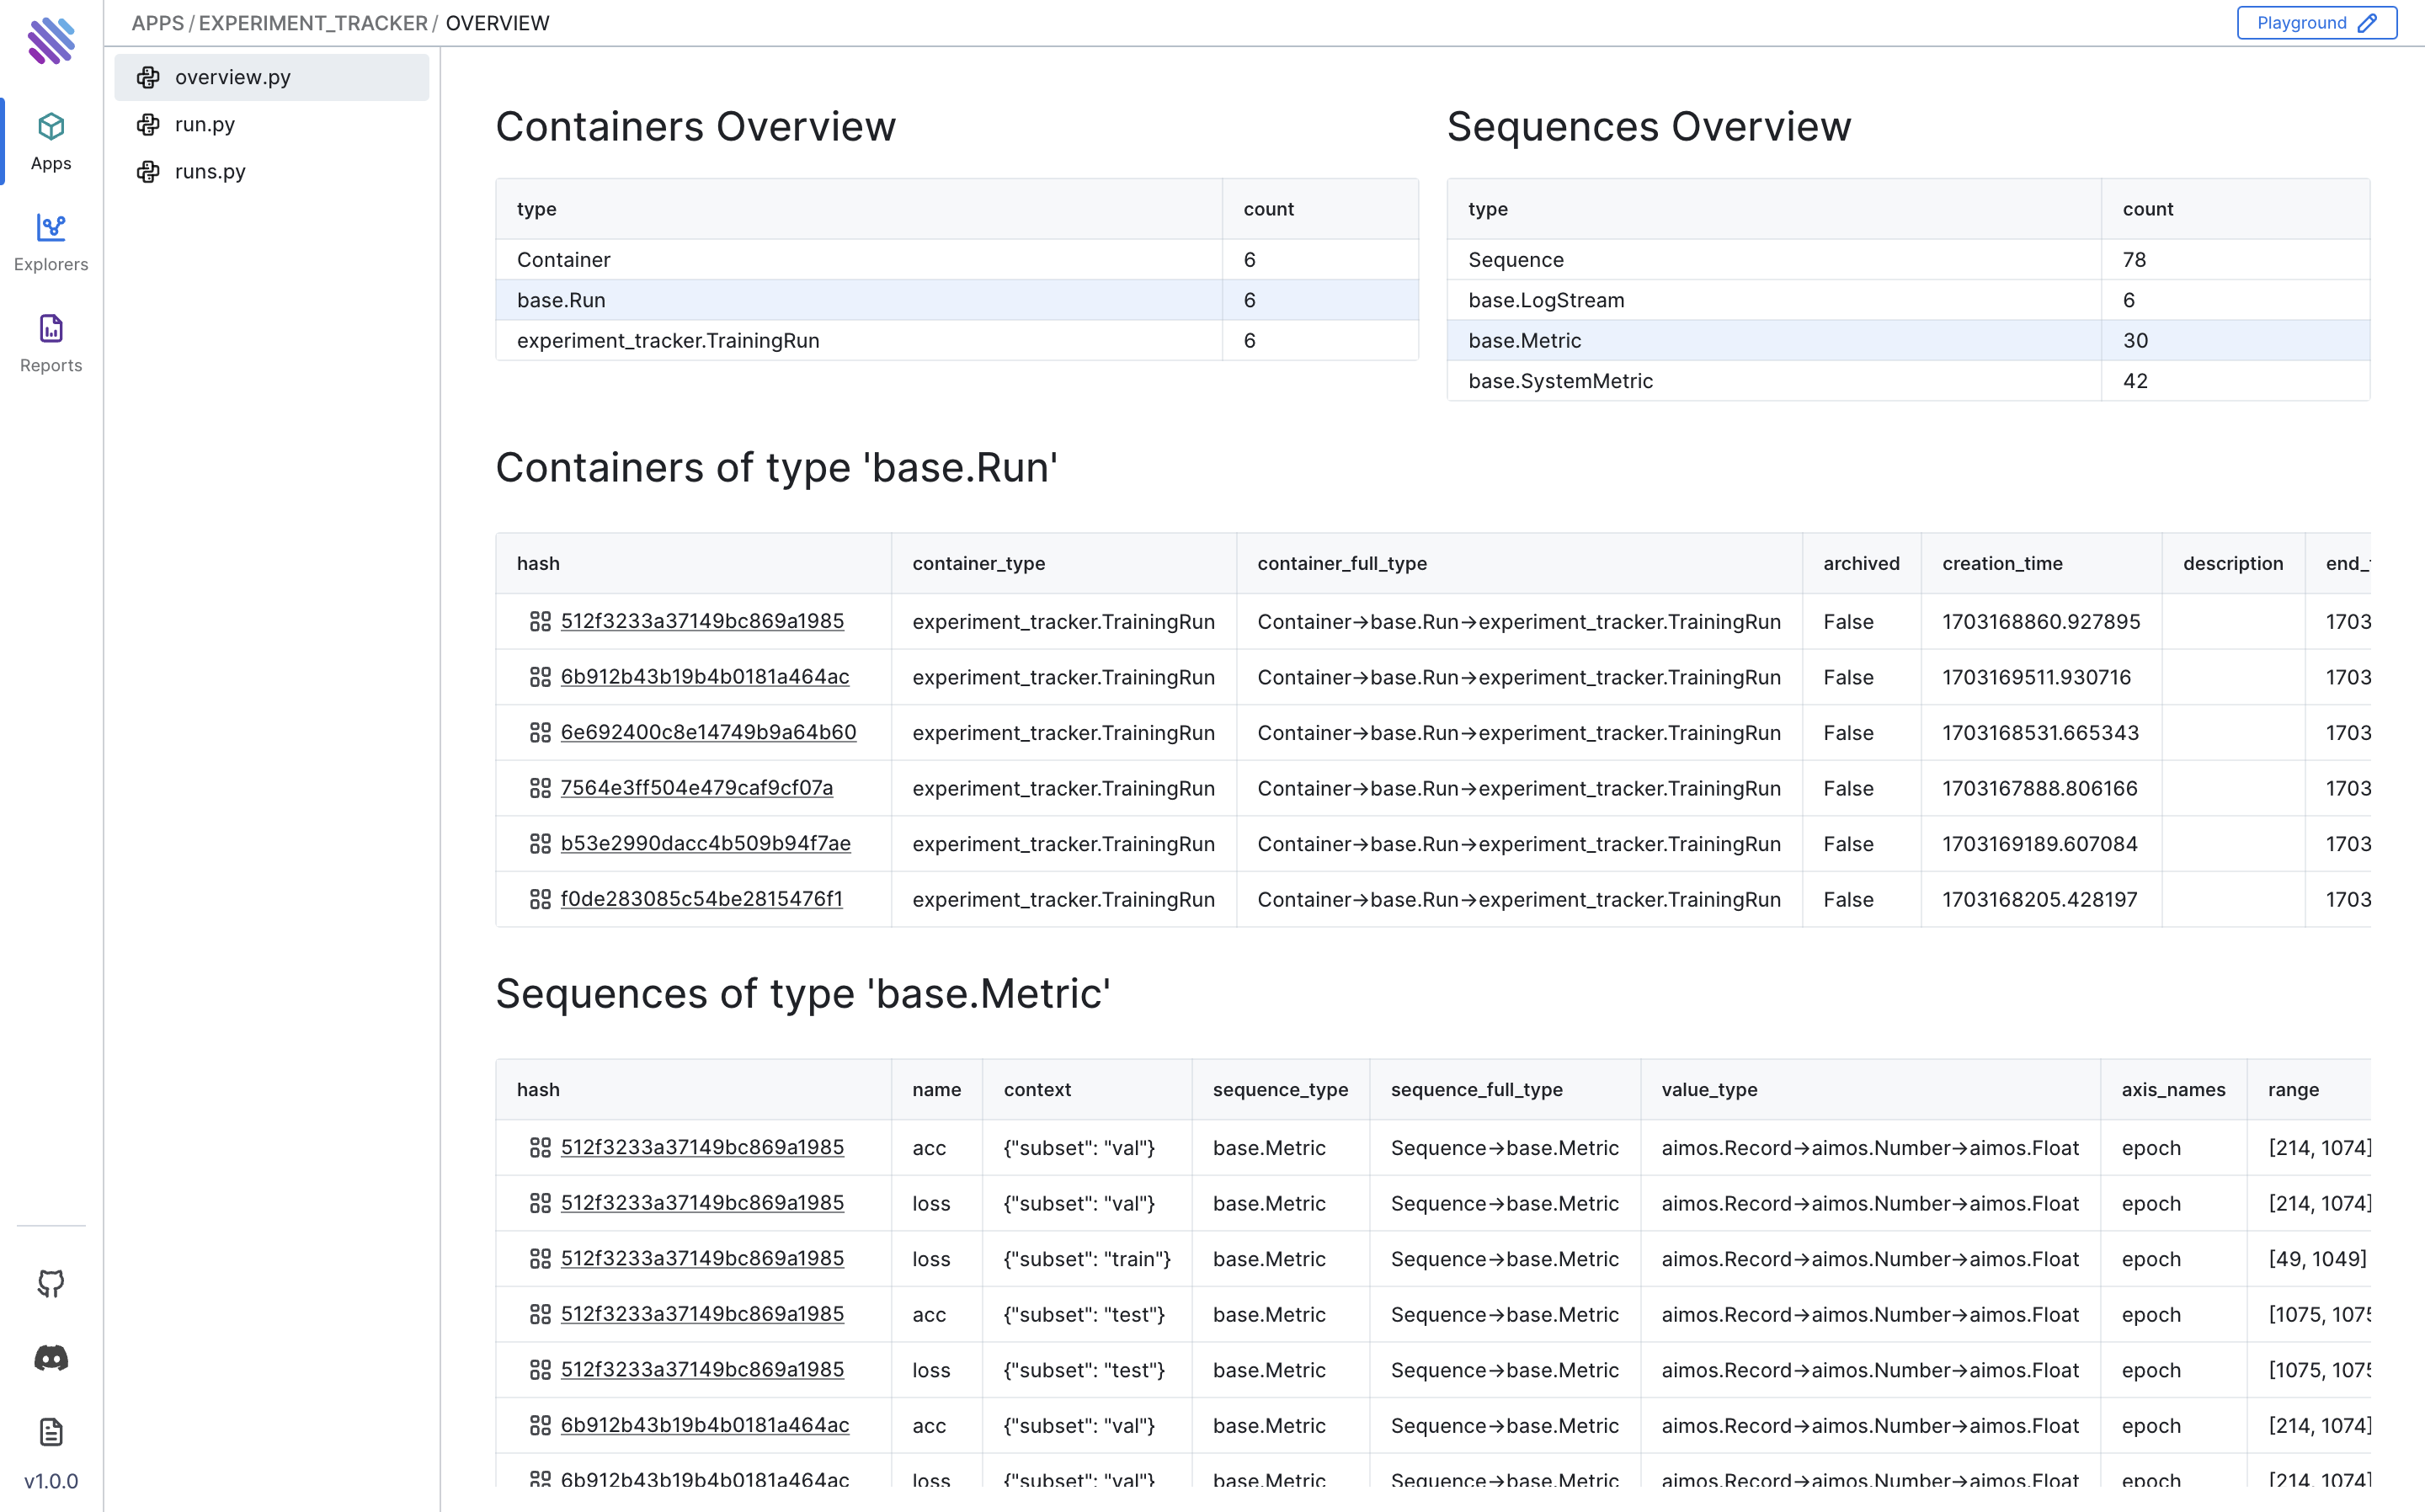
AimOS Overview Page
Head over to the AimOS Overview page to witness the containers and sequences overview tables of your PyTorch Lightning experiment. This page offers an abstract overview of the number of experiments, sequences, metrics, and system metrics tracked within your experiment.
AimOS Runs Page
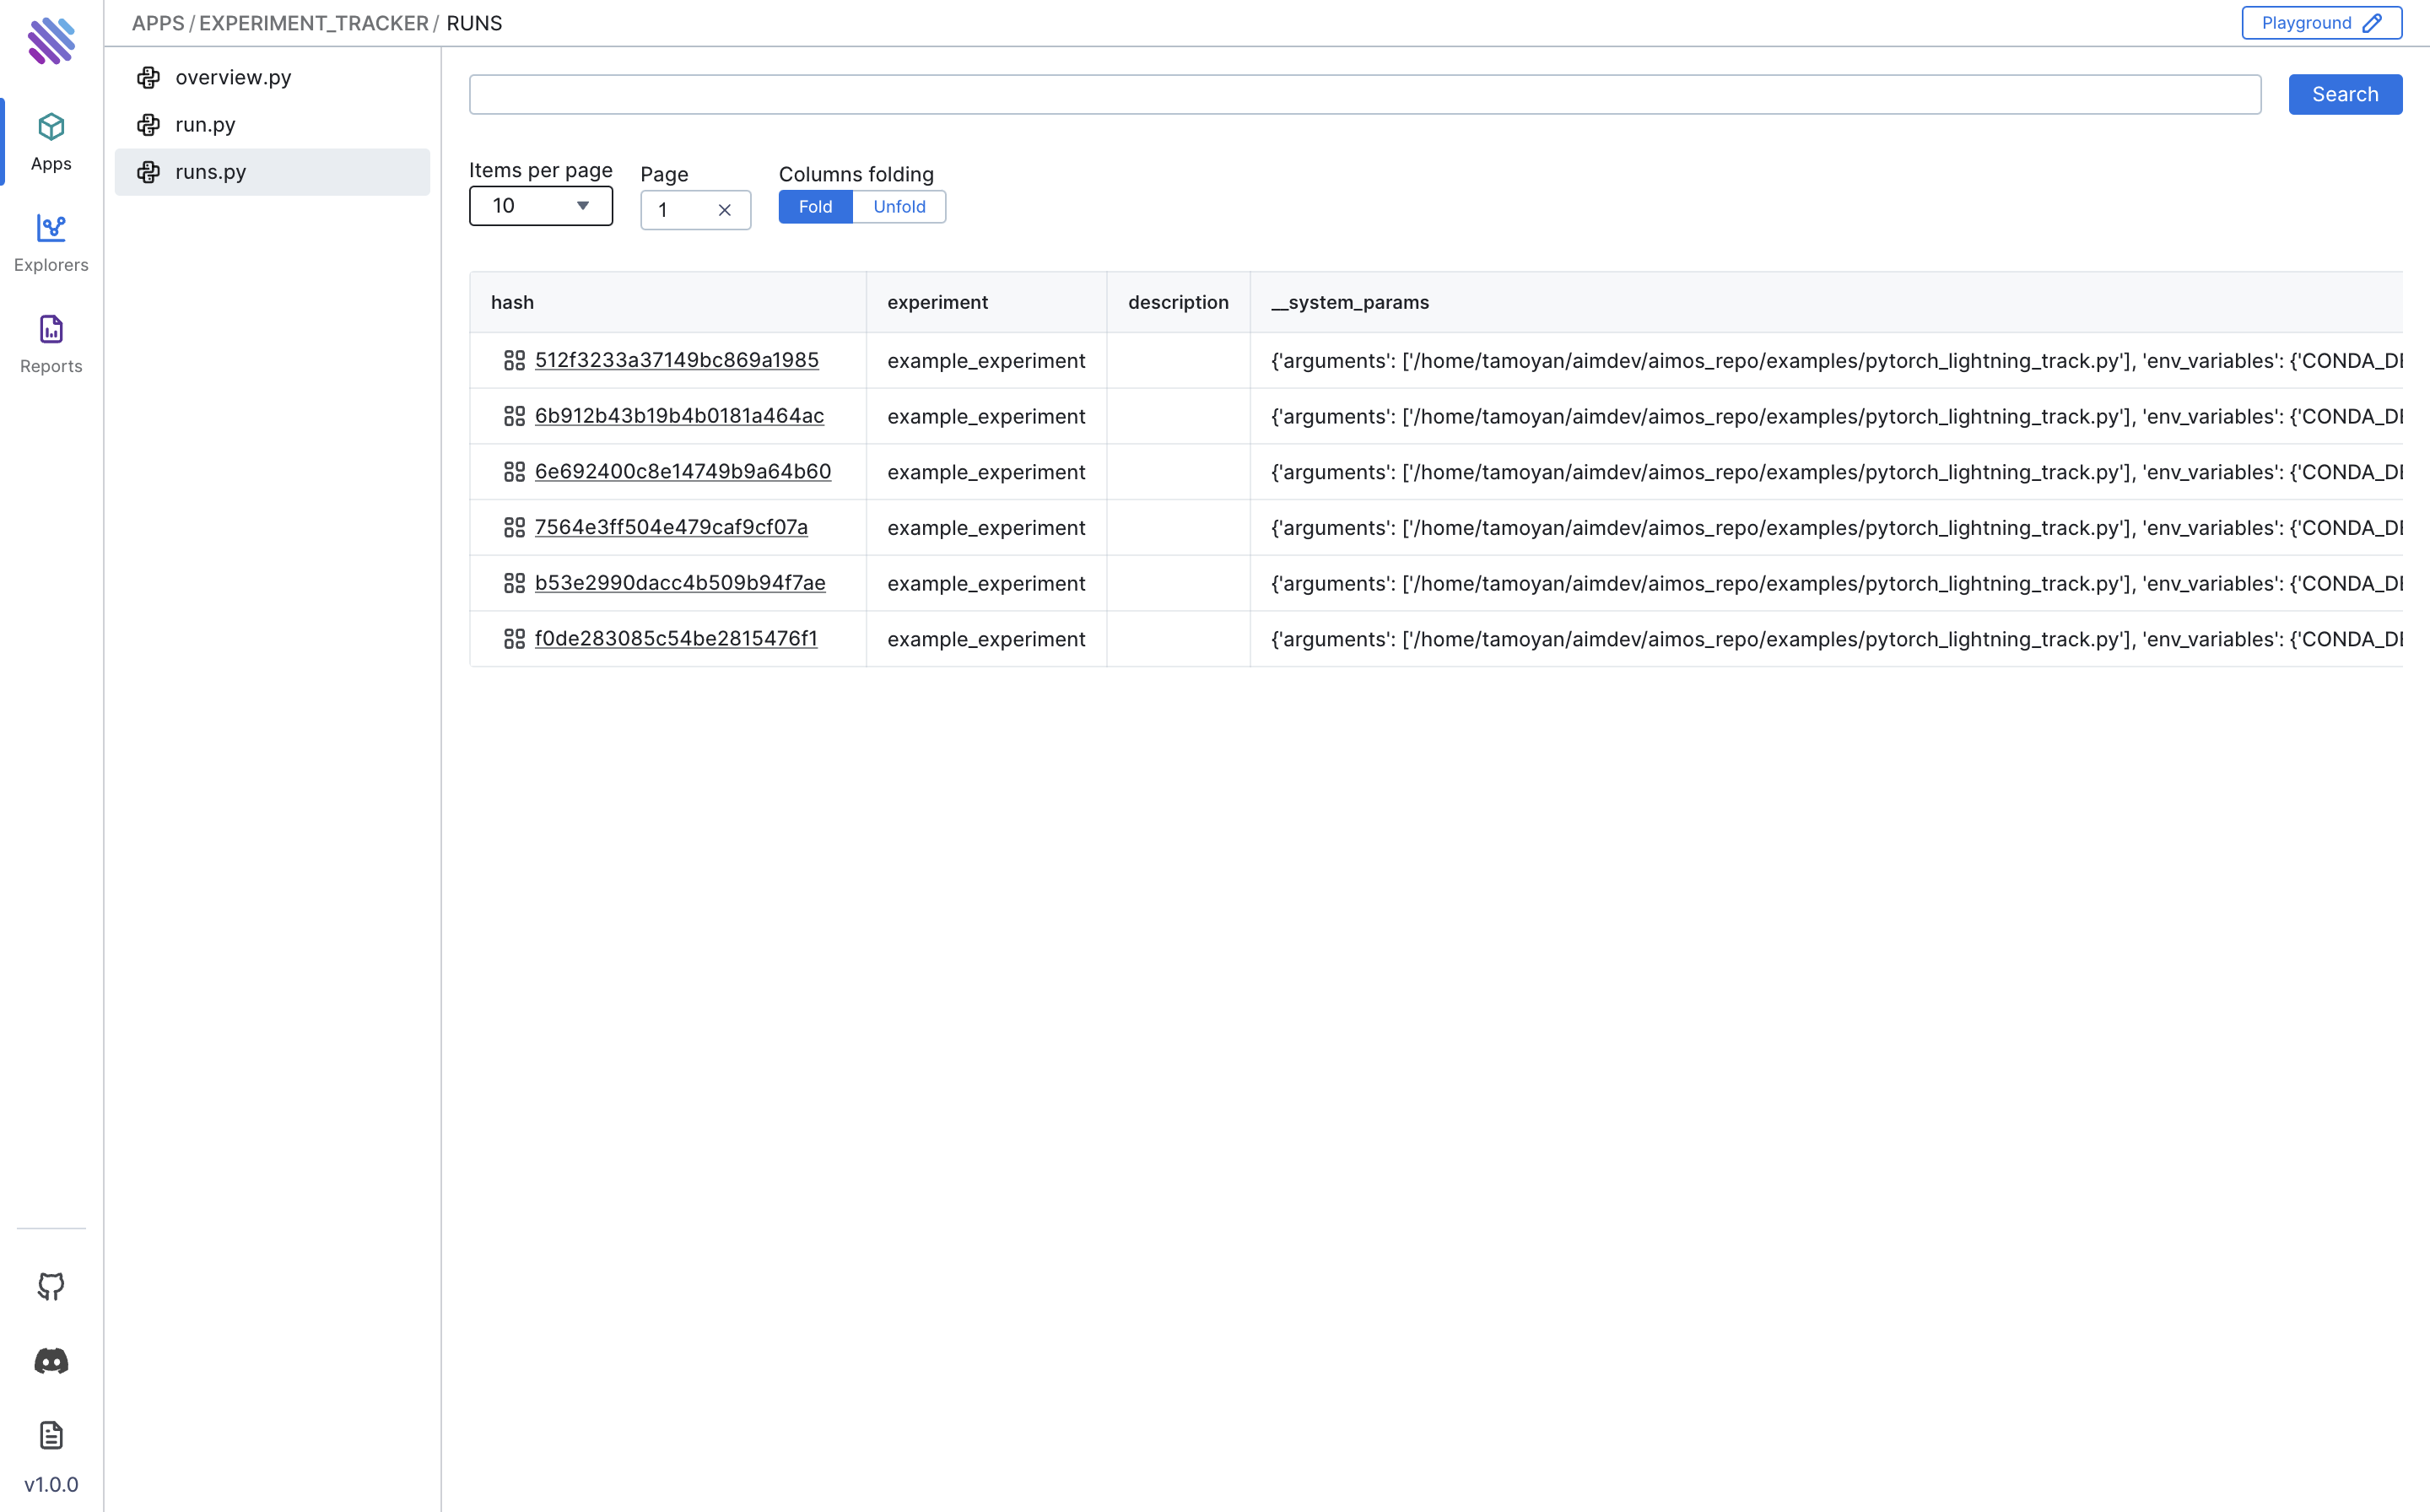
Visit the AimOS Runs page to view the table of all runs, containing basic information about the experiment. This includes hash system parameters, hyperparameters, and model configurations/information.
Run Overview
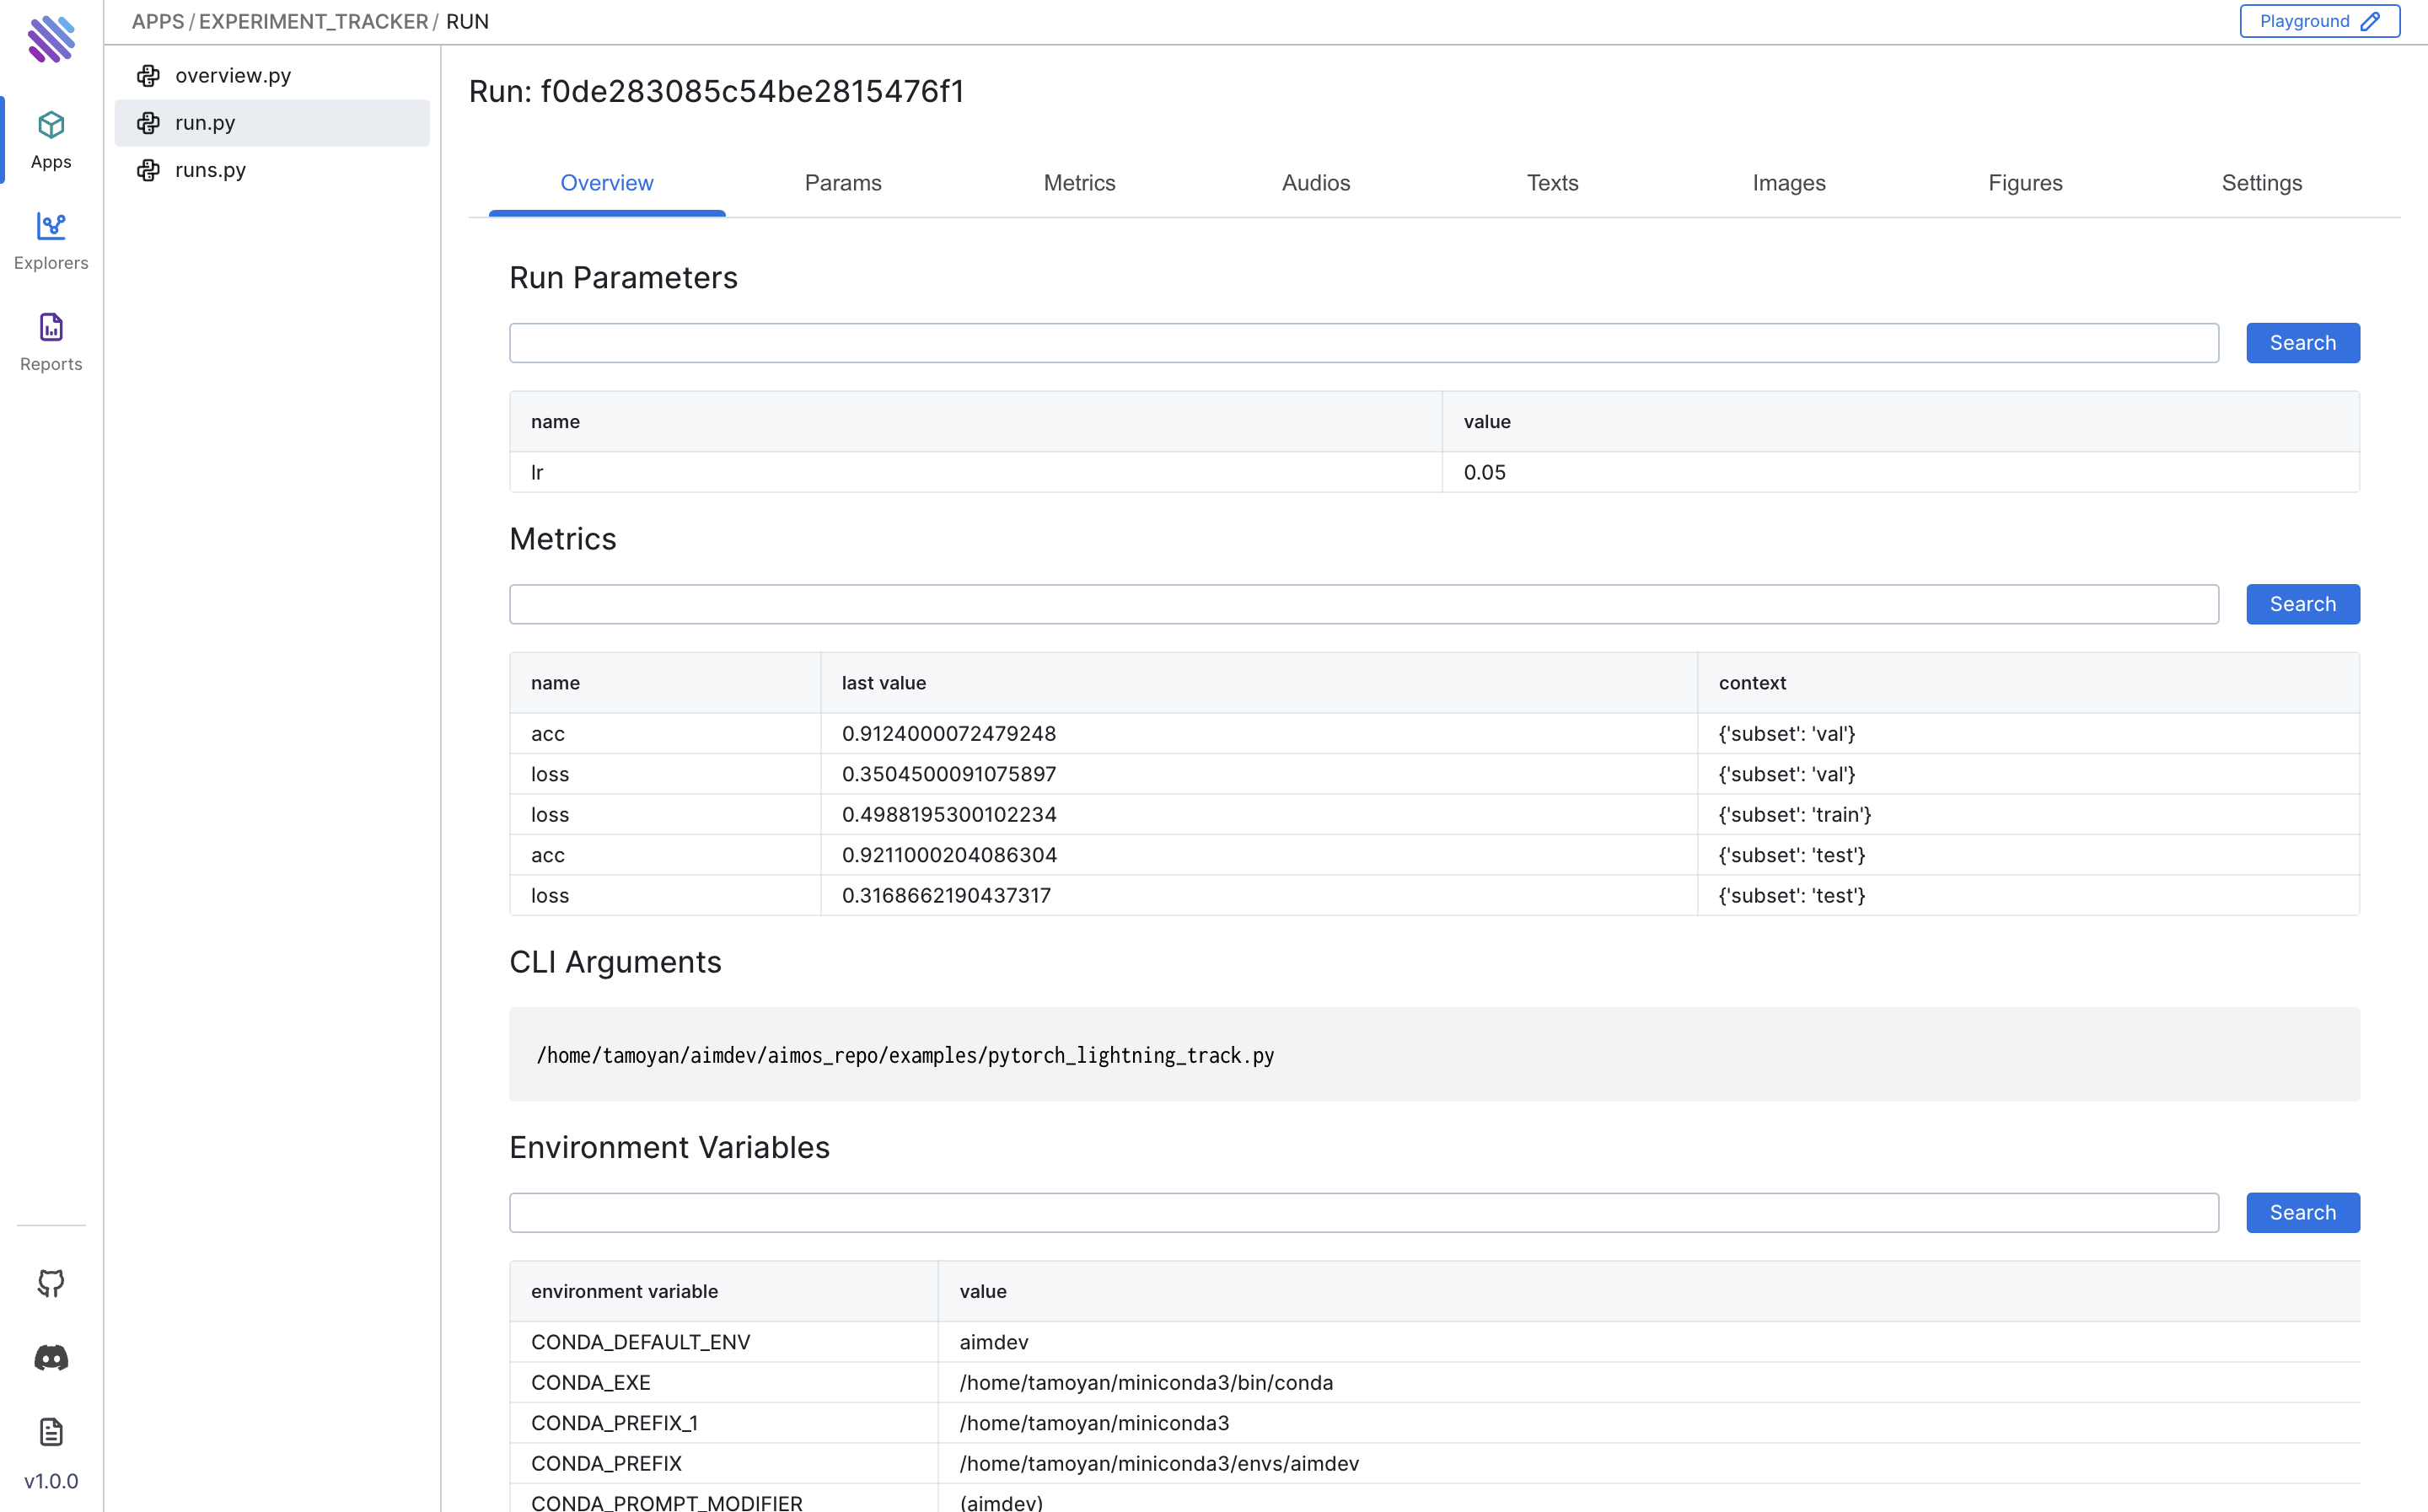
By navigating to each run’s individual page, you'll have a detailed view of the activities within that run.
Navigate through the Overview tab to grasp essential information such as Run Parameters, Metrics (last metrics scores), CLI Arguments used to execute the experiment, Environment Variables, Packages, and their versions.
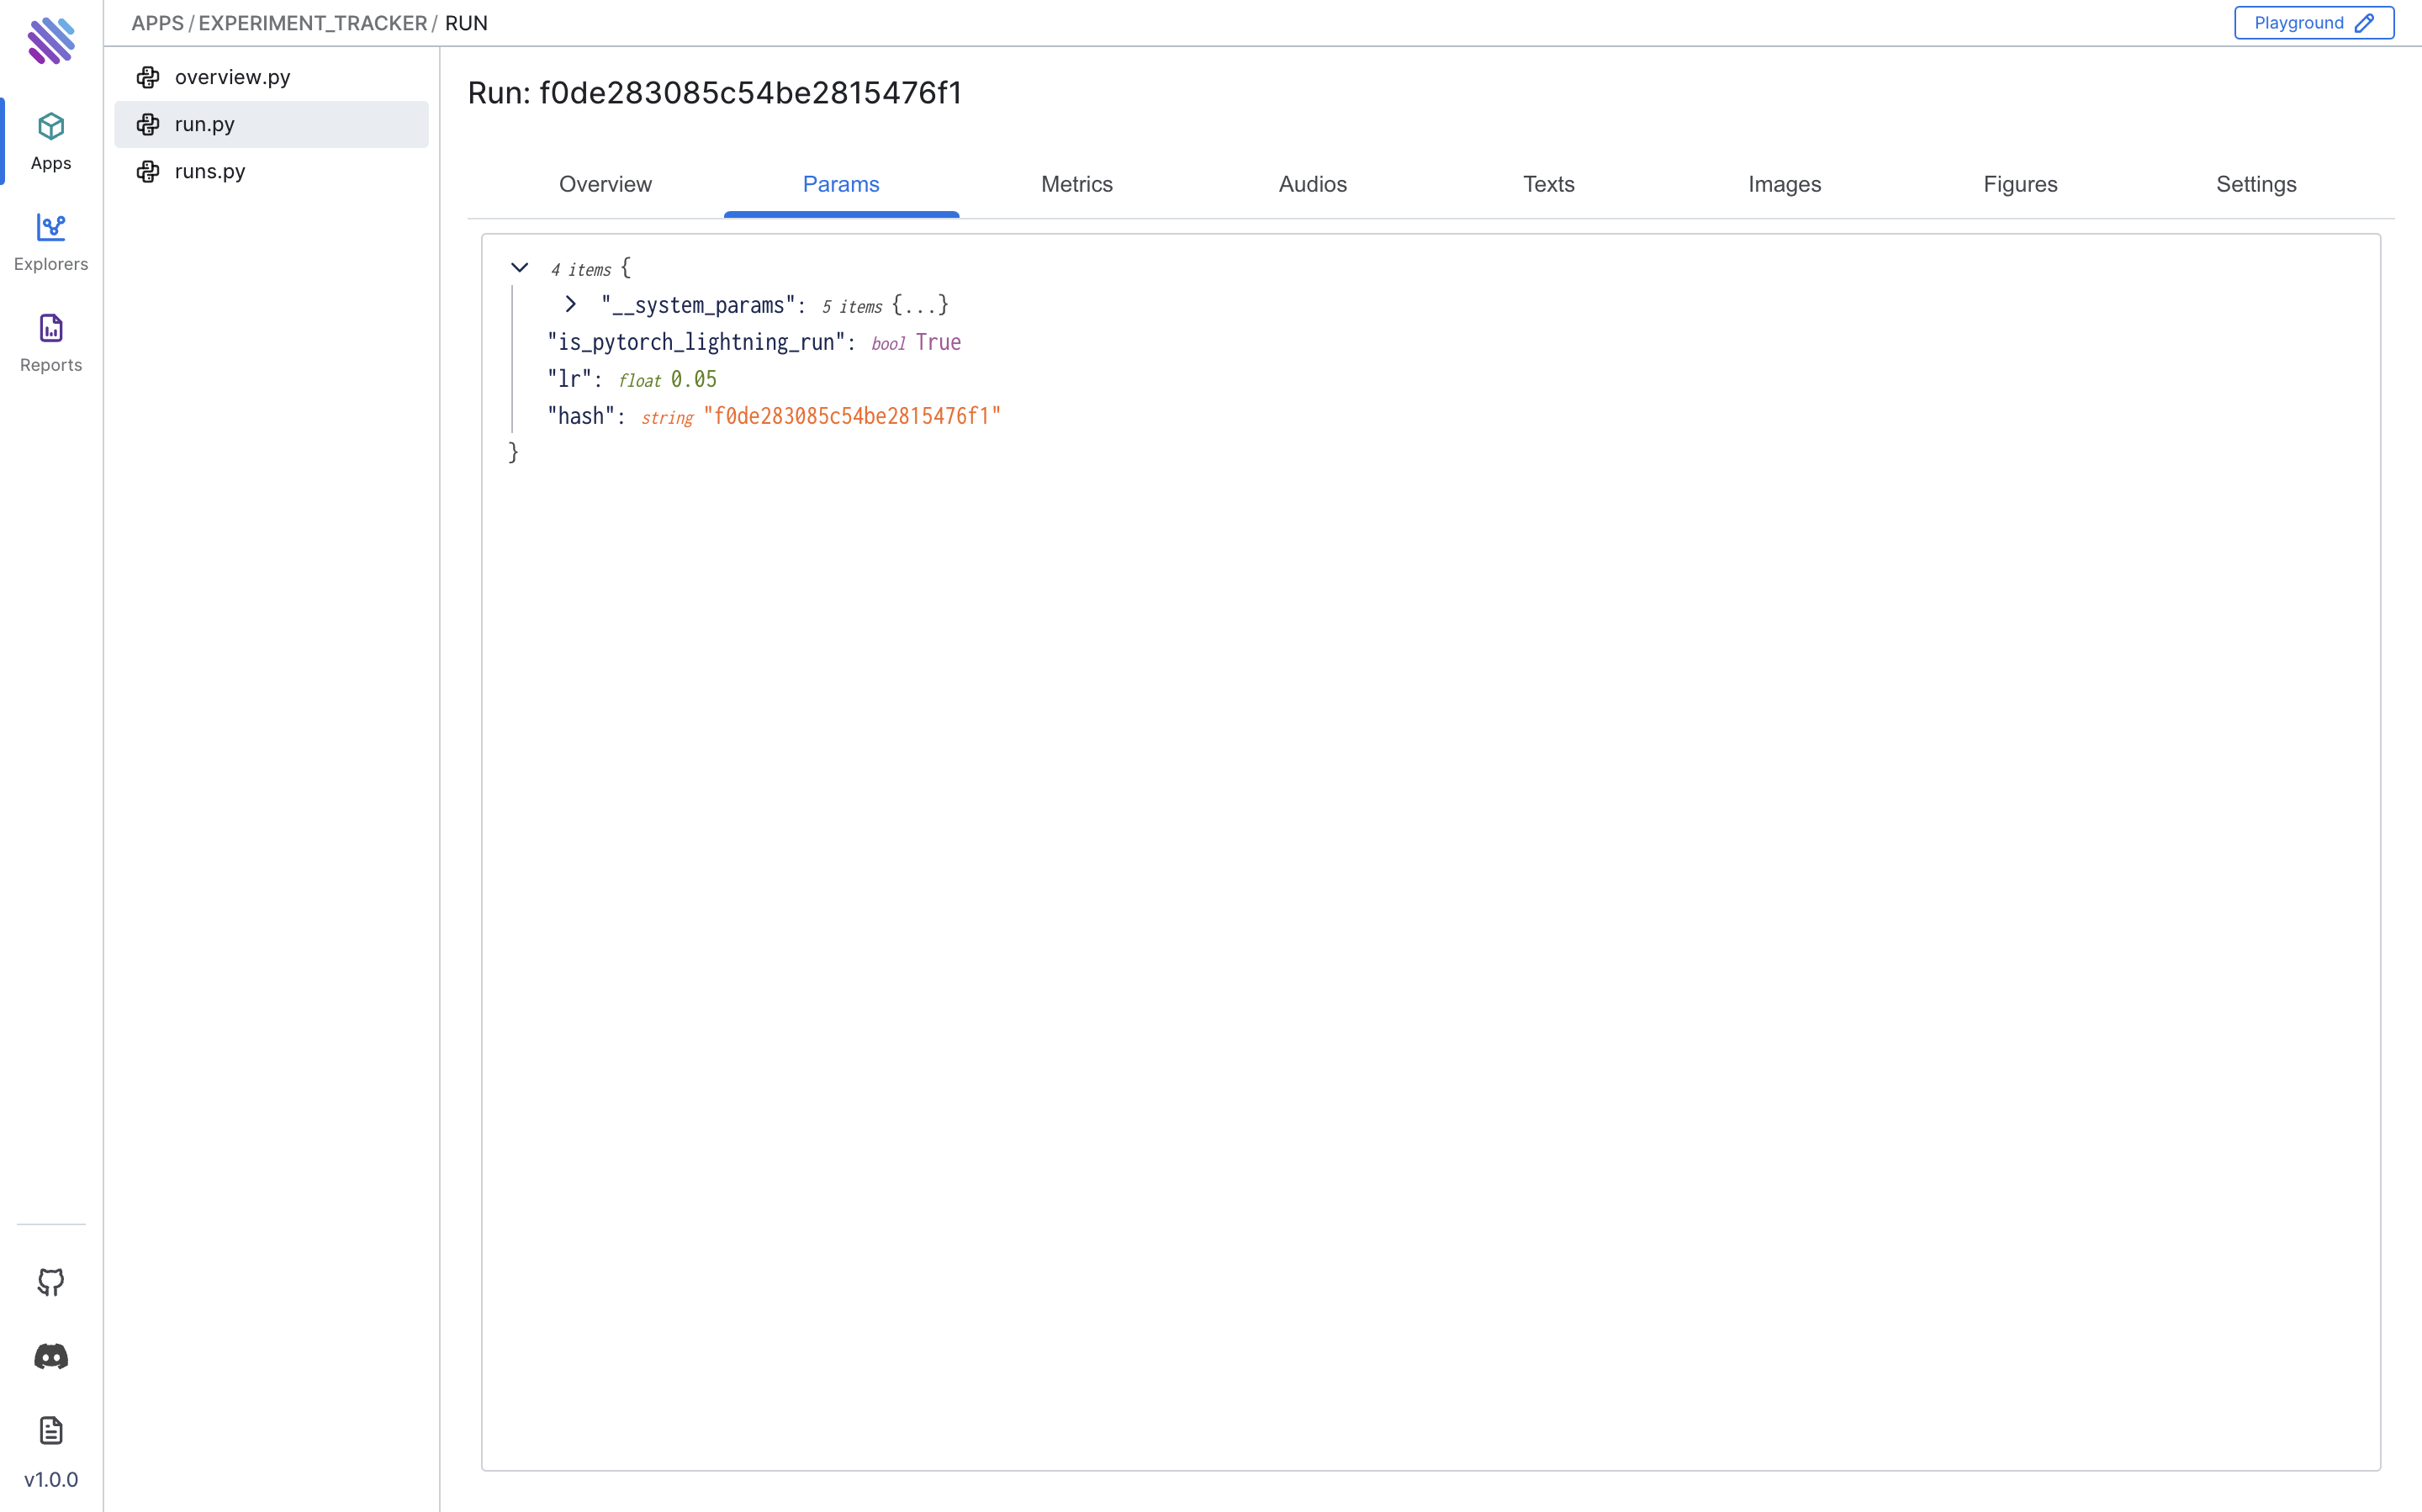
Params Tab
For a more detailed view of all parameters, navigate to the Params tab.
Metrics Tab
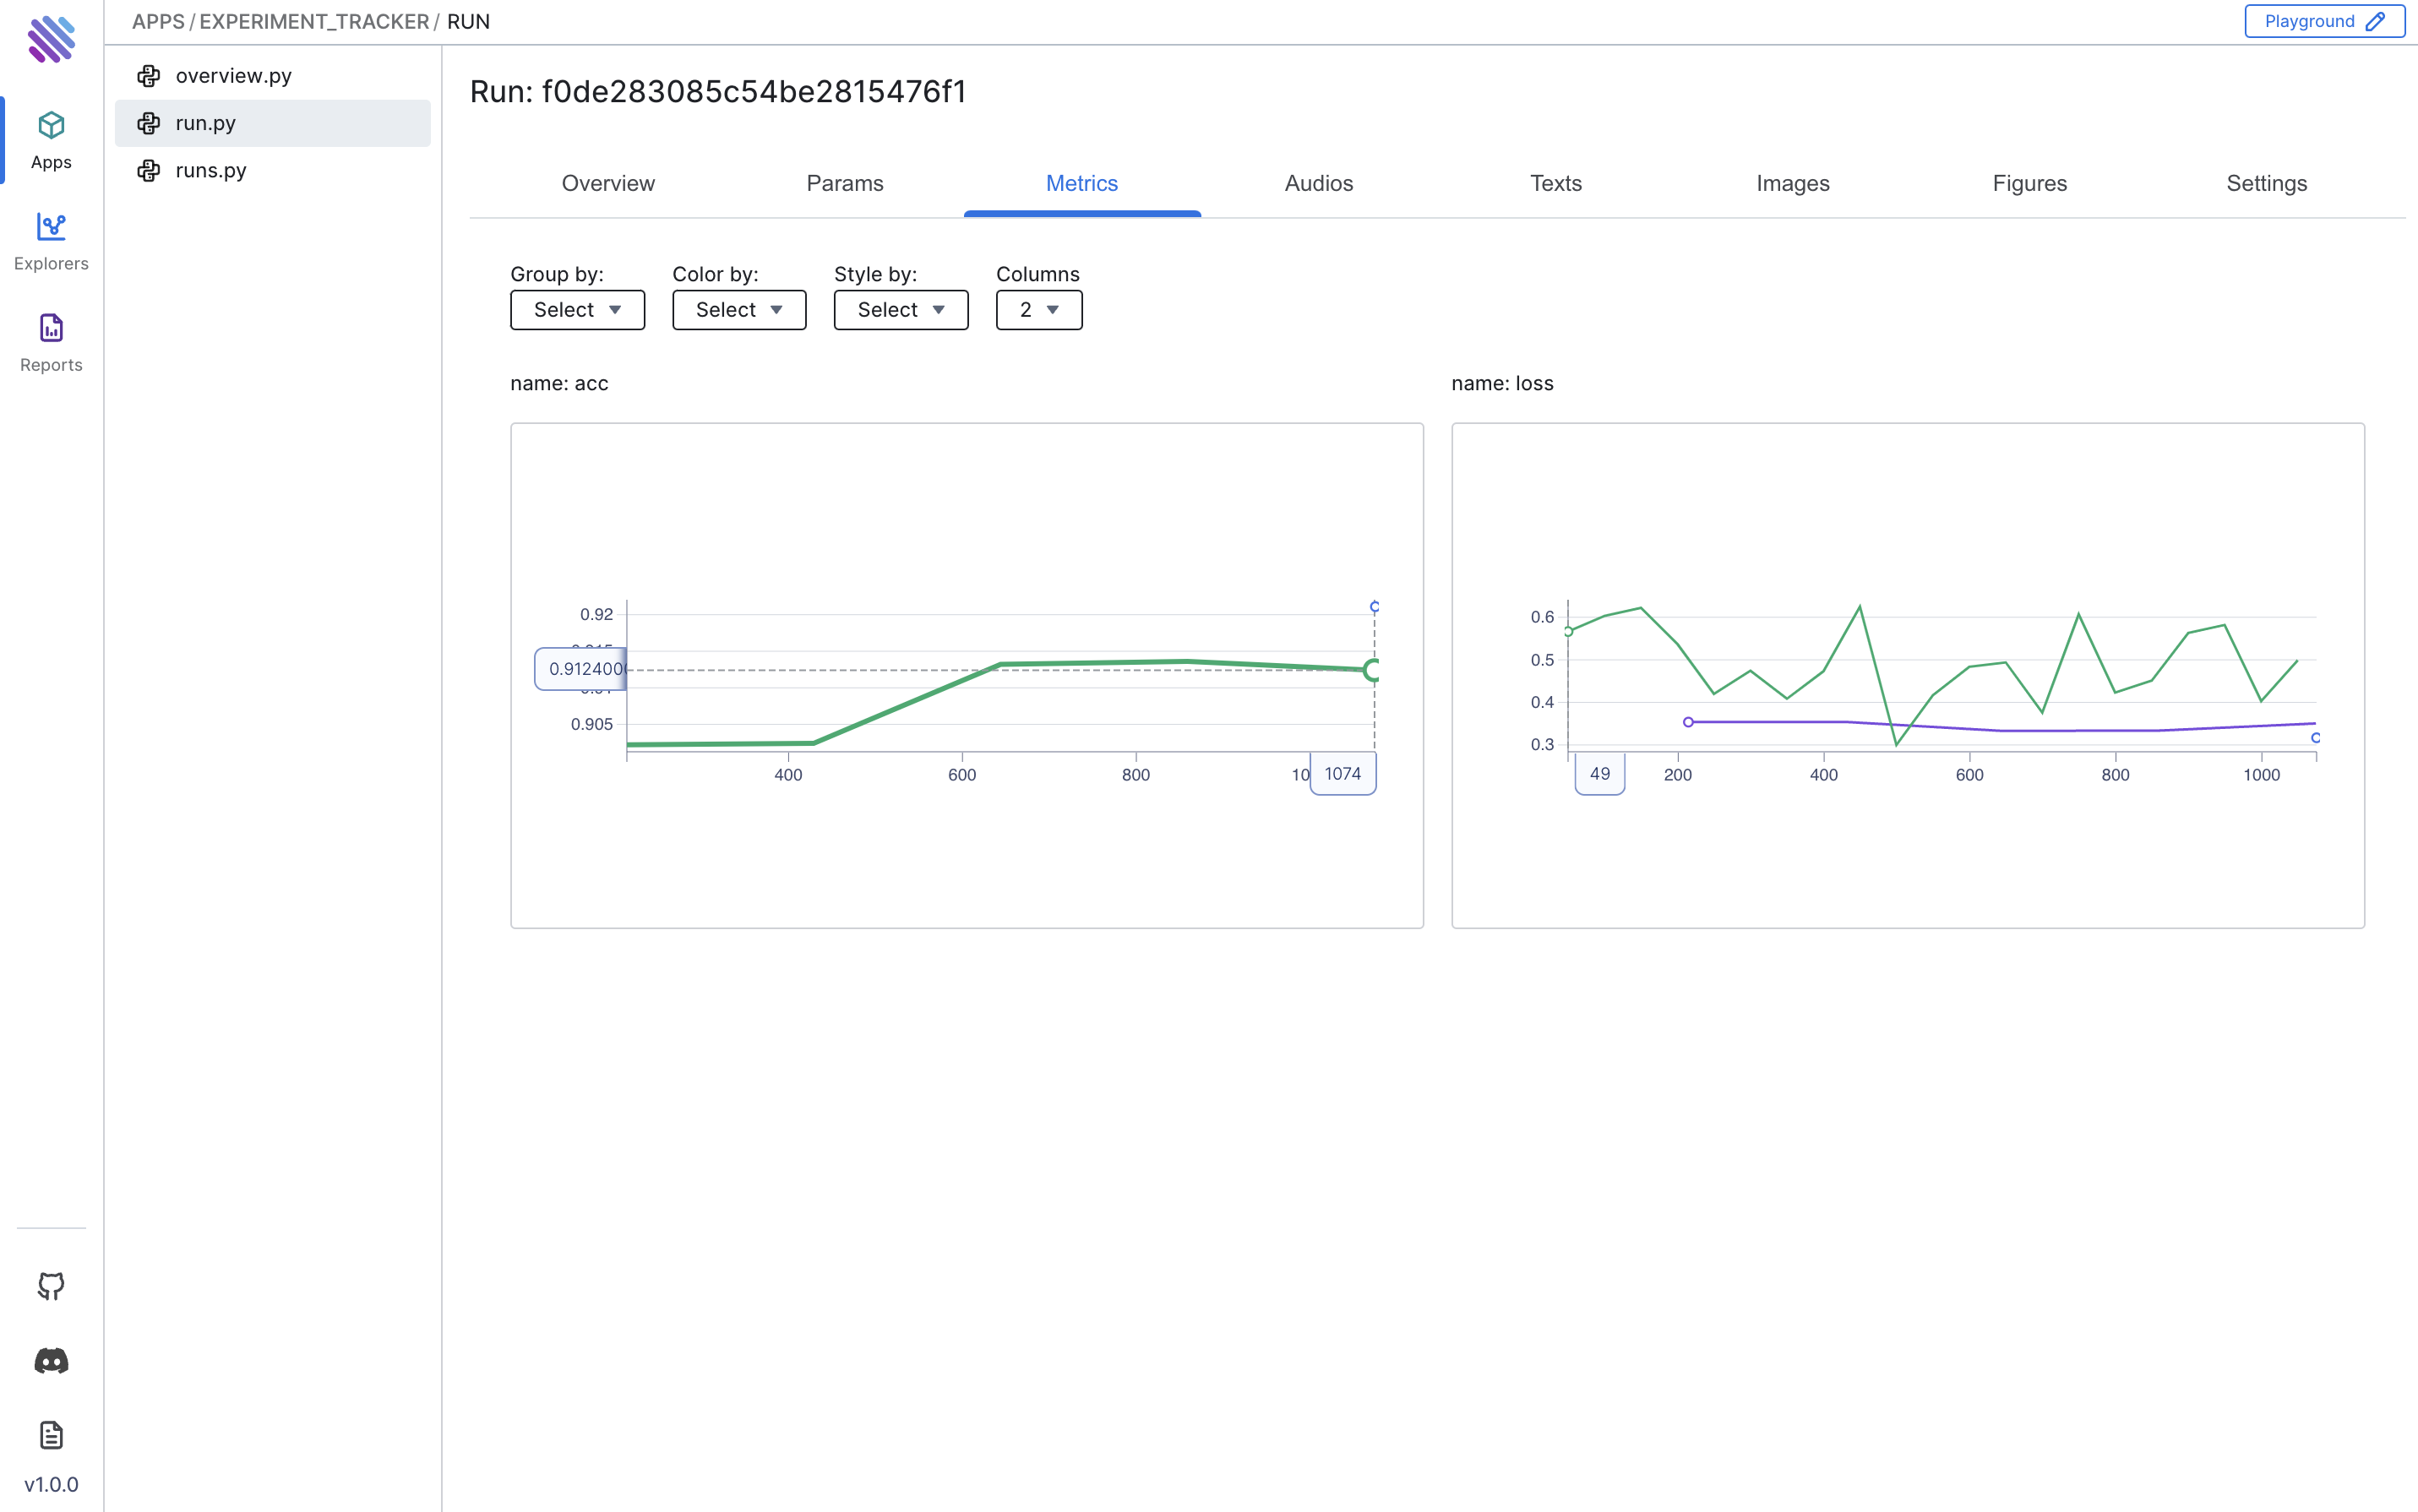
In the Metrics tab, you can explore the graphs of all the tracked metrics. In this example, we tracked the loss and accuracy metrics. To have a better view, let's apply color grouping to the runs based on their context.
In the remaining tabs, discover corresponding types of tracked objects, such as Figures, Text, and Audios.
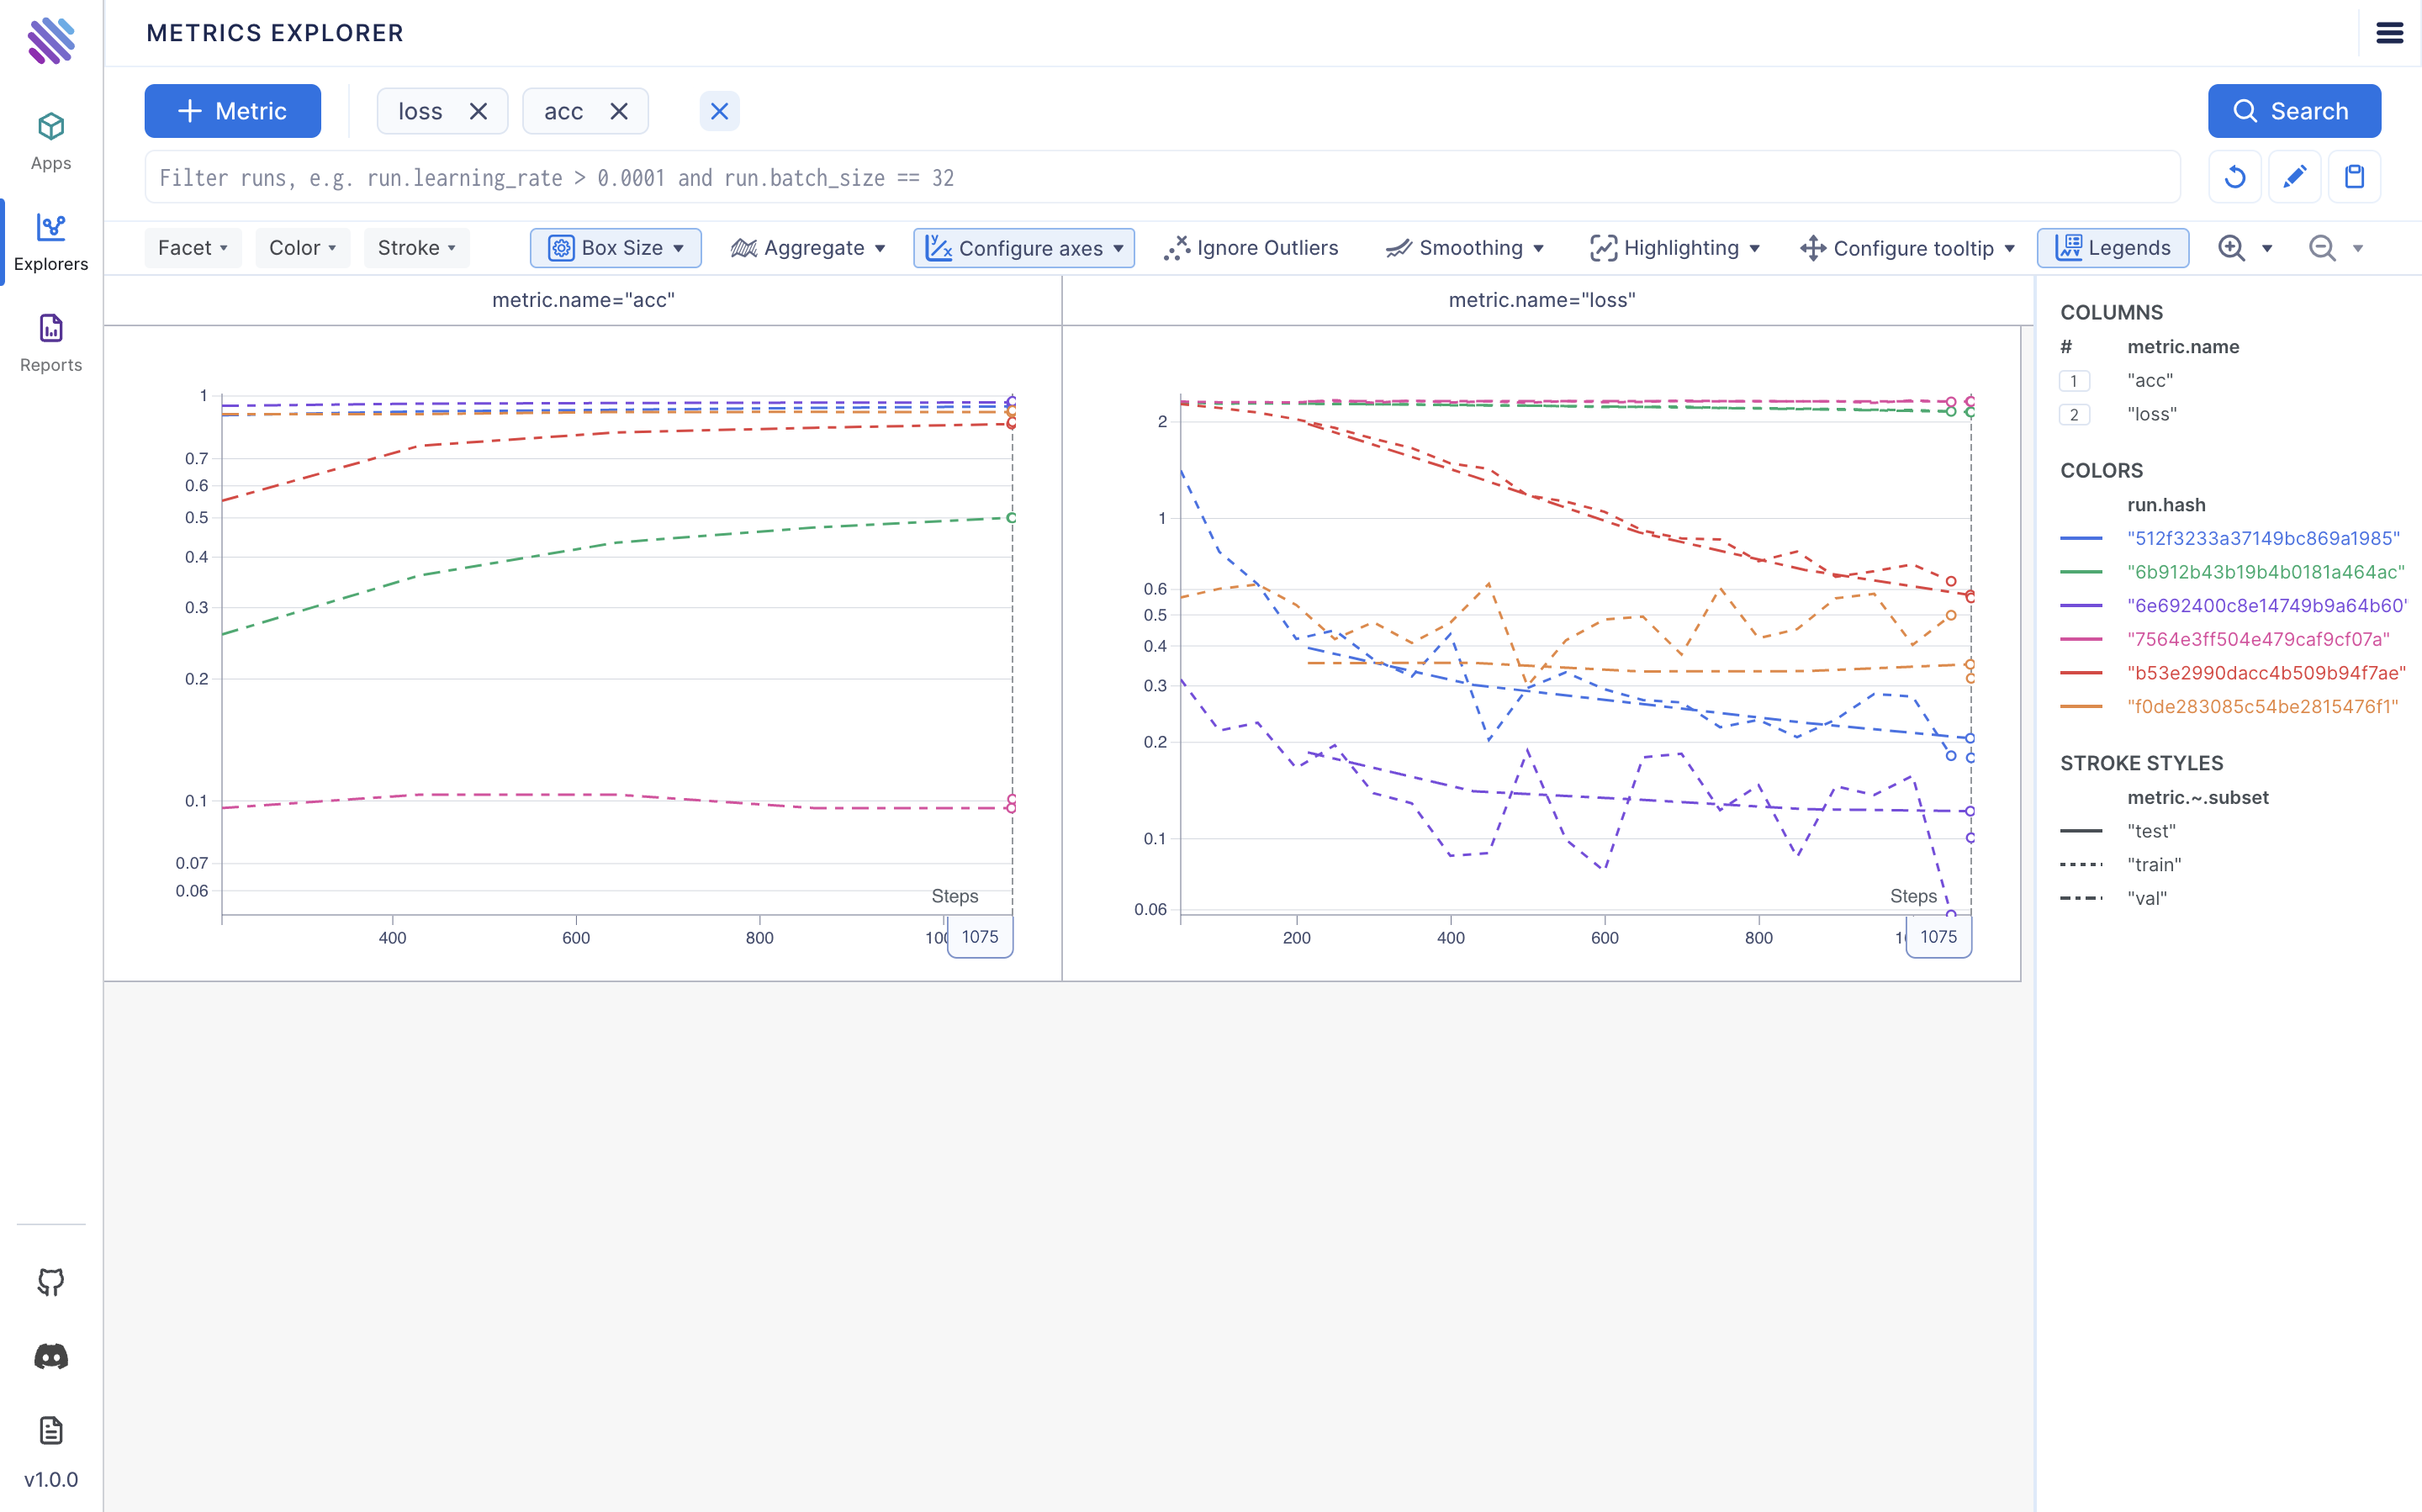
Comparing all Runs
Let's use the Metrics explorer to observe the relationship between accuracy and loss based on the learning rate. To do this, select the loss and accmetrics, apply the stroke by metric.context.subset, and use a log-scale on the y-axis.
Wrapping up
AimOS provides a comprehensive suite of tools to analyze and understand your PyTorch Lightning experiment thoroughly. By leveraging these insights, you can streamline your experimentation process and make data-driven decisions. Embrace the power of AimOS to enhance your PyTorch Lightning experiment experience today!
For further insights into AI system monitoring and observability of software lifecycle, check out our latest article on AimStack blog.
Learn more
AimOS is on a mission to democratize AI Systems logging tools. 🙌
Try out AimOS, join the Aim community and contribute by sharing your thoughts, suggesting new features, or reporting bugs.
Don’t forget to leave us a star on GitHub if you think AimOS is useful, and here is the repository of Aim, an easy-to-use & supercharged open-source experiment tracker.⭐️